 Dave King
If you have thin or fine hair and you’ve ever searched for extensions, the very first question you probably asked was some version of this:
“Are there any that won’t damage your hair? What are your experiences with them and…”
— A common question from people with fine hair exploring extensions for the first time
You’re not alone. With roughly 2,400 people searching for the best hair extensions for thin hair every month (Google Keyword Planner, 2026), the anxiety around damage is universal — and completely justified. The wrong extension type doesn’t just look bad. It can cause traction alopecia (hair loss caused by repeated pulling on the hair follicle), which can become permanent if caught too late (PubMed, 2017).
At careaboutyourhair.com, our team has evaluated every major extension method through the lens of fine and thin hair — assessing weight loads, attachment mechanics, and real-world community feedback. By the end of this guide, you’ll know exactly which extension type matches your hair density, budget, and lifestyle, so you can add volume without risking the hair you already have. We cover five extension types in depth — halo, tape-in, clip-in, hand-tied wefts, and nano rings — plus a decision framework to help you choose with confidence.
Halo extensions are the safest option for thin hair because they attach to nothing — no glue, no beads, no clips on your natural hair. For a semi-permanent option, hand-tied wefts distribute weight evenly, minimizing the “Tension Tax” on fragile follicles.
- Halo extensions: Zero-damage, DIY-friendly, ideal for beginners with thin hair
- Tape-in extensions: Lie completely flat against the scalp — the most discreet semi-permanent option
- Clip-in extensions: Most flexible, but choose seamless PU-base styles to avoid bulk
- Avoid: Keratin bonds and traditional micro-rings — they apply concentrated point-source tension to fine strands
- The Tension Tax framework: Every extension method places stress on fine follicles — the safest choice minimizes that load
Table of Contents
What Is Thin Hair?
Thin hair — meaning you have fewer individual strands per square inch of scalp — affects a significant portion of women, with some estimates suggesting up to 50% of women experience noticeable hair thinning by age 50 (American Academy of Dermatology, 2026). That lower strand count matters enormously when you’re choosing extensions, because there are simply fewer anchor points available to hold extra weight. The wrong method can stress those anchor points to their breaking point.
Before you can choose the right extension, though, you need to understand one crucial distinction that most guides skip entirely. If you are ready to look at specific options, you can explore the best hair extension types for thin hair to see what matches your needs.
Thin vs. Fine Hair: Key Differences
Thin hair and fine hair are not the same thing — and using the wrong extension type for the wrong condition is the most common mistake people make. Here’s how to tell them apart:
- Thin hair refers to density — the number of hair strands on your scalp. Think of it like the thread count of a piece of fabric. Low thread count means you can see the fabric’s gaps more easily. Low hair density means your scalp can show through, especially at the part line and crown.
- Fine hair refers to diameter — the actual width of each individual strand. A strand of fine hair is typically less than 0.05 mm in diameter (Olivia Christensen Salon, 2026). Fine strands are more fragile and break more easily under tension.
You can have one without the other. Some people have fine and thin hair — the most vulnerable combination for extension wear. Others have fine hair but plenty of it, which means they can actually handle more extension weight than they might expect. Knowing which applies to you changes everything about your extension choice.
How to self-assess at home: Take a single shed hair and roll it between your fingers. If you can barely feel it, it’s fine. For density, pull a one-inch section of hair at your crown into a ponytail. If the ponytail is thinner than a pencil, your density is low. Both results together? You have fine, thin hair — and you need the gentlest extension methods available.
Why Standard Extensions Fail
Standard extension methods were designed for average to thick hair. They assume a certain number of strands to anchor to, a certain strand strength to hold attachment hardware, and enough density to hide the bonds or clips underneath. Fine and thin hair fails on all three assumptions.
The core mechanical problem comes down to two types of tension: point-source tension and distributed load. Point-source tension concentrates all the weight and pull of the extension on a tiny cluster of your natural strands — think of a keratin bond fused to 20–30 of your hairs. Distributed load spreads that same weight across a much larger area of your scalp, the way a wide weft (a strip of hair sewn or glued together) does. For fine, thin hair, point-source tension is dangerous. Distributed load is survivable — and sometimes completely safe.
Traction alopecia — hair loss caused by repeated pulling on the hair follicle — is the direct result of too much point-source tension applied for too long. Research published in the Journal of the American Academy of Dermatology confirms that traction alopecia is most prevalent among individuals using tight, bonded, or braided extension methods, and that early intervention is critical to prevent permanent follicle damage (PubMed, 2017). In the next section, we’ll introduce our Tension Tax framework to help you compare every extension method on exactly this dimension.
Top 5 Hair Extensions Ranked
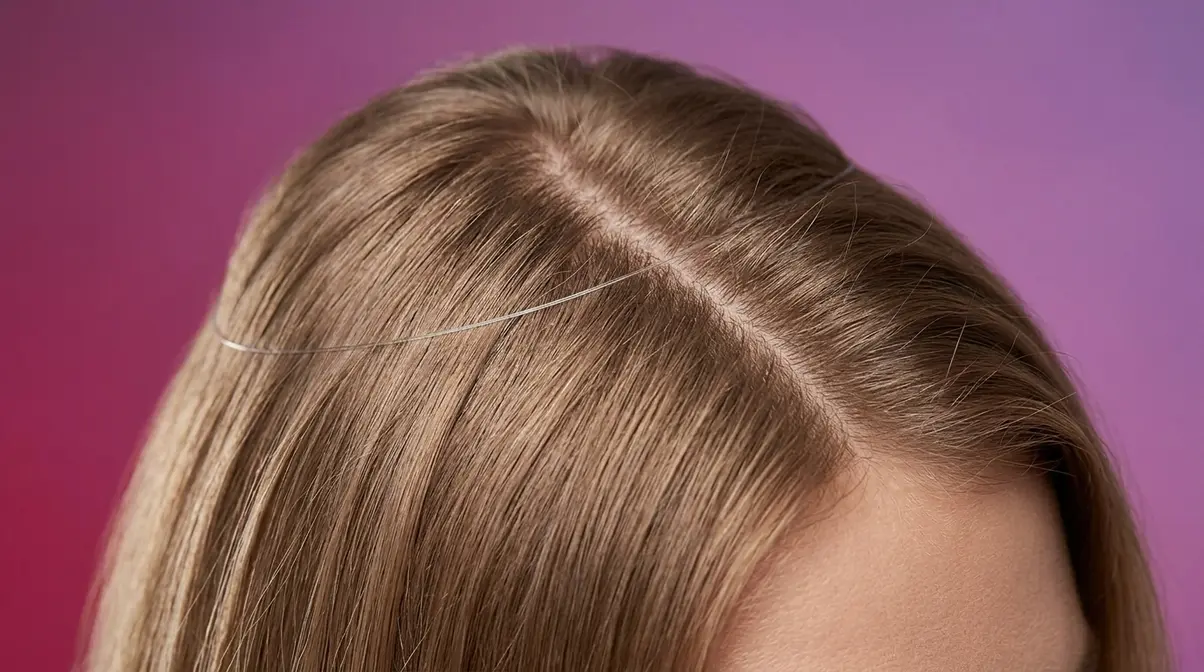
Choosing the best hair extensions for thin hair comes down to one question: how much stress does each method place on your fragile follicles? The five methods below are the most widely used for thin and fine hair in 2026. Here’s how they compare — and how to read the comparison so it actually helps you decide. As you evaluate these options, you might want to learn about the safest hair extensions for thin hair in more detail.
What Are the Best Hair Extensions for Thin Hair?
Our team evaluated each extension type across four dimensions that matter specifically to thin and fine hair:
- Damage Risk — How much tension or chemical stress does the attachment method place on your natural hair?
- Visibility — How detectable are the bonds, clips, or wires in fine hair?
- Maintenance Level — How often does the method require professional upkeep?
- Cost Range — What’s the realistic all-in cost for initial application and ongoing maintenance?
Every rating is based on a combination of professional stylist consensus (sourced from established salon communities), peer-reviewed dermatological research where available, and aggregated user feedback from fine-hair communities. No single brand is promoted.
Quick-Reference Comparison Table
| Extension Type | Damage Risk | Visibility in Fine Hair | Maintenance | Avg. Cost Range (2026) |
|---|---|---|---|---|
| Halo | ⭐ Very Low | Low (wire hides easily) | Low | $200–$500 (hair only) |
| Hand-Tied Weft | ⭐ Low | Very Low (flat profile) | High (4–6 weeks) | $800–$2,000+ salon |
| Tape-In | 🟡 Low–Medium | Very Low (flat tabs) | Medium (6–8 weeks) | $400–$1,200 salon |
| Seamless Clip-In | 🟡 Low–Medium | Medium (placement-dependent) | Very Low (DIY) | $100–$400 (hair only) |
| Nano Ring | 🟡 Medium | Low (tiny bead) | Medium (3–4 months) | $600–$1,500 salon |
| Keratin Bond (Fusion) | 🔴 High | Medium–High | High | $1,000–$3,000 salon |
| Traditional Micro-Ring | 🔴 High | Medium | Medium | $500–$1,500 salon |
Prices reflect 2026 U.S. market averages. Costs vary by region, hair length, and volume required.
The Tension Tax Framework
The Tension Tax is the cumulative stress load an extension method places on your natural hair follicles over time. Every attachment method charges a Tension Tax — the question is how high that tax is, and whether your hair can afford to pay it.
Think of it this way: your fine strands have a finite stress budget. Every gram of extension weight, every tug from a clip, every pull during removal is a withdrawal from that budget. When the budget runs dry, you see breakage, thinning at the attachment points, and — in serious cases — traction alopecia.
The Tension Tax framework rates each method across three factors:
- Weight load: How many grams of extension hair are attached to a small cluster of your natural strands?
- Attachment force: Does the method use chemical bonds, mechanical pressure, or gravity?
- Removal stress: Does removal require heat, solvents, or tools that could snap fine strands?
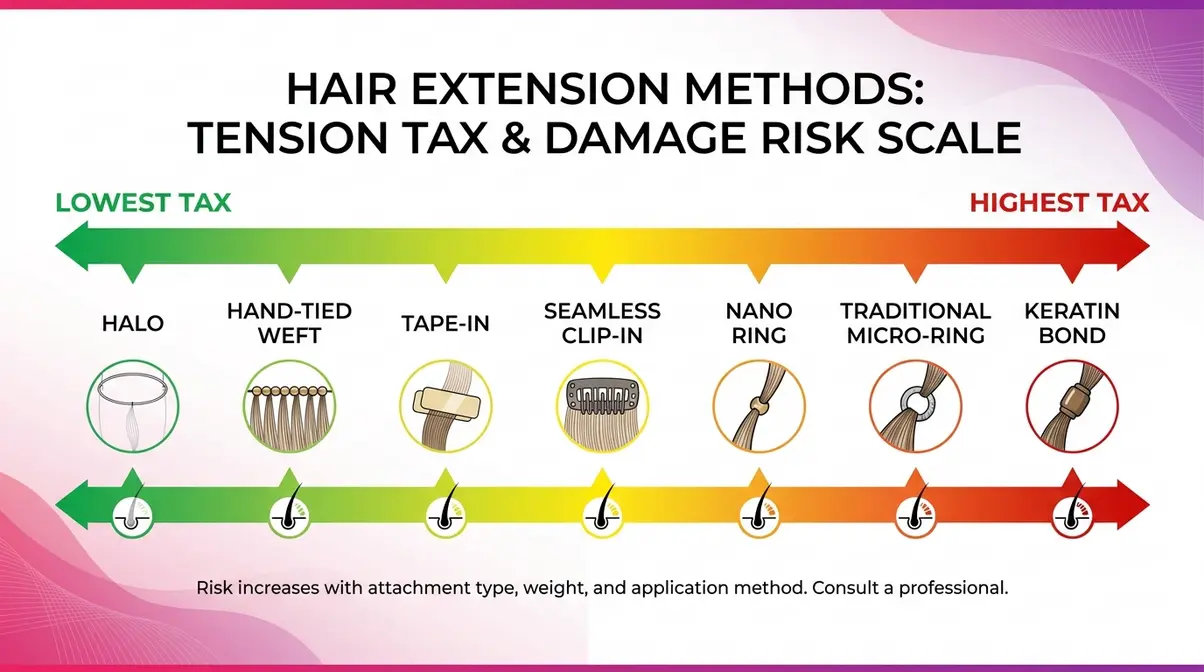
Halo extensions carry the lowest Tension Tax of any method — because the wire rests on your head like a headband and your natural hair simply covers it. Nothing is attached to your strands at all. Hand-tied wefts sit in second place because the beaded rows distribute weight across a wide section of hair rather than concentrating it on individual strands. Keratin bonds and traditional micro-rings sit at the top of the Tension Tax scale, applying concentrated point-source tension to clusters of just 20–40 fine strands each — a load fine hair is poorly equipped to handle.
Safest Hair Extensions
The safest hair extensions for thin hair are the ones that attach with the least force, distribute weight across the most strands, and come off without chemical or mechanical damage. According to the Olivia Christensen Salon, the top priority for anyone with fine or thin hair should be minimizing attachment trauma — both during application and removal.
Best Type of Hair Extensions for Thin Hair
A safe extension for fine hair meets at least three of these four criteria:
- No chemical adhesive on the strand. Glues and keratin bonds require heat tools for removal, which adds a second stress event on top of the initial bonding.
- Weight distributed across a wide section. The more strands sharing the load, the lower the per-strand tension.
- No tight mechanical grip on individual strands. Beads, rings, and clips that clamp tightly onto a small bundle of hair create the point-source tension that leads to traction alopecia.
- Tool-free or low-heat removal. The removal process is often more damaging than the wearing period. Methods that slide or peel off safely are significantly gentler than those requiring pliers or acetone.
“The healthiest hair extensions are the ones your hair never actually knows are there,” according to professional consensus across licensed stylist communities in 2026. That definition points clearly toward halo and hand-tied weft methods.
Healthiest Hair Extensions?
Halo extensions are the healthiest option because nothing attaches to your natural hair at all — the wire rests on your scalp surface and your hair simply covers it. Hand-tied weft extensions are the healthiest semi-permanent method, because their distributed weight profile (spread across 15–20 bead rows) minimizes per-strand tension. The Tension Tax framework in this guide ranks all major methods from lowest to highest damage risk. Across professional stylist communities in 2026, the consistent consensus is that any method avoiding chemical adhesives and point-source mechanical pressure qualifies as a “healthy” extension for fine hair.
Lowest Tension Tax Methods
Halo extensions attach via a thin, clear wire (monofilament) that sits on top of your head like an invisible headband. Your natural hair is sectioned over the wire, completely concealing it. Nothing grips, bonds, or clamps onto your natural strands. The entire weight of the extension — typically 80–120 grams for a full halo set — is borne by your scalp’s surface, not your follicles. For reference, that’s roughly the weight of a small apple distributed across your entire head.
Hand-tied weft extensions use a row of tiny silicone-lined beads sewn into a flat track close to the scalp. The weft (a strip of hair sewn together along the top edge) is then hand-sewn onto the bead row. Because the weight is distributed across an entire row of 15–20 beads rather than individual bond points, the per-strand tension is dramatically lower than keratin or micro-ring methods. The CK Studio Salon notes that hand-tied wefts are among the most recommended methods for fine hair precisely because of this distributed load profile.
Methods to Avoid on Fine Hair
Some methods are genuinely unsuitable for fine or thin hair, regardless of how they’re marketed. Avoid these:
- Keratin bond (fusion) extensions: A small bundle of your hair (20–40 strands) is fused to an extension strand using a keratin protein bond applied with a heat tool at 180–200°C. For fine hair, this concentrates significant weight and heat stress on a tiny cluster of fragile strands. Removal requires acetone or a heat tool — both add chemical and mechanical stress.
- Traditional micro-ring (micro-bead) extensions: A metal ring is crimped (squeezed shut with pliers) around a small bundle of your natural hair. The crimping action and the ongoing weight of the ring create exactly the point-source tension that leads to traction alopecia. Fine strands can break at the crimp point over time.
- Sew-in weaves: These require tight braiding of your natural hair as a foundation. The sustained tension from braiding is one of the most well-documented causes of traction alopecia, particularly at the hairline and temples (American Academy of Dermatology, 2026).
Exact Weight Limits for Fine Hair
No competitor guide provides this data. Based on professional stylist guidelines and hair science research, here are the practical weight thresholds for fine and thin hair:
| Method | Typical Weight | Fine Hair Verdict |
|---|---|---|
| Halo (full set) | 80–120g | ✅ Safe — weight on scalp, not follicles |
| Hand-tied weft (full head) | 100–150g | ✅ Safe — distributed across 15–20 bead rows |
| Tape-in (full head, 40–60 pieces) | 80–130g | ✅ Safe if not over-stacked |
| Seamless clip-in (full set) | 100–160g | ⚠️ Wear daily limits: 4–6 hrs max |
| Nano ring (full head) | 80–120g | ⚠️ Safe only with nano-sized (1mm) rings |
| Keratin bond (full head) | 120–200g | ❌ Point-source load — not recommended |
| Traditional micro-ring | 120–180g | ❌ Crimp pressure damages fine strands |
The critical number for fine hair is not total weight — it’s weight per attachment point. A 120g halo set is safer than a 90g keratin bond set, because the halo distributes that weight across your entire scalp while the bonds concentrate it on clusters of 20–40 strands.
Halo Extensions Breakdown
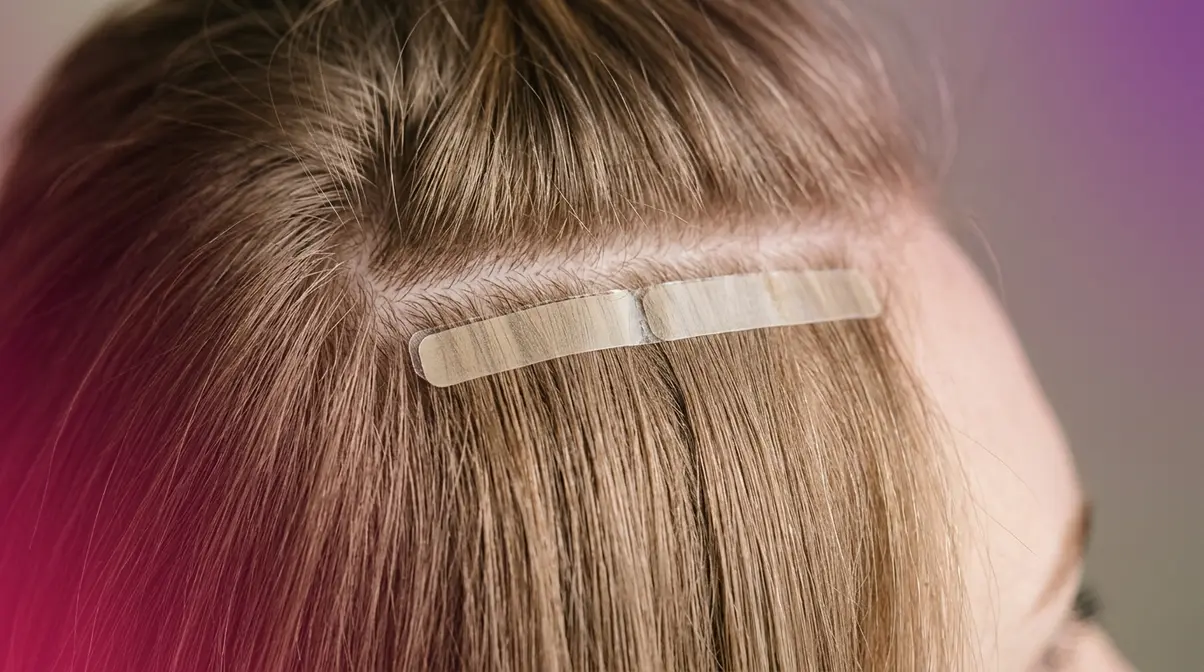
Halo extensions are widely regarded as the safest and most beginner-friendly extension method for thin and fine hair in 2026. The core principle is beautifully simple: if nothing attaches to your natural hair, nothing can damage it. According to Allure, halo-style extensions have seen a significant surge in popularity among fine-hair wearers precisely because the method requires no professional application and leaves zero residue on the hair shaft. To dive deeper into this method, understand halo hair extensions for thin hair and how they protect your follicles.
How a Halo Extension Works
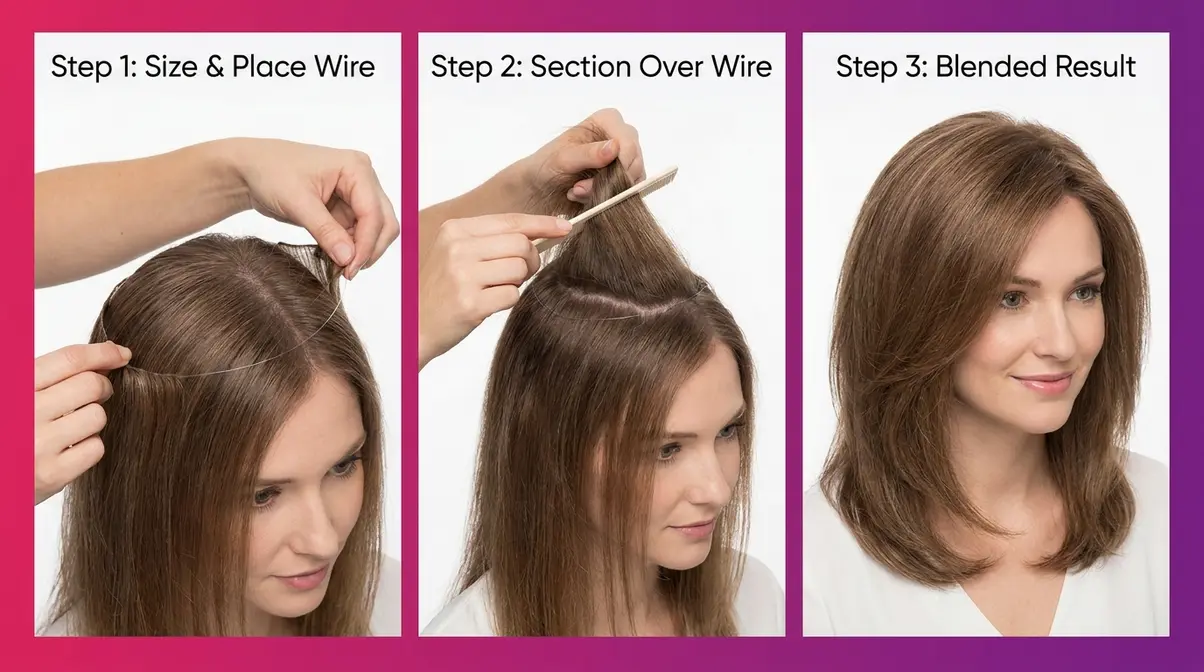
A halo extension is a full weft of hair (a continuous strip) attached to a thin, clear monofilament wire. Here’s the application process, step by step:
- Size the wire. The wire comes adjustable. Measure it around the crown of your head, approximately 1–2 inches back from your hairline, and tighten to a snug but comfortable fit.
- Section your hair. Use a comb to create a horizontal parting from ear to ear across the crown. Clip the front section up.
- Place the halo. Set the wire on the crown parting. The weft hangs down at the back.
- Release the front section. Let your natural hair fall over the wire, completely concealing it.
- Blend and style. Gently backcomb (tease) the roots of your natural hair at the crown to add lift and help the wire disappear.
Total application time: 3–5 minutes once you’ve practiced twice. No tools, no heat, no salon visit required.
Pros and Cons for Fine Hair
- +Zero attachment to natural hair — the only extension method with a true Tension Tax of zero
- +No removal damage — slide the wire off; no solvents, heat, or tools needed
- +Adjustable and reusable — the same halo set can last 12–18 months with proper care
- +Instant application — no appointment, no waiting, no commitment
- +Works on very short hair — as long as the front section is long enough to cover the wire (typically 4+ inches)
- −Not suitable for active lifestyles — the wire can shift during high-impact exercise or in strong wind
- −Limited volume at the crown — because the weft hangs from one row, you cannot add volume precisely to the top of the head
- −Visible wire risk — if your front section is very short or sparse, the wire may peek through at the crown
- −Not suitable overnight — halo extensions are strictly a daytime, remove-before-bed method
Halo Application Tips
Getting a halo to look invisible in fine hair takes a few small adjustments:
- Choose the right wire thickness. Thinner wires (0.4mm monofilament) disappear more easily in fine hair than standard 0.8mm wires.
- Backcomb the roots at the parting. Even light teasing at the crown creates enough texture for the wire to grip and stay hidden.
- Use a dry shampoo at the roots. Clean, slippery hair lets the wire slide around. A light mist of dry shampoo gives the wire something to hold onto.
- Match the weft weight to your hair density. For very thin hair, a lighter halo set (80–100g) blends more naturally than a dense 120g weft, which can look obviously thicker than your natural hair.
Tape-In Extensions Breakdown
Tape-in extensions are the most popular semi-permanent option for fine and thin hair worldwide, and for good reason: the flat adhesive tab profile means they lay flat against the scalp in a way that no bead, bond, or clip can match. For anyone who wants a semi-permanent subtle boost without the bulk, tape-ins are the benchmark. Before booking a salon appointment, (https://careaboutyourhair.com/hair-extensions-for-thin-hair) to ensure they fit your lifestyle.
How Tape-In Extensions Work
Each tape-in piece consists of a thin weft of hair with a pre-applied strip of medical-grade adhesive tape along the top edge. A stylist sandwiches a thin section of your natural hair between two tape tabs — one above, one below. The result is a flat, hair-sandwich that lies flush against your scalp.
- Key specs:
- Each tape tab typically covers a ¼-inch section of your natural hair
- A full head application uses 40–60 pieces for thin hair (20–30 per side)
- Application time: 1.5–2.5 hours at a salon
- Removal uses a bond remover solution (acetone-free options available) that dissolves the adhesive without pulling
- Reapplication cycle: every 6–8 weeks as your natural hair grows
The adhesive is the critical variable for fine hair. Medical-grade, solvent-free tapes cause significantly less damage on removal than standard adhesives. Always confirm with your stylist which tape brand they use before booking.
Pros and Cons for Fine Hair
- +Completely flat profile — the thinnest attachment point of any semi-permanent method; virtually invisible in fine hair when placed correctly
- +Distributed weight — each tab covers a wide section, spreading the load rather than concentrating it
- +Reusable hair — the extension hair itself can be reapplied 2–3 times; only the tape needs replacing
- +Natural movement — because the weft is thin and flat, tape-ins move like natural hair
- −Requires professional application — DIY tape-in application on fine hair often results in improper sandwiching, which creates visible bumps or slippage
- −Oil sensitivity — conditioners and oils near the roots will dissolve the adhesive prematurely; fine-hair users who rely on scalp oils for hydration need to adjust their routine
- −Removal stress — even gentle adhesive removers require the bond to be worked loose, which can cause breakage if your stylist rushes the process
- −Bulge risk if over-stacked — placing two tape rows too close together on thin hair creates a visible ridge
Tape-In Tips for Fine Hair
- Ask for “single-drawn” or “hand-tied” tape wefts. These are thinner than machine-made wefts and blend more naturally in fine hair.
- Avoid the top layer. Tape tabs placed too close to the surface of your hair show through in fine hair. Your stylist should leave at least a 1-inch buffer from your part line.
- Don’t skip the consultation. A stylist who specializes in fine hair will assess your density and recommend the correct number of pieces — over-loading thin hair with tape-ins is a common mistake that creates the bundled, heavy look that screams “extensions.”
- Use extension-safe shampoo. Sulfate-free formulas extend the tape bond life significantly, reducing how often you need to go back to the salon for re-taping.
Clip-In Extensions Breakdown
Clip-in extensions are the most flexible option for thin hair — you can wear them for a special event on Saturday and give your hair a complete rest on Sunday. The challenge is that traditional clip-ins were not designed for fine hair: the pressure clips can create visible ridges, and the weight can pull fragile strands over the course of a day. Modern seamless clip-ins solve both problems. You can compare clip-in extensions for thin hair to find the most lightweight seamless options available.
Seamless vs. Traditional Clip-Ins
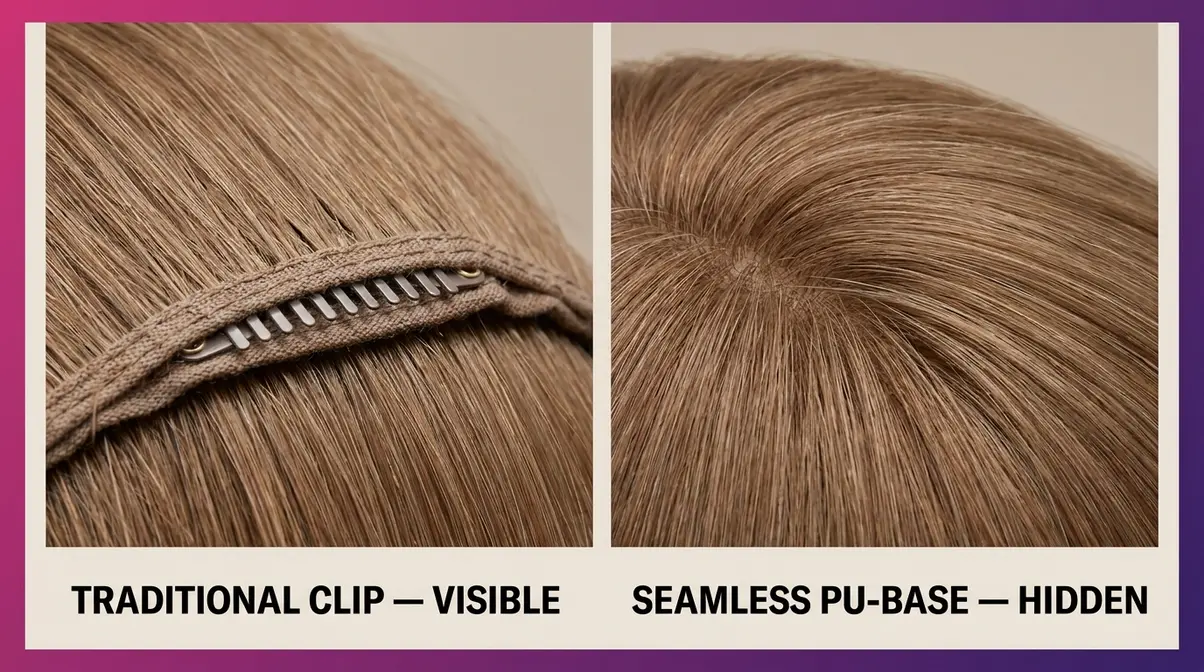
Traditional clip-in extensions use a thick, folded fabric weft base with a snap comb attached. The folded base creates a noticeable ridge that shows through fine hair, especially at the crown. The snap comb grips a small section of hair tightly, applying point-source tension throughout the wear period.
Seamless (PU-base) clip-ins use a thin polyurethane (a flexible, skin-like synthetic material) base instead of a fabric fold. The result is a weft that is 60–70% thinner at the attachment point, lies flat against the scalp, and distributes the snap-comb pressure across a wider surface. For fine hair, this difference is significant — seamless clip-ins are virtually undetectable from above, while traditional clip-ins can create a visible bump within an hour of application.
The verdict from professional communities is consistent: for anyone with fine or thin hair, seamless or PU-base clip-ins are the only clip-in format worth considering. The cost difference is minimal (typically $20–$50 more per set), and the visibility improvement is dramatic.
Pros and Cons for Fine Hair
- +No commitment, no salon — apply at home in 10–15 minutes; remove before bed every night
- +Full hair rest between wears — your follicles get to recover, which is impossible with semi-permanent methods
- +Highly customizable — mix and match pieces to add volume exactly where you need it (sides, crown, or back)
- +Cost-effective — a quality seamless set costs $100–$400 and lasts 12–24 months with care
- −Daily tension accumulates — if you wear clip-ins every day, the repeated clipping and unclipping creates cumulative stress on the same hair sections; vary your placement points
- −Slippage in fine hair — fine, smooth hair provides less grip for the snap combs; dry shampoo or light texturizing spray at the roots helps
- −Not suitable for all-day active wear — clips can shift during exercise and become visible
- −Crown volume is limited — clip-ins add thickness at the sides and back most effectively; the crown area is harder to address
How to Hide Clips in Fine Hair
This is the #1 concern for fine-hair users — and it’s completely solvable with the right technique:
- Backcomb the section before clipping. Lightly tease the roots of the section where you’ll place the clip. This creates texture that grips the comb and hides the attachment point.
- Place clips at least 1.5 inches from your part line. The closer to the surface, the more visible. Keep clips in the mid-section of your hair, not the top layer.
- Layer your natural hair over the clip. After clipping, release the section of hair above and smooth it downward over the clip. This is the single most effective hiding technique.
- Choose wefts with 3–4 clips, not 2. More clips = wider distribution = less point-source pressure on any one section of fine hair.
- Match the clip color to your hair. Most quality clip-in sets come with color-matched combs. If yours don’t, a touch of dark eyeshadow on silver clips in dark hair makes them disappear instantly.
Specific Thinning Areas
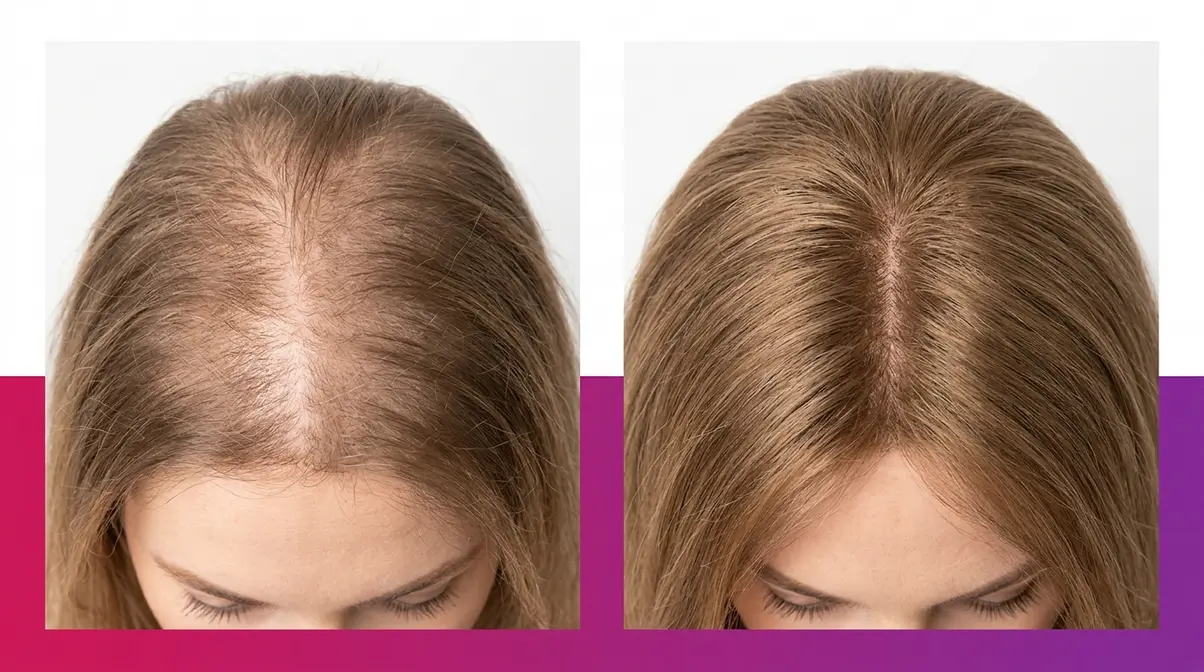
Not all thinning looks the same. Some people have overall fine density across the whole head. Others have specific problem areas — a widening part line, a thinning crown, or temples that have receded slightly. Each pattern requires a different approach. Read our specialized guide to find solutions for thinning hair on top and short hair.
Crown and Part-Line Thinning
Crown thinning is the most difficult extension challenge for fine hair. Standard wefts and clip-ins are designed to add volume to the sides and back — areas where you can layer extensions under your natural hair. The crown is different: it’s the top of your head, fully visible, with no overlying hair to hide attachment points.
The three options that actually work for crown thinning:
- Halo extensions with crown teasing. The halo wire sits just behind the crown, and the weft adds volume to the back and sides. Backcombing the crown area of your natural hair creates the illusion of density at the top without placing anything directly on the crown.
- Crown clip-in volumizers. These are small, single-clip wefts (sometimes called “top pieces”) designed specifically for the crown area. They attach to a single section of hair at the very top and blend downward. Place them 2 inches back from the hairline to avoid visibility.
- Hair toppers (covered in the next section) — the most effective solution for significant crown thinning.
What doesn’t work: Full weft tape-ins or hand-tied rows placed at the crown. The attachment points are impossible to hide at the top of the head, and the tension they create in that area is particularly risky for thinning crown hair.
Hair Toppers vs. Full Sets
A hair topper (also called a “top piece” or “crown piece”) is a partial hairpiece that clips directly onto the crown or part line. Unlike full extension sets, a topper is designed specifically to cover a defined thinning area rather than add overall volume.
| Feature | Hair Topper | Full Extension Set |
|---|---|---|
| Coverage area | Crown / part line only | Full head volume |
| Application | 2–4 pressure-sensitive clips | Multiple wefts, rows, or wire |
| Best for | Localized crown thinning | Overall low density |
| Average cost | $150–$600 | $200–$2,000+ |
| Detectability | Very low (designed to blend) | Depends on method |
| Damage risk | Low (wide-base clips) | Varies by method |
For women experiencing pattern thinning at the crown — a common presentation of female-pattern hair loss — a topper is often more effective and less stressful on remaining hair than a full extension set. The Perfect Locks guide notes that toppers paired with the right color match are among the most natural-looking solutions for localized thinning.
Solutions for Short, Thin Hair
The most common concern for short-haired people considering extensions is blending: how do you make extensions look natural when your own hair is only 4–6 inches long? The good news is that several methods work well on short, thin hair — with the right approach.
- Halo extensions are the most forgiving for short hair. As long as your front section reaches at least 4 inches (enough to drape over the wire), a halo works. Choose a shorter weft length (12–14 inches) to avoid an obvious length jump.
- Tape-ins with a layered cut: A skilled stylist will cut and layer the tape-in hair to blend with your natural length. This is the most natural-looking semi-permanent option for short, thin hair.
- Avoid clip-ins for very short hair (under 4 inches). There’s simply not enough natural hair to cover the attachment points or create a believable blend.
The key for short, thin hair is choosing extension hair that’s only 2–4 inches longer than your natural length. A dramatic length jump from 5 inches to 20 inches rarely looks convincing on fine hair.
Making Extensions Invisible
Even the best extension method fails if the color doesn’t match, the placement is off, or the styling reveals the attachment points. These three factors — color, placement, and styling — determine whether your extensions look natural or detectable. Getting all three right is what separates a seamless result from an obvious one. For more styling tricks, check out these tips for invisible hair extensions and natural blending.
Color Matching: #1 Visibility Factor
Color matching is the single most important factor in making extensions look invisible — more important than the extension method itself. A perfectly placed halo extension in the wrong color will be visible immediately. A tape-in set in a perfect color match can be undetectable even in direct sunlight.
For fine and thin hair, color matching is especially critical because there is less natural hair to blend with and obscure minor color differences. Follow these guidelines:
- Match to your mid-lengths and ends, not your roots. Most people with thin hair have lighter ends from natural fade or prior color services. If you match to your root color, the extensions will look darker than the rest of your hair.
- Consider highlights in your extensions. Solid-color extensions on highlighted hair look flat and obviously fake. Ask for extensions with 2–3 tones mixed in to mimic the natural variation in highlighted hair.
- Order samples before committing. Most reputable extension suppliers will send color swatches. Hold the swatch against your mid-lengths in natural daylight — not indoor lighting.
- Go slightly lighter, not darker. When in doubt, a shade slightly lighter than your natural color blends more naturally than one that’s slightly darker.
Placement for Seamless Blending
Where you place extensions matters almost as much as which type you choose. For thin and fine hair, these placement rules are non-negotiable:
- Never place extensions in the top layer of your hair. The top 1–2 inches of your hair is the visibility zone — everything placed here will show. Extensions belong in the middle and lower sections, where your natural hair drapes over them.
- Use the two-finger rule for tape-ins and wefts. Place your first row at least two finger-widths (approximately 1.5 inches) below your part line. This gives enough natural hair to cover the attachment point from every angle.
- For crown thinning, use a halo or topper — do not attempt to place tape-ins or clip-in wefts at the crown. The scalp is too exposed in that area.
- Layer extensions from bottom to top. Start with the lowest row first, then work upward. Each new row of extensions covers the attachment points of the row below.
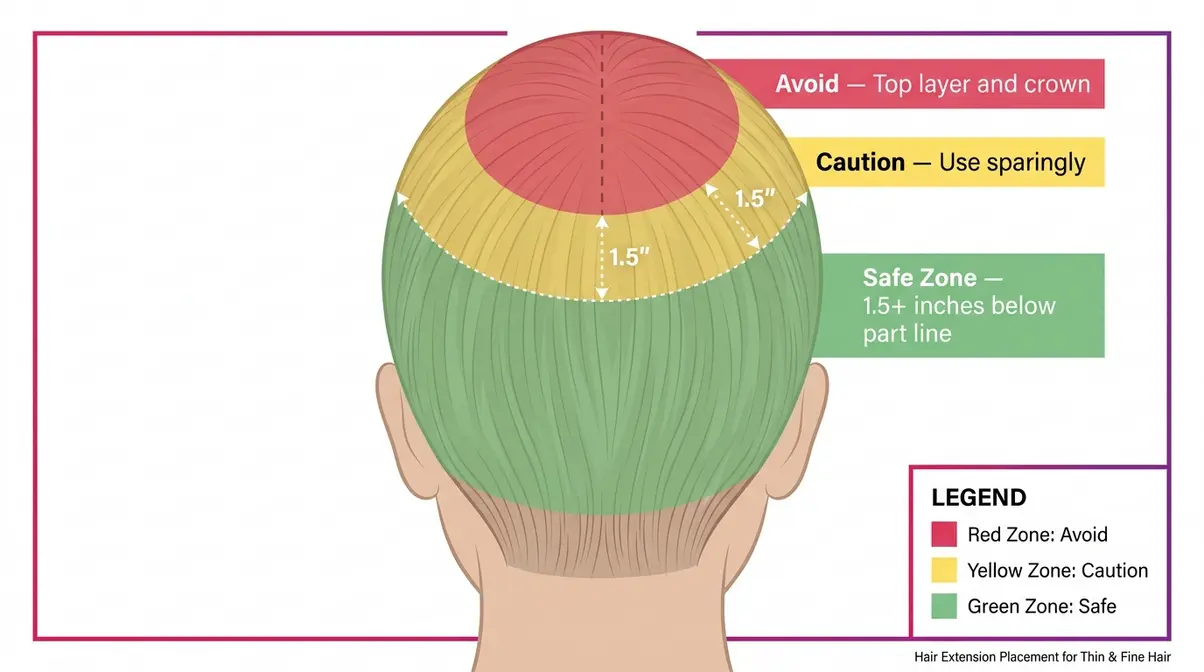
Most Discreet Extensions?
Tape-in extensions are the most discreet semi-permanent option for fine hair because the flat adhesive tab lies flush against the scalp with no raised profile. For temporary wear, seamless PU-base clip-ins are virtually undetectable when placed in the correct zone (1.5 inches below the part line) and layered with natural hair on top. Both methods score low on the Tension Tax scale and high on invisibility — provided color matching is accurate and placement follows the two-finger rule described in this guide.
Temporary vs. Permanent
The biggest practical decision after choosing your extension type is choosing your commitment level. DIY temporary extensions and salon semi-permanent extensions serve different needs, different budgets, and different lifestyles. Here’s an honest breakdown of both — including real cost numbers. Use our flowchart below to compare permanent and temporary hair extension options effectively.
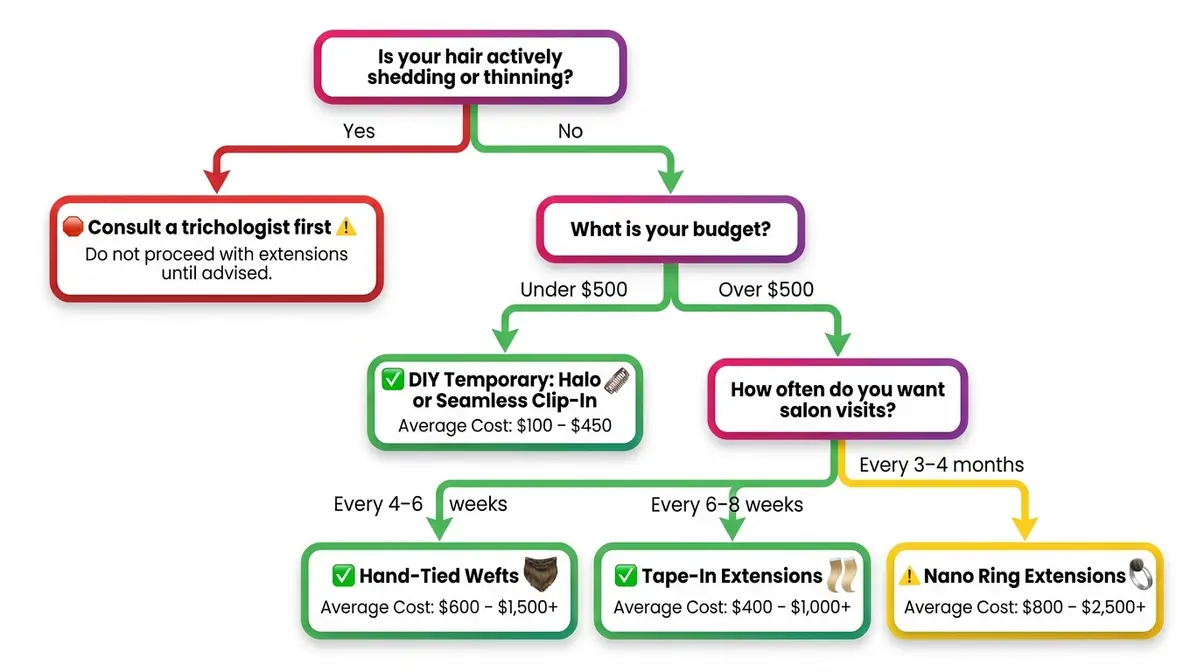
DIY Temporary Extensions
DIY temporary extensions — primarily halo and clip-in styles — give you complete control. You apply them when you want volume, remove them before bed, and your natural hair rests in between. There’s no appointment, no waiting, and no ongoing cost beyond the initial purchase.
- Realistic cost breakdown (2026):
- Quality seamless clip-in set: $150–$400
- Quality halo extension: $200–$500
- Maintenance tools (wide-tooth comb, extension brush, storage hanger): ~$30–$50
- Total first-year cost: $200–$500
The hidden cost of DIY extensions is time. Expect 10–20 minutes per application when you’re new to it, dropping to 3–7 minutes once you’ve built the habit. If you’re wearing them 3–4 days a week, that’s a meaningful daily commitment.
Who DIY extensions are right for: Anyone new to extensions, anyone with a tight budget, anyone who wants to test the waters before committing to a salon method, and anyone who values the ability to give their hair regular rest periods.
Salon Semi-Permanent Extensions
Salon semi-permanent extensions — tape-ins, hand-tied wefts, and nano rings — stay in your hair 24/7 for 6–12 weeks at a time. They offer the most natural, seamless result because they move with your hair at all times. The trade-off is cost, maintenance appointments, and the fact that your natural hair is under continuous (if distributed) tension throughout the wear period.
Realistic cost breakdown (2026):
| Method | Initial Application | Maintenance (per visit) | Annual Cost (est.) |
|---|---|---|---|
| Tape-In | $400–$1,200 | $150–$400 (every 6–8 weeks) | $1,200–$3,600 |
| Hand-Tied Weft | $800–$2,000 | $200–$500 (every 4–6 weeks) | $2,400–$6,000 |
| Nano Ring | $600–$1,500 | $150–$350 (every 3–4 months) | $1,200–$3,000 |
Prices reflect 2026 U.S. market averages and do not include the cost of extension hair, which may be purchased separately.
Who salon extensions are right for: Anyone who wants a result they don’t have to think about daily, anyone who needs extensions for professional or social reasons that require a consistently polished look, and anyone whose budget supports the ongoing maintenance cycle.
Trending Now: Nano Rings
Nano ring extensions are the newest semi-permanent method gaining serious traction in 2026 — and they deserve specific attention for fine-hair wearers because they were explicitly designed to address the damage concerns of traditional micro-rings.
A nano ring is a micro-bead that is approximately 90% smaller than a traditional micro-ring — typically just 1mm in diameter. Instead of crimping around a large bundle of 30–40 strands, a nano ring attaches to a much smaller bundle of 5–10 strands, dramatically reducing point-source tension. Because no heat or chemicals are involved in either application or removal (the ring is opened and closed with a special tool), the thermal and chemical stress components of the Tension Tax are eliminated entirely.
- Why nano rings work for fine hair:
- The 1mm bead is small enough to hide under fine hair without creating a visible bump
- The cold-application process means no heat damage at the attachment point
- The ring can be re-tightened or repositioned as hair grows, without the full removal process required by tape-ins or keratin bonds
The caution: Nano rings still apply mechanical pressure to a small bundle of strands. For hair that is extremely fine (strand diameter below 0.04mm) or severely thinned (density below 30%), even nano rings may concentrate too much tension on vulnerable follicles. A consultation with a stylist certified in nano ring application is strongly recommended before proceeding. Pricing ranges from $600–$1,500 for initial application, with maintenance every 3–4 months (as of Q2 2026).
When to Avoid Extensions
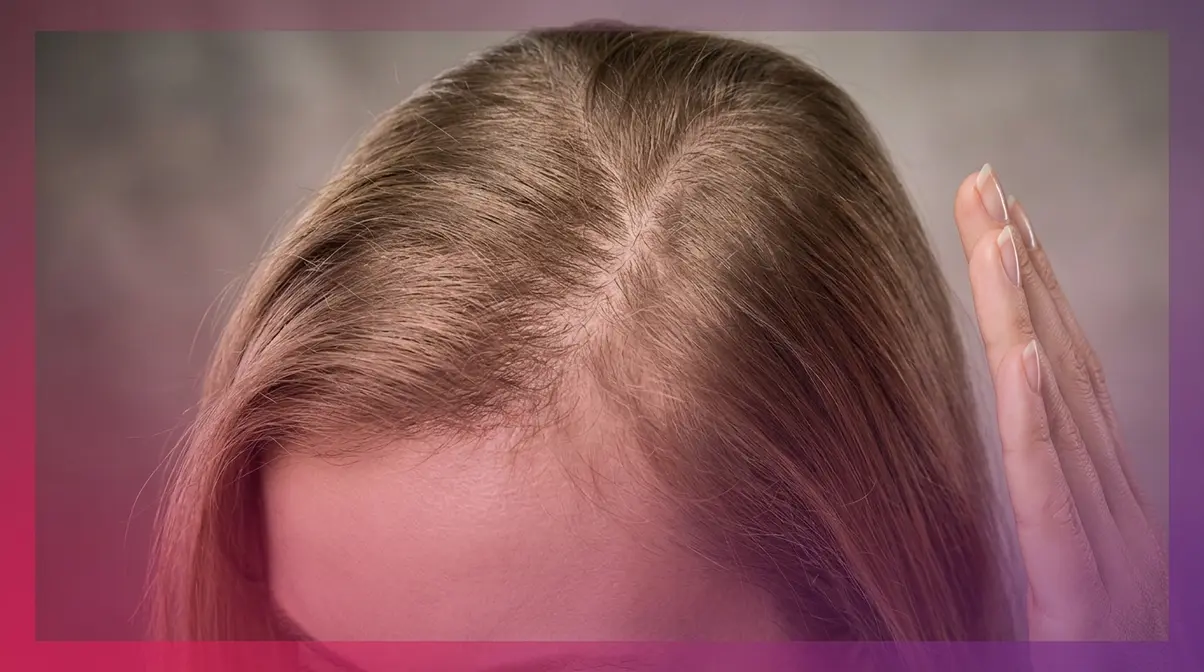
Extensions are not the right answer for every situation. Knowing when to hold off — or when to seek professional guidance before proceeding — is as important as knowing which method to choose. This section is the one that builds real trust: honest guidance about limitations.
Can Hair Be Too Thin for Extensions?
Yes, hair can be too thin for extensions — and recognizing the threshold protects you from further damage. Watch for these warning signs before applying any extension method:
- Active hair shedding above 150 strands per day. Average daily shedding is 50–100 strands (American Academy of Dermatology, 2026). If you’re consistently losing significantly more, adding extension weight to already-stressed follicles can accelerate the loss.
- Scalp visibility across the entire crown, not just at the part line. When your scalp is clearly visible in multiple areas, your density is too low to safely anchor even distributed-load methods like tape-ins or hand-tied wefts.
- Previous traction alopecia damage. If you have existing bald patches or thinning lines from a previous extension method or tight hairstyle, those follicles need a full recovery period — typically 6–12 months — before any extension is applied.
- Ongoing medical hair loss. If your thinning is caused by alopecia areata, telogen effluvium, or medication side effects, extensions mask the symptom without addressing the cause and can worsen the underlying condition.
- Hair that breaks at the root with minimal tension. If your strands snap with very light pulling, they cannot support any additional weight — even a halo extension is too much.
If you’re unsure whether your hair is ready for extensions, the safest first step is a trichologist (a specialist in hair and scalp health) consultation, not a salon booking.
When to Seek a Consultation
Some situations require expert assessment before you make any extension decision:
- You’ve noticed thinning in the past 12 months that you haven’t yet discussed with a doctor or dermatologist. Sudden or progressive thinning can have medical causes — thyroid conditions, nutritional deficiencies, hormonal changes — that need to be ruled out before extensions are appropriate.
- You have a history of scalp conditions such as seborrheic dermatitis, psoriasis, or eczema. Adhesives and mechanical attachments can irritate an already-inflamed scalp and trigger flare-ups.
- You want nano rings, keratin bonds, or hand-tied wefts. These methods require a stylist with specific certification. Applying them without proper training causes exactly the kind of damage they were designed to avoid when done correctly.
- You’re considering extensions after chemotherapy or medical hair loss. Regrowing post-chemo hair is extremely fragile. Most dermatologists recommend waiting until the hair has grown back for at least 6 months before applying any extension method.
A consultation with a certified trichologist or a licensed stylist who specializes in fine and thinning hair costs $75–$200 in most markets — a small investment compared to the cost of repairing extension damage or treating accelerated hair loss.
Frequently Asked Questions
Who Is Not a Good Candidate?
People with active medical hair loss, existing traction alopecia, or scalp conditions are not good candidates for hair extensions. Anyone unsure about their candidacy should consult a trichologist or dermatologist before booking a salon appointment.
Least Damaging Extensions?
The least damaging hair extensions for fine hair are halo extensions (zero attachment), followed by hand-tied wefts and tape-ins when applied correctly by an experienced stylist. The key differentiator is whether the method uses point-source tension (concentrated on a small bundle of strands) or distributed load (spread across a wide section). Nano rings — a newer option growing in popularity in 2026 — also rank low in damage for fine hair when sized correctly (1mm beads) and applied by a certified technician. Keratin bonds and traditional micro-rings carry the highest damage risk and should be avoided on fine or thin hair. Always prioritize methods that avoid chemical adhesives and tight mechanical clamping.
Making the Final Choice
The best hair extensions for thin hair are the ones that match your specific combination of hair density, thinning pattern, lifestyle, and budget — not just the ones that are generically “safe.” The Tension Tax framework makes this decision concrete: every method places a measurable stress load on your fragile follicles, and your job is to choose the method whose tax your hair can comfortably afford.
For most people starting from zero, that means halo extensions first. They cost nothing in follicle stress, require no appointment, and give you an honest preview of how extensions look and feel on your specific hair before you commit to a salon method. If you love the result and want something more permanent, tape-ins or hand-tied wefts offer the lowest Tension Tax among semi-permanent methods — with nano rings as a strong emerging option for those who want the security of a bonded method without the heat or chemical damage.
The Tension Tax doesn’t just help you choose your first extension. It helps you evaluate every new method, every stylist’s recommendation, and every product that enters the market — because the fundamental question never changes: how much stress does this place on my fine follicles, and can my hair afford to pay it?
Start with a halo set. Wear it for a few weeks. If you love the added volume and want to graduate to a semi-permanent method, book a consultation with a stylist certified in fine-hair extensions — not just any stylist — and bring the weight limits and placement guidelines from this guide with you. Your hair will thank you for doing the homework first.

Dave King
Writes evidence-based hair-care guides for Care About Your Hair — for every hair type, jargon-free and independent.