Table of Contents
- Introduction to Crochet Hair Styles
- What Are Crochet Braids? Understanding the Mechanics
- Key Benefits of Choosing Crochet Hairstyles
- Essential Crochet Braid Patterns for a Flawless Foundation
- Trending Crochet Hair Styles and Textures
- Advanced Techniques: The Knotless and Invisible Part Method
- Step-by-Step Guide: How to Install Crochet Hair DIY
- Maintenance Routine: Caring for Your Real Hair Underneath
- Safe Removal and Post-Style Hair Care
- Top Brands and Where to Buy Crochet Hair
- Frequently Asked Questions
This blog post may contain affiliate links. As an Amazon Associate I earn from qualifying purchases.
Introduction to Crochet Hair Styles
Crochet hair styles have become one of the most sought-after protective styling options for women across the United States, offering an unbeatable combination of versatility, affordability, and hair health benefits. This comprehensive guide explores everything from installation techniques to maintenance routines, helping you achieve salon-quality results whether you’re a first-timer or a seasoned protective style enthusiast.
Why Crochet Braids Are the Ultimate Protective Style
Crochet braids represent a revolutionary approach to protective styling that has evolved significantly from its humble beginnings in the 1990s. Originally known as the latch hook method, this technique has transformed into a sophisticated styling option that rivals traditional sew-ins and individual braiding methods.
The modern crochet method allows wearers to achieve virtually any texture imaginable, from tight coily patterns that mimic natural curls to sleek, straight blown-out looks. Unlike traditional protective styles that can take six to eight hours in a salon chair, most crochet installations can be completed in two to three hours, making them ideal for busy lifestyles.
What makes crochet styles particularly appealing is their accessibility across different hair types and conditions. Whether you’re transitioning from relaxed to natural hair, protecting your strands during seasonal changes, or simply wanting a low-maintenance style, crochet braids offer a solution that protects your natural hair while allowing creative expression.
The technique works exceptionally well for anyone looking to give their natural hair a break from daily manipulation. Women with relaxed hair can use crochet styles during stretching periods, while those with natural textures can protect their strands from environmental stressors and reduce breakage from constant styling.
What Are Crochet Braids? Understanding the Mechanics
Before diving into specific styles and techniques, it’s important to understand exactly how crochet braids differ from other protective styling methods and what makes them unique in the world of hair extensions.
Defining the Crochet Method
The crochet method fundamentally differs from traditional sew-in weaves and individual braiding techniques in both application and structure. While sew-ins involve stitching wefts of hair onto cornrowed bases and box braids require braiding extensions strand by strand into the natural hair, crochet installation uses a latch hook tool to loop pre-packaged hair through a cornrowed foundation.
This looping mechanism creates a secure attachment without the tension associated with tight braiding at the root. The cornrow base serves as the anchor system, typically braided in various patterns depending on the desired final look. The latch hook tool, a simple metal implement with a hinged latch at one end, catches the folded extension hair and pulls it through the cornrow, creating a knot that holds the extension in place.
The beauty of this system lies in its simplicity and the minimal stress it places on the natural hairline and edges. Unlike individual braids that can create tension points at each braid root, crochet styles distribute weight more evenly across the cornrow base, making them significantly gentler on fragile hairlines.
Synthetic vs. Human Hair Options
Understanding the material options available for crochet installation helps you make informed decisions about cost, longevity, and styling versatility. The market offers three primary categories: synthetic fibers, human hair, and blended options that combine both materials.
Kanekalon fiber remains the most popular synthetic option, known for its soft texture and ability to hold curls and waves without excessive frizzing. This Japanese-developed fiber feels lightweight, comes in countless colors and textures, and typically costs between eight and fifteen dollars per pack. Toyokalon, a similar synthetic option, offers slightly more shine and a silkier feel, though some users find it tangles more easily than Kanekalon.
Human hair crochet extensions provide the most natural appearance and styling flexibility, allowing you to use heat tools, dye the hair, and achieve movements that perfectly mimic natural hair growth. However, these options typically cost three to five times more than synthetic alternatives and require more intensive maintenance to preserve their quality throughout the wearing period.
Pre-looped hair comes with the extension already folded and secured with a small band at the loop point, significantly speeding up installation time. Loose bulk hair requires manual folding during installation, offering more control over loop placement and potentially creating a flatter, less bulky root area.
Key Benefits of Choosing Crochet Hairstyles
Crochet styles have surged in popularity not just for their aesthetic versatility but for practical advantages that address common concerns associated with protective styling.
Time Efficiency and Speed of Installation
Time savings represent one of the most compelling reasons women choose crochet over traditional protective styles. While a full head of individual box braids might require six to ten hours depending on size and length, most crochet installations can be completed in two to four hours, even for beginners working on their own hair.
Professional stylists can often complete crochet installations in ninety minutes to two hours, making them an excellent option for clients with limited time availability. This efficiency doesn’t come at the expense of longevity, as properly installed and maintained crochet styles typically last four to eight weeks, comparable to traditional braiding methods.
The speed advantage becomes even more pronounced when comparing removal times. Individual braids require careful unraveling of each braid, a process that can take two to three hours. Crochet styles, by contrast, can be removed in thirty to sixty minutes by simply cutting the extension hair and unraveling the cornrow base.
Zero Tension and Scalp Health
Hair loss and thinning edges have become increasingly common concerns, often exacerbated by protective styles that create excessive tension along the hairline. Crochet installation addresses this issue through its unique attachment method that eliminates individual braid tension points.
The cornrow foundation, when braided with appropriate tension, distributes the weight of extensions across wider surface areas rather than concentrating stress at individual follicles. This distribution pattern significantly reduces the risk of traction alopecia, the gradual hair loss caused by repeated pulling at the hair root.
For women experiencing hairline sensitivity or early signs of edge thinning, crochet styles offer a protective option that can actually support hair recovery. The reduced manipulation during the wearing period allows damaged follicles to rest and potentially regenerate, especially when combined with proper scalp care practices.
Accessibility and Affordability
Cost considerations play a significant role in protective style choices, particularly for women who maintain these styles year-round. A full crochet installation using quality synthetic hair typically costs between thirty and seventy dollars in materials if done at home, or one hundred to two hundred fifty dollars when professionally installed.
Compare these figures to traditional sew-in installations that often range from one hundred fifty to four hundred dollars, or individual braiding services that can cost two hundred to five hundred dollars depending on braid size and length. The cost efficiency becomes even more apparent when you factor in the reusability of your cornrow pattern knowledge and the ability to refresh or change styles without starting completely from scratch.
The accessibility extends beyond financial considerations to include the learning curve required for self-installation. While mastering neat cornrow patterns takes practice, the actual crochet looping technique can be learned in a single practice session, making DIY installation achievable for most people willing to invest a few hours in learning.
Versatility and Texture Matching
Modern crochet hair manufacturers have developed textures that authentically replicate virtually every natural hair pattern, from loose waves to tight coily curls. This variety allows for seamless blending with your natural texture or the freedom to experiment with textures different from your own.
For those with tighter curl patterns like 4A hair, extensions are now available that perfectly match the dense, springy coil structure, creating an indistinguishable blend between natural hair and extensions. Women with looser curl patterns can find water wave or deep wave options that mirror their natural texture with remarkable accuracy.
This texture matching capability extends to color blending as well. The availability of highlighted, ombré, and multi-tonal extension packs means you can achieve dimensional color effects without chemical processing. For those interested in trying trendy shades, combining crochet styles with clip-in sections or leave-out areas styled with temporary color can create custom looks without the commitment of permanent brown hair dye.
Essential Crochet Braid Patterns for a Flawless Foundation
The cornrow foundation pattern you choose directly impacts the final appearance, styling versatility, and longevity of your crochet style. Understanding different braiding patterns helps you select the right foundation for your desired look.
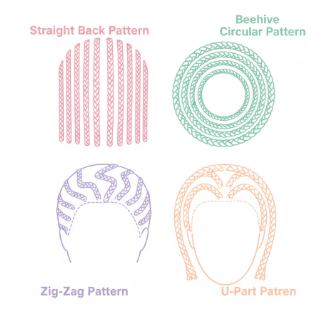
The Straight Back Pattern
Straight back cornrows running from the front hairline to the nape create the most straightforward foundation pattern, ideal for styles worn down or with minimal manipulation. This pattern works particularly well when installing hair with bangs or heavy fringe elements that will conceal the front hairline.
The parallel structure provides even tension distribution and creates a smooth surface for extension attachment. Most stylists recommend spacing these cornrows approximately one to one and a half inches apart, though this spacing can be adjusted based on the volume of extensions being installed.
This pattern excels for beginners learning crochet installation since the uniform structure makes it easier to maintain consistent loop placement and tension throughout the installation process. The straightforward layout also simplifies the removal process, as you can easily identify each cornrow’s beginning and end points.
The Beehive Pattern
The beehive or circular braiding pattern creates concentric circles of cornrows starting from a central point, typically positioned at the crown or slightly toward the back of the head. This pattern has become the gold standard for styles intended to be worn in high ponytails, top knots, or updos.
By eliminating horizontal braid lines that would be visible when hair is pulled upward, the beehive pattern ensures a clean, professional appearance regardless of how the style is manipulated. The circular structure also provides excellent weight distribution for heavier extension hair, preventing sagging or distortion of the style over time.
Creating a proper beehive pattern requires more advanced braiding skills than straight backs, as maintaining consistent spacing while working in circles presents additional challenges. However, the investment in learning this technique pays dividends in styling versatility.
The Zig-Zag or U-Part Pattern
For styles featuring a defined side or middle part, the zig-zag cornrow pattern creates a foundation that disguises the grid structure underneath the parting area. Instead of straight horizontal or circular braids that would create visible lines at the part, zig-zag braids follow an angular pattern that breaks up these lines.
The U-part variation leaves a horseshoe-shaped section of natural hair out around the perimeter, particularly concentrated at the top and front. This leave-out section gets styled and blended with the crochet extensions, creating an extremely natural-looking hairline and part area.
This pattern works exceptionally well for those concerned about the artificial appearance some crochet styles can have at the part line. By incorporating your natural hair in the most visible areas, you achieve a result that closely mimics hair growing directly from the scalp.
The Illusion Pattern (Individual Perimeter)
The illusion technique combines individual plaits or cornrows around the entire perimeter hairline with a quicker braiding pattern in the interior sections. This hybrid approach creates the appearance of individual braids or twists along the hairline where scrutiny is highest, while the faster interior installation keeps the overall process time-efficient.
Typically, the perimeter section extends one to two inches back from the natural hairline all around the head. Individual extensions are either braided directly into these perimeter plaits or looped in a manner that mimics individual attachment. The interior sections use traditional crochet installation over a cornrow base, hidden beneath the perimeter hair.
This technique has gained popularity for goddess locs, faux locs, and twist styles where a natural hairline appearance is paramount. While it adds thirty to sixty minutes to the installation process, the resulting realism often justifies the additional time investment.
Trending Crochet Hair Styles and Textures
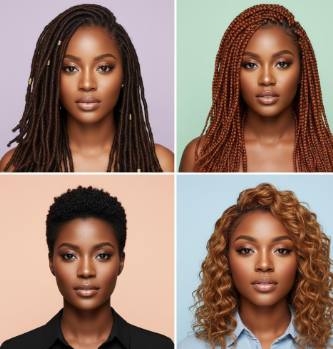
The crochet hair market has exploded with options in recent years, offering textures and styles that cater to every aesthetic preference and occasion. Understanding current trends helps you select styles that feel contemporary while suiting your personal taste.
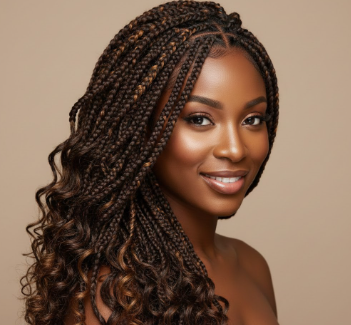
Curly and Wavy Crochet Styles
Curly and wavy textures continue to dominate the crochet market, offering natural-looking movement and volume that requires minimal daily styling. These textures work particularly well for women seeking low-maintenance options that still deliver visual impact.
Deep twist textures feature tightly spiraled curls that create significant volume and a bohemian aesthetic. The defined curl pattern holds up well to humidity and maintains its structure throughout the wearing period with minimal refreshing. Water wave textures offer a looser, more relaxed curl pattern that mimics hair that has naturally dried after swimming, creating a beachy, carefree appearance.
Bohemian curl styles have surged in popularity, characterized by their irregular curl pattern that combines different curl sizes within the same pack. This variation creates a more authentic, natural appearance since real hair rarely features perfectly uniform curls. Beach wave patterns offer even looser, more relaxed movement, ideal for those wanting texture without excessive volume.
Gogo curls and loose spiral patterns fall somewhere between defined curls and waves, offering versatility for both casual and professional settings. These textures can be brushed out for a fuller, fluffier appearance or left in their natural state for more defined curl clumps.
Crochet Braids and Twists
Pre-braided and pre-twisted crochet hair has revolutionized the installation process for those wanting braided or twisted looks without the time investment of individual installation. These options come with the braiding or twisting already completed, ready to be looped through the cornrow base.
Senegalese twist crochet packs feature smooth, rope-like twists that taper to sealed ends, available in various lengths and thicknesses. The sleek appearance works well for professional environments while still offering protective benefits. Havana twists provide a chunkier alternative with more texture and a slightly more casual aesthetic.
Box braid crochet options now come in sizes ranging from micro to jumbo, allowing you to achieve the classic box braid look in a fraction of the installation time. Quality options feature realistic-looking roots and natural color variation that mimics hand-braided styles.
Passion twists and spring twists represent the bohemian end of the spectrum, featuring deliberately imperfect, slightly distressed textures that create a lived-in, artistic appearance. These styles typically incorporate subtle color variations and irregular textures that enhance their handmade aesthetic.
Faux Locs and Goddess Locs
Loc-inspired crochet styles allow you to experiment with the loc aesthetic without the long-term commitment required for cultivated locs. These styles have evolved significantly, now offering textures that convincingly replicate locs at various stages of maturity.
Butterfly locs have become particularly trendy, characterized by their deliberately distressed appearance with loose, flyaway hairs throughout the length. This texture creates a soft, romantic aesthetic quite different from the neater appearance of traditional faux locs. The installation typically involves wrapping extension hair around a base braid or twist, then strategically loosening sections to create the signature butterfly effect.
Nu locs and soft locs offer a more polished alternative, featuring smoother surfaces with subtle texture variation. These styles work well for professional settings where a neater appearance is preferred while still delivering the visual impact of loc styles.
The color possibilities within loc styles have expanded dramatically, with manufacturers offering everything from natural blacks and browns to fashion colors, ombré effects, and even salt and pepper hair combinations that create sophisticated, mature aesthetics without requiring permanent color changes.
Straight and Blow-Out Textures
Straight crochet hair options serve those wanting sleek, polished looks or who prefer to start with straight hair and create their own curl patterns using flexi-rods, perm rods, or heat styling.
Yaki straight textures replicate the appearance of natural African-textured hair that has been blown out or pressed, featuring slight texture and body rather than bone-straight strands. This texture blends seamlessly with natural hair that has been straightened, creating cohesive looks for those who prefer straighter styles.
Sleek straight options using high-quality Kanekalon offer glossy, bone-straight results similar to silk press outcomes. These work particularly well for blunt cuts, precision bobs, and geometric styles where clean lines are essential to the overall aesthetic.
The versatility of straight textures allows for heat styling experimentation, though synthetic options require low heat settings and careful technique to avoid melting or damaging the fibers. Human hair crochet options eliminate these concerns, accepting heat styling just like natural hair.
Short and Tapered Cuts
Crochet installation isn’t limited to long, flowing styles. Short textured cuts have gained significant traction, offering edgy alternatives that still provide protective benefits.
Crochet pixie cuts typically use curly or coily textured hair cut into short, layered styles that frame the face. These installations often incorporate the illusion technique around the perimeter to create realistic hairlines and texture variation that mimics natural short cuts.
Tapered afro styles use kinky or afro-textured crochet hair installed in a rounded shape, then cut and shaped to create tapered silhouettes. The ability to achieve a perfectly shaped afro without the daily maintenance required for natural afro styling makes this an appealing option for many.
Mohawk and undercut variations combine shaved or very short sides with longer textured tops, creating dramatic contrasts. These styles can be achieved by braiding only the center section of the head and installing extensions in that area, leaving the sides with natural hair cut short or by using shorter extension lengths on the sides with dramatic length on top.
Advanced Techniques: The Knotless and Invisible Part Method
As crochet techniques have evolved, stylists have developed advanced methods that address common concerns about the visibility of attachment points and achieve even more natural-looking results.
The Invisible Part Technique
Creating a realistic scalp appearance at the part line has been one of the primary challenges in crochet installation, particularly for straight or wavy styles where the scalp is more visible. The invisible part technique addresses this concern through strategic loop placement and knot concealment.
The method involves creating your desired part line within the cornrow pattern, then installing hair on either side of this part using a modified looping technique. Instead of pulling the extension hair completely through the cornrow and knotting it on top, you pull it through at an angle that positions the knot underneath the cornrow, hidden from view.
This requires inserting the latch hook from the opposite direction than standard installation, catching the extension hair, and pulling it through while maintaining awareness of knot positioning. The result places all visible hair above the cornrow base while hiding attachment evidence underneath.
For maximum realism, some stylists apply concealer or root touch-up powder that matches the scalp tone along the part line, further disguising any visible braiding or attachment points. This extra step takes only a few minutes but significantly enhances the natural appearance of the finished style.
The Knotless Crochet Look
Traditional crochet installation creates a small knot at the base where the extension loops through the cornrow, sometimes creating slight bulk at the root area. The knotless crochet method minimizes this bulk through a modified attachment technique.
The pull-through method feeds extension hair through the cornrow without creating a traditional knot, instead securing it through tension and strategic looping. This technique involves inserting the latch hook, catching only a small section of the extension hair rather than the full folded loop, and pulling this section through. The remaining hair then wraps around the base, creating security through wrapping rather than knotting.
This approach works particularly well along the hairline and part areas where bulk reduction makes the most significant visual difference. While it requires more time and precision than standard looping, the resulting flatness at the root creates a more authentic appearance, especially during the first few weeks when synthetic hair is at its smoothest.
Blending natural hair with extensions along the perimeter enhances the knotless effect. Leaving out small sections of natural hair and wrapping or twisting them together with the extension pieces creates seamless transitions that are virtually undetectable, even upon close inspection.
Step-by-Step Guide: How to Install Crochet Hair DIY
Learning to install crochet hair yourself opens up significant cost savings and styling flexibility. While the process requires practice to achieve salon-quality results, the basic technique is accessible to most people willing to invest time in learning.
Preparation and Tools Needed
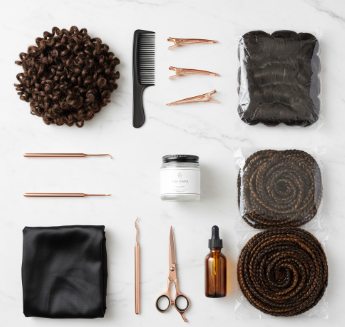
Successful crochet installation begins with gathering the right tools and materials before you start. The essential tool list includes a latch hook or crochet needle, the primary implement that pulls extensions through your cornrow base. These tools typically cost between three and eight dollars and are available at beauty supply stores and online retailers.
A rat-tail comb assists with creating clean parts and sectioning hair during the cornrow braiding phase. Edge control or styling gel helps smooth natural hair and create neat braiding foundations, while hair clips keep sections organized during the braiding process.
Scalp oil or a lightweight oil blend should be applied before braiding to ensure your natural hair and scalp remain moisturized throughout the wearing period. Finally, purchase enough crochet hair packs to complete your desired style, typically ranging from four to eight packs depending on the texture and desired fullness.
Preparing the Natural Hair
Proper hair preparation significantly impacts both the appearance and health outcomes of your crochet style. Begin with a thorough cleansing using a clarifying or deep-cleaning shampoo that removes product buildup, oils, and environmental residue from your strands and scalp.
Follow cleansing with a deep conditioning treatment, allowing it to process for at least twenty minutes under heat if possible. This moisture infusion ensures your natural hair enters the protective style well-hydrated, reducing the risk of dryness and breakage during the wearing period.
After rinsing the deep conditioner, apply a leave-in conditioner focusing on the mid-lengths and ends of your natural hair. Allow hair to dry until slightly damp rather than soaking wet, as this makes braiding easier while still allowing you to work with manageable hair.
Apply a light oil to your scalp and along the length of your hair, focusing on areas prone to dryness. Grapeseed oil, jojoba oil, or lightweight oil blends work well, providing moisture without excessive heaviness that might cause buildup during the wearing period.
Braiding the Foundation
The cornrow foundation determines the success of your entire installation, making this the most critical skill to develop for quality results. Begin by sectioning your hair according to your chosen braid pattern, using clips to keep unworked sections out of the way.
Start braiding at the front hairline or at the center point if creating a beehive pattern. Apply edge control or gel to the section you’re braiding, smoothing it thoroughly to create a neat base. Begin your cornrow using the three-strand underhand technique, where outer strands cross under the center strand rather than over it.
Maintain consistent tension throughout each braid, firm enough to create a stable base but not so tight that you feel pulling or discomfort at the scalp. Remember that the cornrows need to last four to eight weeks, so excessive tension will create prolonged stress on your follicles.
Keep cornrows as flat as possible against the scalp rather than creating raised, bulky braids. Flat cornrows provide better surfaces for extension attachment and create less overall bulk in the finished style. Continue this pattern until your entire head is braided according to your chosen pattern.
Looping and Latching
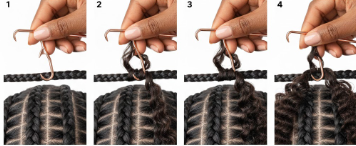
With your cornrow foundation complete, you’re ready to begin the actual crochet installation. Start at the nape of the neck, working from bottom to top, which allows you to see your work more easily and creates a natural layering effect as you progress.
Fold your extension hair in half to create a loop, or use pre-looped hair if you’ve chosen that option. Insert your latch hook under the cornrow from one side, going completely through to the other side. The hook should slide under the braid without catching individual hairs.
Open the latch on your hook, then place the looped center of your extension hair into the open hook. Close the latch, securing the hair, then pull the hook back through the cornrow, bringing the loop with it. You should now have a loop on one side of the cornrow and two loose ends on the other side.
Open the loop wide enough to pass the two loose ends through it, then pull these ends to tighten the loop against the cornrow base. This creates a simple knot that secures the extension hair. Adjust the positioning so the knot sits flat and the hair extends evenly on both sides.
Continue this process along each cornrow, spacing your loops according to the desired fullness. Closer spacing creates fuller results but uses more hair, while wider spacing creates lighter, more natural volume. Most medium-density styles place loops approximately one to one and a half inches apart.
Finishing Touches
Once all extensions are installed, the finishing phase transforms your crochet installation from functional to polished. Begin by assessing the overall shape and length, identifying any areas that appear uneven or excessively long.
Using sharp hair shears, carefully trim and shape the style to your desired length and silhouette. For curly styles, work in small sections, trimming conservatively since curly hair appears longer when stretched than it does in its natural state. Straight styles allow for more precise cutting since you can clearly see the cutting line.
Address any stray synthetic hairs or fuzzy pieces by carefully singeing them with a lighter, passing the flame quickly near the ends without holding it in place. This technique works only for synthetic hair and should be done cautiously to avoid damage. Never use this method on human hair extensions.
Style your edges using edge control and a small brush, laying them smoothly against your hairline to create a polished appearance. Some people choose to leave out small sections of natural hair at the temples or nape to blend with the extensions, which should be styled at this stage to integrate seamlessly with the crochet hair.
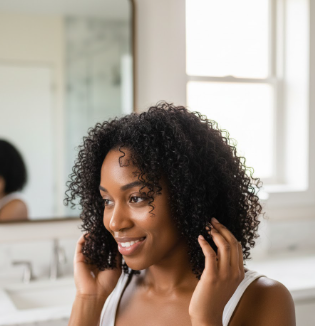
For curly and wavy styles, you may want to separate or fluff the curls to achieve your desired fullness and definition. Work mousse or curl cream through the lengths, scrunching gently to encourage curl formation and reduce any synthetic sheen.
Maintenance Routine: Caring for Your Real Hair Underneath
Proper maintenance during the wearing period determines both the longevity of your style and the health of your natural hair underneath. Developing consistent care routines prevents common issues like scalp buildup, itching, and tangling.
Nighttime Routine for Longevity
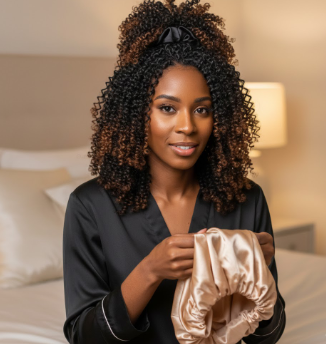
Protecting your crochet style while you sleep significantly extends its lifespan and maintains its fresh appearance. The pineapple method works excellently for curly and wavy styles, involving gathering all hair loosely at the very top of your head and securing it with a satin scrunchie or loose hair tie.
This technique keeps curls elongated and prevents crushing or flattening that occurs when sleeping directly on the hair. For styles too short to pineapple, use a satin or silk bonnet that covers all hair without compressing it excessively.
Silk or satin pillowcases provide an additional layer of protection, reducing friction even if your bonnet slips off during the night. These smooth fabrics prevent the frizzing and tangling that cotton pillowcases can cause, particularly with synthetic hair extensions.
For braided or twisted styles, simple bonneting usually provides sufficient protection without additional gathering. Ensure your bonnet is large enough to accommodate the style without crushing it, as compressed braids can develop permanent bends or creases over time.
Scalp Care and Itch Prevention
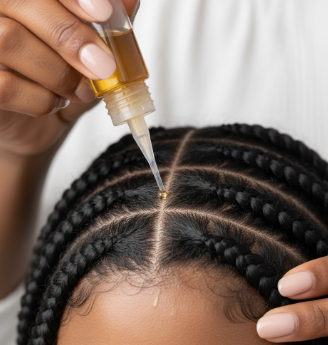
Scalp care represents the most critical maintenance aspect since neglecting the scalp can lead to discomfort, odor, and potential skin issues. The sealed cornrow foundation makes direct scalp access challenging, requiring tools and products designed for this specific situation.
Nozzle-tip applicator bottles allow precise oil application directly onto the scalp between cornrows. Fill these bottles with lightweight oils like grapeseed, jojoba, or tea tree oil blends that provide moisture without excessive heaviness. Apply oil every two to three days, focusing on the scalp rather than the extension hair.
Tea tree oil mixed with a carrier oil provides both moisture and antimicrobial properties that can prevent scalp irritation and itching. Peppermint oil offers similar benefits while creating a cooling sensation that soothes irritated scalps. Always dilute these essential oils properly to avoid skin irritation.
The apple cider vinegar rinse technique addresses itching caused by synthetic hair fibers, which some people find irritating during the first few days of wear. Mix equal parts apple cider vinegar and water in a spray bottle, then lightly mist the cornrow base and synthetic hair roots. Allow it to air dry completely, which neutralizes the alkalinity of synthetic fibers and reduces irritation.
Washing Crochet Braids
Cleansing your scalp during the wearing period maintains scalp health and prevents buildup that can cause odor or discomfort. However, washing crochet styles requires modified techniques to avoid frizzing synthetic hair or loosening the installation.
Focus cleansing efforts on the scalp and cornrow base rather than the extension hair. Dilute a clarifying or moisturizing shampoo with water in an applicator bottle, creating a thinner consistency that penetrates more easily. Apply this mixture directly onto the scalp along the cornrow parts, using the nozzle tip to target the scalp surface.
Gently massage the scalp with your fingertips, using small circular motions that clean without disturbing the cornrows. Avoid scrubbing or aggressive manipulation that might loosen the braids or tangle the extension hair.
Rinse thoroughly using lukewarm water, allowing the water to flow in the direction of the hair rather than scrubbing or piling hair on top of your head. This directional rinsing prevents tangling while ensuring all shampoo residue is removed.
For synthetic extensions, minimize water exposure when possible. Some people prefer dry shampoo or witch hazel for spot cleaning between full washes. Spray dry shampoo directly onto the scalp, allow it to absorb for a few minutes, then gently massage it through before brushing away any visible residue.
Managing Frizz and Tangling
Even with careful maintenance, some frizzing and tangling naturally occurs with synthetic crochet hair, particularly after several weeks of wear. Strategic management keeps these issues under control without requiring premature removal.
Light mousse application helps refresh curly and wavy textures while controlling frizz. Apply mousse to damp hands, then scrunch it through the lengths of the hair, focusing on areas showing the most frizz. Allow the hair to air dry, which reactivates the curl pattern and smooths the hair cuticle.
For matted or severely tangled ends, trimming represents the most effective solution. Use sharp scissors to carefully cut away matted sections, working conservatively to preserve length while removing damaged areas. Regular trimming every two to three weeks maintains a fresh appearance throughout the wearing period.
Hot water dipping refreshes synthetic curls that have lost their definition, though this technique requires caution to avoid burns. Boil water, then allow it to cool for about thirty seconds. Quickly dip small sections of the synthetic hair into the water, holding them submerged for just two to three seconds before removing. The heat temporarily resets the curl pattern, though this method works only on heat-safe synthetic fibers.
Safe Removal and Post-Style Hair Care
Knowing when and how to remove your crochet style protects your natural hair and ensures it remains healthy for your next protective styling session. Proper removal techniques prevent unnecessary breakage and tangling.
Knowing When to Remove the Style
Several indicators signal that your crochet style has reached the end of its optimal wearing period. Significant new growth, typically visible after six to eight weeks, creates excessive tension at the cornrow base and makes the style appear less neat.
Matting at the natural hair roots where your hair has begun growing out of the cornrows indicates it’s time for removal. If you notice significant tangling or feel resistance when gently tugging at your cornrow base, your natural hair has likely begun matting and requires release.
Excessive frizzing or deterioration of the extension hair, while not directly harmful to your natural hair, diminishes the style’s appearance and often coincides with the timeframe when removal benefits your natural hair. Most synthetic crochet styles look their best for four to six weeks, though proper maintenance can extend this period.
Scalp discomfort, persistent itching that doesn’t respond to normal remedies, or any signs of scalp irritation warrant immediate removal regardless of how long the style has been installed. Your scalp health always takes priority over maintaining a hairstyle.
Step-by-Step Removal Process
Begin removal by cutting the extension hair a few inches from the root, which eliminates most of the extension length and makes the remaining removal process more manageable. Work in sections, cutting all extensions before beginning to unravel cornrows.
Take your time cutting, ensuring you’re cutting only extension hair and not your natural hair. The visual and textural difference between the synthetic extensions and your natural hair should be obvious, but working carefully in good lighting prevents accidental cutting of your own hair.
Once all extensions are cut short, begin carefully unraveling the cornrows starting from the end where you finished each braid. Use your fingers or a rat-tail comb to gently loosen the braid, working slowly through any tangled areas rather than pulling or forcing the hair.
As you release each cornrow, detangle the freed natural hair immediately before moving to the next braid. This progressive detangling prevents the loose hair from tangling with still-braided sections, making the overall process smoother and less damaging.
Use a detangling spray or leave-in conditioner on each section as you unravel it, adding slip that makes finger-detangling easier. Work from the ends of your hair toward the roots, gently separating knots and tangled areas without pulling or forcing the hair.
Post-Removal Treatment
After removing all extensions and fully detangling your natural hair, implement a restoration routine that addresses any dryness or stress the hair experienced during the protective styling period. Begin with a clarifying shampoo that removes any oil buildup, product residue, or lint accumulated during the wearing period.
Follow the clarifying wash with a protein treatment if your hair feels unusually stretchy, limp, or weak. Protective styles can sometimes lead to moisture overload if the hair remained too moist without adequate protein balance. A light to moderate protein treatment restores strength and elasticity.
Deep condition thoroughly, allowing the treatment to process for at least thirty minutes under heat if possible. This moisture infusion replenishes any hydration lost during the protective styling period and prepares your hair for either its next style or a period of wearing it out.
If you plan to install another crochet style immediately, allow your hair at least a few days of rest with simple, low-manipulation styling. This break gives your scalp time to recover from the cornrow tension and allows you to assess your hair’s condition before committing to another extended protective style.
Top Brands and Where to Buy Crochet Hair
The quality of your crochet hair significantly impacts the final appearance and longevity of your style. Understanding which brands offer the best value and where to purchase them helps you make informed buying decisions.
Popular Synthetic Hair Brands
Freetress has established itself as one of the most reliable names in synthetic crochet hair, offering extensive texture options with consistent quality across product lines. Their water wave, deep twist, and braid variations are particularly popular, known for minimal tangling and authentic-looking textures.
The Outre X-Pression line provides excellent value, with their pre-stretched braiding hair and various crochet textures receiving consistently positive reviews. The brand focuses on creating low-maintenance options that hold up well throughout extended wearing periods.
Bobbi Boss has gained recognition for their innovative textures, particularly their nu locs and various faux loc options. The brand frequently releases trendy new textures, staying current with evolving style preferences while maintaining quality standards.
Sensationnel offers premium synthetic options with their Lulutress and other specialty lines, typically priced slightly higher than budget alternatives but delivering superior softness and more realistic appearances. Their ombré and highlighted options provide excellent color variety without requiring multiple packs in different shades.
Navigating Beauty Supply Stores vs. Online Retailers
Local beauty supply stores offer the advantage of seeing and touching hair before purchase, allowing you to assess texture, color, and quality firsthand. Staff at these stores can often provide recommendations based on experience with different brands and customer feedback.
However, selection at physical stores can be limited compared to online options, and prices are sometimes higher than online retailers. Building a relationship with your local beauty supply store can lead to helpful advice and sometimes negotiated pricing, particularly when purchasing multiple packs.
Online retailers like Amazon provide vast selection and competitive pricing, with customer reviews offering insights into product quality and performance. The ability to compare multiple brands and textures simultaneously makes online shopping efficient for research purposes.
When purchasing online, pay attention to seller ratings and return policies, as hair quality can vary between batches and unauthorized sellers sometimes offer substandard products. Reading recent reviews helps identify any quality control issues with specific products or sellers.
Specialty online hair retailers often provide the best combination of selection, quality assurance, and customer service, though prices may be slightly higher than marketplace sellers. These retailers typically guarantee authentic products and offer more detailed product information than general marketplaces.
Estimating Packs Needed
Understanding how many packs of hair you need prevents both shortage situations that interrupt installation and overbuying that wastes money. The required amount varies significantly based on texture type and desired fullness.
Curly and kinky textures typically require more packs than straight hair due to their compact curl patterns. For shoulder-length curly styles, plan for five to seven packs for medium fullness, while longer or very full styles might require eight to ten packs.
Straight and wavy textures generally need fewer packs since the hair extends to its full length without curl shrinkage. Four to six packs usually suffice for medium-length straight styles, while very long styles might require six to eight packs.
Pre-braided and pre-twisted options vary by brand, with some packs containing more hair than others. Check the manufacturer’s recommendations, though most styles require four to six packs for full head coverage.
When in doubt, purchasing one extra pack provides insurance against running short near the end of installation. Most retailers accept unopened returns, and having backup hair available for the next installation proves useful if you plan to repeat the style.
Frequently Asked Questions
How long do crochet hair styles typically last?
Crochet hair styles generally last four to eight weeks depending on maintenance, hair texture, and lifestyle factors. Proper care including regular scalping oiling, protective nighttime routines, and gentle cleansing extends longevity toward the upper end of this range. You should remove the style when you notice significant new growth, matting at the roots, or excessive frizzing that diminishes the appearance.
Can you swim or exercise while wearing crochet braids?
Yes, you can swim and exercise with crochet braids, though synthetic hair requires specific care afterward. After swimming in chlorinated or salt water, rinse the hair thoroughly with fresh water and apply a leave-in conditioner to prevent drying and tangling. For exercise, wear a satin-lined workout cap to absorb sweat from the scalp while protecting the extensions, then allow the style to air dry completely before covering it again.
Does crochet hair damage your natural hairline?
Crochet hair does not damage your hairline when properly installed with appropriate tension and when removed within the recommended timeframe. The technique actually creates less tension than individual braids because weight distributes across cornrows rather than individual attachment points. Damage occurs only when cornrows are braided too tightly, when styles are left in too long allowing excessive matting, or when removal is rushed without proper detangling.
How many packs of hair do I need for a full head?
Most crochet styles require four to eight packs for a full head, with the exact number depending on texture and desired fullness. Curly and kinky textures typically need six to eight packs for medium fullness due to curl shrinkage, while straight and wavy textures usually require four to six packs. Very long styles, extremely full installations, or very thick natural hair foundations may require additional packs beyond these estimates.
Can I wash my crochet hair in the shower?
You can wash crochet hair in the shower by focusing cleansing on the scalp and cornrow base rather than saturating the extensions. Use a diluted shampoo in an applicator bottle, applying it directly to the scalp along the parts, then gently massage with fingertips before rinsing with water flowing in the hair’s direction. Minimize water exposure to synthetic extensions to prevent excessive frizzing, and allow the style to air dry completely after washing.
What is the best way to stop synthetic crochet hair from itching?
The most effective itching remedy involves spraying a diluted apple cider vinegar solution onto the cornrow base and synthetic hair roots, then allowing it to air dry completely. This neutralizes the alkaline coating on synthetic fibers that causes irritation for many people. Additionally, apply lightweight oils like tea tree or peppermint oil blended with a carrier oil directly to the scalp every two to three days to maintain moisture and soothe irritation.
Is it possible to reuse crochet hair extensions?
You can reuse crochet hair extensions if they remain in good condition after removal, though this works better with human hair than synthetic options. Gently remove any tangles, wash the hair with mild shampoo, deep condition if needed, and allow it to air dry completely before storing. Synthetic hair typically shows more wear after the first use, with increased frizzing and curl pattern deterioration, while quality human hair extensions can be reused multiple times with proper care.
What is the difference between pre-looped and loose crochet hair?
Pre-looped crochet hair comes with a small band already securing the fold point, allowing you to immediately insert your latch hook and begin installation without manually folding each piece. Loose crochet hair requires you to fold each section during installation, which takes slightly more time but allows more control over loop size and potentially creates less bulk at the root. Pre-looped hair typically costs one to three dollars more per pack but can reduce installation time by thirty to sixty minutes.
Can I install crochet hair on short natural hair?
Yes, you can install crochet hair on short natural hair as long as your hair is long enough to cornrow, typically at least two to three inches. Shorter hair may require smaller, more numerous cornrows to create an adequate foundation, and you might need to use more gel or edge control to keep shorter strands secured within the braids. The crochet method actually works well for short hair since the extensions attach to cornrows rather than requiring significant natural hair length for blending.
How do I make my crochet braids look less bulky?
Reduce crochet braid bulk by using the knotless installation method, spacing loops slightly farther apart, and choosing a flatter cornrow pattern braided close to the scalp. Installing fewer packs of hair than maximum recommendations creates more natural volume, and using pre-looped hair with smaller loop bands or loose hair folded into smaller loops minimizes root thickness. For styles with parts, the invisible part technique positions knots underneath cornrows rather than on top, significantly reducing visible bulk in the most scrutinized areas
