Table of Contents
- The Science of Airplane Hair: Why Your Waves Suffer at 30,000 Feet
- Pre-Flight Prep: The Secret to Better Hair Starts Before You Leave
- Your Post-Flight Wavy Hair Rescue Plan: Step-by-Step Routines
- Building Your Travel-Sized Wavy Hair Toolkit
- Advanced Strategies for Common Post-Flight Wavy Hair Problems
- Arrive and Thrive with Confident Wavy Hair
- Frequently Asked Questions About Taking Care of Wavy Hair After a Flight
This blog post may contain affiliate links. As an Amazon Associate I earn from qualifying purchases.
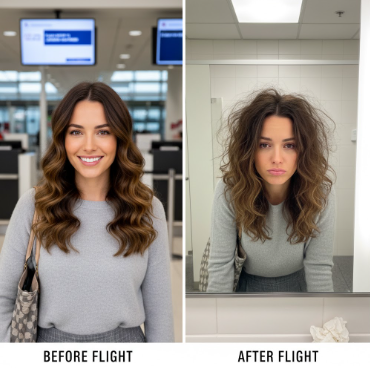
Stepping off a plane and catching your reflection in the airport restroom mirror can be a shocking experience for anyone with wavy hair. The defined, bouncy waves you styled before your journey have transformed into a flat, frizzy, staticky mess that barely resembles your natural texture. You’re not imagining things, and you’re certainly not alone in this frustration. The airplane cabin environment creates a perfect storm of conditions that assault your wave pattern, stripping moisture and leaving your hair desperate for rescue. This comprehensive guide provides everything you need to prevent in-flight hair damage and quickly revive your waves upon landing, whether you have fifteen minutes or a full hour to dedicate to your post-flight hair recovery.
The Science of Airplane Hair: Why Your Waves Suffer at 30,000 Feet
Understanding why your hair reacts so dramatically to air travel helps you combat the problem more effectively. The airplane cabin isn’t just uncomfortable for you; it’s actively hostile to your hair’s health and structure. By examining the specific environmental factors at play, you can develop targeted strategies that address the root causes rather than just the symptoms.
The Dehydration Effect: How Dry Cabin Air Causes Frizz and Dryness
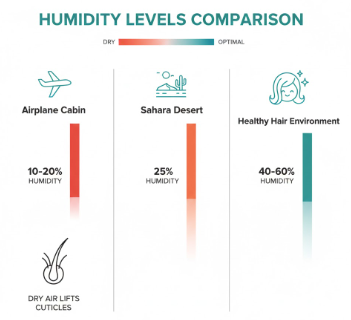
Airplane cabin humidity regularly drops to between 10 and 20 percent, which is significantly lower than the Sahara Desert’s average humidity of 25 percent. Your hair thrives in environments with 40 to 60 percent humidity, so this drastic difference creates immediate problems. When exposed to such extremely dry air, the protective outer layer of your hair shaft (the cuticle) begins to lift and separate as individual strands desperately search for moisture from any available source.
This cuticle lifting is the primary cause of that straw-like texture and instant frizz you notice after just a few hours of flight time. Wavy hair is particularly vulnerable because its natural shape already makes it more porous than straight hair, meaning it loses and absorbs moisture more rapidly. The longer your flight, the more pronounced this dehydration becomes, which explains why transcontinental or international travelers often experience the most severe hair disasters.
Static, Pressure, and Tangles: The Other In-Flight Culprits
Beyond the humidity crisis, several other factors conspire against your waves during flight. Static electricity builds up from the constant friction between your hair and synthetic materials used in airplane seats, headrests, blankets, and even your clothing. This electrical charge causes individual hair strands to repel each other, creating that flyaway effect that makes your hair look wild and unmanageable.
Physical pressure also plays a significant role in disrupting your wave pattern. Hours of resting your head against a seat back can completely flatten the waves at your crown and the back of your head, creating an uneven texture that’s difficult to revive. The combination of extreme dryness and limited movement during flight also encourages tangling, especially at the nape of your neck and behind your ears where hair rubs against itself and your seat.
Pre-Flight Prep: The Secret to Better Hair Starts Before You Leave
The most critical mistake travelers make is focusing solely on post-flight recovery while ignoring prevention. A strategic pre-flight routine can reduce hair damage by up to 70 percent, making your post-landing refresh dramatically easier and faster. Think of this preparation phase as building a protective fortress around your hair strands, fortifying them to withstand the challenging conditions ahead.
To Wash or Not to Wash: Timing Your Pre-Flight Hair Routine
Resist the urge to wash your hair on the morning of your flight. Freshly washed hair lacks the protective coating of natural oils (sebum) that helps shield strands from environmental stressors. Instead, complete your full wash day routine one to two days before your departure, allowing your scalp’s natural oils to redistribute along the hair shaft.
During this pre-travel wash day, incorporate a deep conditioning treatment that you leave on for at least 15 to 20 minutes. This intensive moisture infusion creates a reservoir of hydration within the hair shaft that will sustain your waves through the flight. Focus on products containing ingredients like shea butter, coconut oil, or hydrolyzed proteins that penetrate deeply rather than just coating the surface.
If you must wash your hair the day before travel, apply a strengthening protein treatment followed by a moisture-rich conditioner. This combination fortifies the hair structure while maximizing hydration levels. Many experienced travelers at Care About Your Hair have found this pre-flight timing strategy makes the single biggest difference in how their waves recover after landing.
The Power of a Protective Hairstyle for Wavy Hair

Leaving your wavy hair down and loose during a flight is essentially inviting disaster. Every movement against your seat creates friction, every shift of your head disrupts the wave pattern, and every hour of exposure to dry air compounds the damage. Protective styling isn’t just helpful; it’s essential for maintaining any semblance of your natural texture.
Loose Braids or Twists to Preserve Wave Patterns
Creating one or two loose braids before boarding offers multiple benefits for wavy hair. The braiding process gently encourages your waves into organized clumps rather than allowing them to separate into chaotic individual strands. This technique also dramatically reduces the surface area of hair exposed to dry cabin air and minimizes friction against your seat and clothing.
Keep your braids loose rather than tight to avoid creating unwanted crimps or bends in your wave pattern. Start the braid slightly below your ears rather than at your scalp to prevent tension headaches during long flights. When you release the braids after landing, you’ll find your waves grouped into defined sections that are much easier to refresh and style.
The Silk Scrunchie Bun: A Gentle Updo

The “pineapple” method is beloved by wavy and curly hair communities for good reason. Gather your hair into a very high, loose bun positioned near your forehead, secured with a silk or satin scrunchie. This placement keeps the bulk of your hair off your seat back, protecting your wave pattern from being flattened.
The silk or satin scrunchie is non-negotiable because these materials create minimal friction and won’t leave dent marks in your hair. Position the bun loose enough that you don’t feel any pulling or tension, as tight styles can cause breakage and headaches during long flights. This method works particularly well for shoulder-length to long wavy hair.
What to Avoid: Tight Ponytails and Metal Clips
Never use regular elastic hair ties, especially those with metal connectors, for travel hairstyles. These create severe tension points that can lead to breakage and leave deep creases in your hair that are nearly impossible to remove without rewashing. Similarly, avoid tight ponytails positioned at the back of your head, as these will be flattened by the headrest and can cause significant discomfort during the flight.
Metal clips and bobby pins can also create dents and pressure points, and they may set off metal detectors during security screening. Stick with fabric-covered hair ties or scrunchies made from hair-friendly materials.
Sealing in Moisture: Your Last Step Before the Airport
After arranging your protective hairstyle, apply a final moisture-sealing layer to create a barrier against the dry cabin air. Use a lightweight leave-in conditioner or three to five drops of hair oil, focusing application on your mid-lengths and ends where hair is oldest and most vulnerable to damage. Avoid applying too much product at your roots, as this can lead to greasiness.
Think of this step as weatherproofing your hair. Just as you’d apply sunscreen before sun exposure or moisturizer before facing cold winter air, this protective product layer shields your hair from the extreme environmental conditions it’s about to encounter. Argan oil, jojoba oil, and lightweight silicone serums work particularly well for this purpose without weighing down wavy hair.
Your Post-Flight Wavy Hair Rescue Plan: Step-by-Step Routines
This section addresses the core question that brought you to this guide, providing two distinct approaches based on your time constraints and available resources. Whether you’re rushing to a business meeting immediately after landing or have the luxury of a full hotel bathroom and an hour to spare, these routines will restore your waves to their pre-flight glory.
The 15-Minute Refresh: When You Have to Be Somewhere Immediately
Time-constrained travelers need an efficient strategy that delivers maximum results with minimal effort and products. This quick-fix approach transforms disaster-zone hair into presentable, professional-looking waves using techniques you can perform in an airport restroom or car.
Step 1: Gently Release Your Hair and Assess the Situation
Take down your protective style slowly and carefully, resisting the temptation to shake your head vigorously or run your fingers through your hair repeatedly. Use only your fingertips to gently separate the larger sections created by your braid or bun, working from the ends upward toward your roots. This gentle approach prevents creating additional frizz while you evaluate what specific problems need addressing.
Look for the primary issues: Are your roots flat? Is frizz the main concern? Do you have sections that lost their wave pattern entirely? Identifying your specific challenges helps you prioritize the next steps for maximum efficiency.
Step 2: Tame Frizz and Flyaways with Water-Activated Hands
Lightly dampen your palms with water from a restroom sink or a small spray bottle, then shake off the excess so your hands are just barely moist. Use the “praying hands” method by sandwiching sections of your hair between your palms and gently smoothing downward from roots to ends. This technique tames the fuzzy outer layer without disrupting your wave pattern or adding excessive moisture that would require drying time.
Focus this smoothing primarily on the surface layer of hair rather than saturating every strand. The goal is to encourage lifted cuticles to lay flat again, creating a smoother appearance and eliminating that wild, unkempt look.
Step 3: Reactivate Waves with a Travel-Sized Refresh Spray
Lightly mist your hair with a wave refresh spray, holding the bottle about eight to ten inches away to create a fine, even distribution rather than concentrated wet spots. If you don’t have a commercial refresh spray, create a DIY version by mixing water with a small amount of leave-in conditioner in a travel spray bottle (use approximately one part conditioner to ten parts water).
After misting, use scrunching motions to encourage your wave pattern to reform. Cup sections of hair in your palms and gently squeeze upward toward your scalp, repeating this motion several times on each section. You should hear a slight squelching sound as the product and water activate any styling products still remaining in your hair from your pre-flight routine.
Step 4: Add Volume at the Roots with the Flip and Shake Method
Flip your entire head upside down and gently shake your hair at the roots, using your fingers to lift the hair away from your scalp. This breaks up any flattening from the headrest and redistributes the hair for more even volume. While still upside down, scrunch your hair a few more times, then flip back upright.
Avoid touching your hair too much after this point, as the more you manipulate it, the more frizz you create. Allow it to air dry during your taxi ride or walk to your destination. The result won’t be perfect, but it will be dramatically improved and entirely acceptable for most situations.
The Full Reset: A Complete Revival Routine for Your Hotel or Home
When you have access to a shower and adequate time, a thorough refresh routine can completely restore your waves to their pre-travel condition. This approach is ideal for evening arrivals when you can dedicate proper attention to your hair before the next day’s activities.
Step 1: Detangle Before You Wet
Never attempt to detangle wavy hair while it’s dry and damaged from flight. Begin by applying a generous amount of conditioner or a dedicated detangling spray to your still-dry hair, focusing on any areas with knots or significant tangling. Allow this to sit for two to three minutes to soften the tangles.
Use your fingers or a wide-tooth comb to gently work through knots, always starting at the very ends and gradually working upward toward your roots. This bottom-up approach prevents pushing tangles tighter and reduces breakage significantly. Take your time with this step; rushing through detangling causes more damage than any other part of the hair care routine.
Step 2: To Wash or Co-Wash: Making the Right Choice
Assess whether your hair feels genuinely dirty or simply dry. If you only flew for a few hours and your hair doesn’t feel grimy or weighed down with product buildup, opt for a co-wash (conditioner-only wash) or a very gentle, sulfate-free hydrating shampoo. These cleanse without stripping the moisture your hair desperately needs after the dehydrating flight.
For longer flights or if you used heavy styling products before travel, a clarifying shampoo might be necessary to remove buildup. However, follow this immediately with a deep conditioning treatment to replace stripped moisture. Most travelers find that a standard sulfate-free shampoo strikes the right balance, providing adequate cleansing without excessive drying.
Similar to caring for wavy hair after the pool, post-flight hair needs extra gentleness during the cleansing process to avoid compounding the damage from environmental exposure.
Step 3: Maximize Hydration with the Squish to Condish Method
After shampooing, apply a generous amount of conditioner from your ears downward, using more product than you might normally use. Rather than simply rinsing it all out, employ the “squish to condish” technique that the wavy hair community swears by for maximum hydration and wave formation.
With your head flipped upside down under running water, cup handfuls of water and conditioner mixture in your palms and repeatedly squish it upward into your hair with a scrunching motion. You’ll hear a squelching sound as your hair absorbs water and product. Continue this process for at least two to three minutes, allowing your hair to become fully saturated with moisture.
Rinse out most but not all of the conditioner, leaving just enough that your hair still feels slightly slippery. This remaining conditioner provides additional moisture and slip for the next styling steps.
Step 4: Applying Your Stylers for Definition and Hold
With your hair still soaking wet (not just damp but actually dripping), apply your styling products. Wavy hair accepts and distributes products most evenly when thoroughly wet. Start with a moisturizing wave cream, using the praying hands method to smooth it through from mid-lengths to ends, then gently scrunch to encourage wave formation.
Follow with a gel for hold, which helps your waves maintain their pattern as they dry and provides frizz control. Use more gel than you think you need; wavy hair requires adequate product to form defined clumps and hold them through the drying process. The gel may create a crunchy cast initially, but you’ll scrunch this out once hair is completely dry.
Layer products in this specific order because lighter products (creams) penetrate better when applied first, while heavier products (gels) seal everything in and provide the exterior hold.
Step 5: Air-Drying vs. Using a Travel Diffuser
Air-drying is the gentlest option but takes the longest and may result in less volume. If you have the time and won’t be going anywhere for several hours, this is ideal for minimizing heat damage. Avoid touching your hair while it dries to prevent frizz and allow the gel cast to form properly.
If you need faster results or want more volume and definition, use a hair dryer with a diffuser attachment on low speed and low to medium heat. Hover the diffuser around sections of hair rather than aggressively scrunching with it, as too much manipulation creates frizz. Focus on drying the roots first to create lift, then gently diffuse the lengths until about 80 percent dry, allowing the last 20 percent to air dry.
Many frequent travelers invest in a compact travel diffuser that fits in checked luggage. While hotel hair dryers can technically work, they rarely have diffuser attachments and their high heat settings can undo all your careful restoration work.
Building Your Travel-Sized Wavy Hair Toolkit
Preparation prevents poor performance, and this applies perfectly to travel hair care. Having the right products in appropriate sizes means you can maintain your routine regardless of your destination. This curated toolkit ensures you’re never caught without essential items when your waves need rescue.
The Non-Negotiable Carry-On Essentials
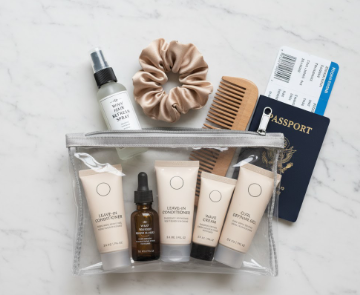
Your carry-on bag should contain the absolute minimum items needed for in-flight protection and immediate post-landing refresh. These TSA-compliant products (3.4 ounces or 100 milliliters or less) fit easily in your quart-sized liquids bag without taking valuable space.
A travel-sized refresh spray tops the list of essentials, as this single product can revive waves without requiring a full wash. Choose one that contains moisturizing ingredients rather than just water and alcohol, which would further dry your hair. A small bottle of lightweight hair oil or serum (argan, jojoba, or a silicone-based product) provides emergency frizz control and adds shine.
Don’t forget a silk or satin scrunchie for your protective in-flight hairstyle, and include a small tube of leave-in conditioner that serves multiple purposes: pre-flight protection, in-flight moisture boost for long flights, and post-landing detangler and styler. A wide-tooth comb rounds out the essentials for gentle detangling.
Checked Luggage Must-Haves for a Full Routine
Your checked bag can accommodate full-sized products or larger travel sizes for complete wash-day routines at your destination. Include travel-sized bottles (typically 8 to 12 ounces) of your preferred sulfate-free shampoo and hydrating conditioner. These larger sizes allow for multiple washes during extended trips without forcing you to use potentially unsuitable hotel products.
Pack your regular styling products including wave cream and gel in checked luggage. If you’re committed to maintaining your routine while traveling, a collapsible travel diffuser is an excellent investment. These compact accessories fold down to about half their operating size and work with most standard hotel hair dryers.
Consider decanting your favorite products into travel-sized containers rather than purchasing separate travel versions. This ensures product consistency and is more economical for frequent travelers. Many wavy-haired travelers looking into quality custom hair care options wonder is Prose worth it for the convenience of travel-sized custom formulations delivered regularly.
Expert Pick: The One Product to Never Travel Without
Celebrity hairstylist and curl specialist Christo of New York’s Christo Fifth Avenue salon emphasizes that if you could only pack one hair product for travel, it should be a high-quality, versatile leave-in conditioner. According to Christo, “A good leave-in conditioner functions as your detangler, your moisture replenisher, your styler, and your frizz controller. It’s the Swiss Army knife of wavy hair care, especially when you’re dealing with the dehydrating effects of air travel.”
Look for leave-in conditioners with ingredients like glycerin (a humectant that attracts moisture), panthenol (pro-vitamin B5 that strengthens and moisturizes), and natural oils for slip and shine. The product should be lightweight enough to not weigh down your waves but substantial enough to provide real benefits.
Advanced Strategies for Common Post-Flight Wavy Hair Problems
Beyond the basic refresh routines, specific issues require targeted solutions. These advanced techniques address the most frustrating post-flight hair problems that standard approaches don’t fully resolve, setting this guide apart from basic travel hair advice.
How to Restore Volume to Flat, Weighed-Down Roots
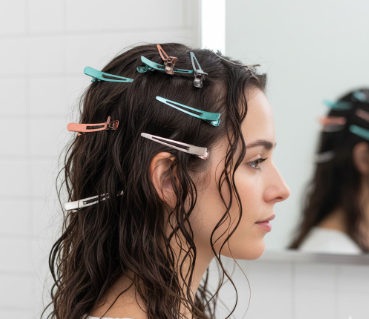
Flat roots plague wavy-haired travelers because the back of the head presses against the seat for hours, training hair to lie flat against the scalp. To counteract this, use root clips while your hair dries after your post-flight wash. These small clips lift the hair at the crown and strategic points around your head, allowing it to dry in an elevated position that creates natural volume.
If you don’t have root clips, try the “upside-down diffusing” technique. Flip your head completely upside down and diffuse the roots while using your free hand to lift sections away from your scalp. This encourages the roots to dry in a lifted position rather than flat against your head.
Once your hair is completely dry, apply a small amount of dry shampoo or texturizing spray directly at the roots only. Use your fingers to massage it into the scalp, which both absorbs any oil and creates additional lift. Alternatively, if your roots feel clean but simply lack volume, a lightweight volumizing spray applied at the roots while damp can make a significant difference.
Fixing Uneven Wave Patterns and Straightened-Out Pieces
Few things are more frustrating than achieving beautiful waves on most of your head while a few stubborn sections hang straight or form inconsistent patterns. This commonly occurs when certain areas press against the seat more than others or when some sections dry differently than the rest.
Target problem areas individually rather than re-doing your entire head. For a straightened-out piece, dampen just that section with your refresh spray, apply a small amount of gel, and then coil the section around one or two fingers to create a tight spiral. Hold for a few seconds, then release and allow it to dry (or diffuse gently). This technique creates a defined wave in that specific area without disturbing the rest of your hair.
For sections with weak or loosened wave patterns, the finger-coiling method also works, or you can try the “micro-scrunch” technique. Dampen the section, apply product, and use very small scrunching motions with just your fingertips to encourage tighter wave formation in that specific area.
The Climate Factor: Adjusting Your Routine for Your Destination
Experienced travelers know that your destination’s climate should influence your post-flight routine as much as the flight itself does. Environmental humidity levels dramatically affect how wavy hair behaves and which products work best. This climate-specific approach demonstrates advanced understanding of hair science.
Arriving in a Humid Climate
When traveling to humid destinations like Miami, New Orleans, Houston, or anywhere tropical, your primary concern shifts from dryness to frizz control and wave definition maintenance. Humidity causes the hair shaft to absorb moisture from the air, which makes the cuticle swell and creates frizz while potentially loosening your wave pattern.
For humid climates, adjust your post-flight routine to include stronger-hold products with anti-humectant properties. Use gels rather than lighter creams as your primary styler, and consider products containing ingredients like amodimethicone or other silicones that create a barrier against atmospheric moisture. Apply products generously and ensure your hair is completely dry before going outside, as damp hair absorbs humidity even more readily.
A hard gel cast is your friend in humid environments, so don’t scrunch it out as thoroughly as you might normally. Leave a slight amount of crunch to maintain definition throughout the day. Some travelers also find that applying a light layer of anti-humidity serum or oil to completely dry hair provides an additional protective barrier.
Arriving in a Dry Climate
Desert destinations and high-altitude cities like Denver, Phoenix, Las Vegas, or Albuquerque present the opposite challenge. The air remains extremely dry, sometimes even drier than the airplane cabin you just left. In these environments, your hair will continuously lose moisture, becoming increasingly dry, brittle, and prone to static throughout your stay.
Adjust your routine to prioritize moisture retention above all else. Use richer, cream-based products rather than lightweight gels. Leave-in conditioners become absolutely essential and should be applied generously. Consider layering multiple moisturizing products: a leave-in conditioner, then a wave cream, then just a light gel for minimal hold.
Some travelers find that applying a small amount of hair oil to completely dry hair helps seal in moisture throughout the day in dry climates. Drink extra water to hydrate from within, and consider using a portable travel humidifier in your hotel room overnight to prevent your hair from drying out while you sleep.
You might also reduce the frequency of shampooing during trips to dry climates, opting for water-only refreshes or co-washing instead to preserve your hair’s natural oils. The same moisture-preservation strategies you’d use after spending time in chlorinated water, similar to wavy hair after the pool, apply to extremely dry climates.
Arrive and Thrive with Confident Wavy Hair
Air travel doesn’t have to mean automatic bad hair days and frustrating recovery periods. By understanding the science behind airplane hair damage, preparing strategically before your flight, protecting your waves during travel, and knowing exactly how to refresh them after landing, you can step off the plane with hair that looks nearly as good as when you left home. The three-part approach of preparation, protection, and targeted recovery transforms travel hair care from reactive damage control to proactive maintenance.
Whether you have fifteen minutes in an airport restroom or a full hour in your hotel bathroom, the techniques in this guide provide solutions for every situation and timeframe. Remember to adjust your approach based on your destination’s climate, pack your essential products in travel-friendly sizes, and never underestimate the power of that pre-flight protective hairstyle. With these strategies in your travel toolkit, you can focus on enjoying your journey and destination rather than stressing about your hair.
Frequently Asked Questions About Taking Care of Wavy Hair After a Flight
Should I wet my wavy hair after a flight?
Yes, at least lightly misting it is beneficial. A refresh spray or light water application reactivates your wave pattern and combats the extreme dryness from cabin air. You don’t need a full wash for every flight, but some moisture is essential for revival.
How do you revive flattened waves without washing?
Flip your hair upside down and gently shake at the roots to break up flatness. Lightly mist with a refresh spray and scrunch upward with your hands to reform waves. This technique takes under five minutes and works remarkably well for restoring volume and definition.
What is the best protective hairstyle for wavy hair on a plane?
A loose, high bun positioned near your forehead and secured with a silk or satin scrunchie provides optimal protection. This “pineapple” style keeps hair off the seat back, protects ends, and minimizes flattening. Loose braids offer an excellent alternative that also preserves wave patterns.
How do I stop my hair from getting so frizzy on an airplane?
Prevention is key. Deep condition one to two days before flying and apply leave-in conditioner or light oil before boarding to seal in moisture. Wear your hair in a protective style during the flight to minimize exposure to dry air and friction against seat materials.
Is dry shampoo a good idea for wavy hair after a flight?
Use it sparingly and strategically. Dry shampoo works well for absorbing oil and adding root volume, but it can be drying. Apply only at the roots if needed, and balance by hydrating your mid-lengths and ends with moisture-rich products.
Can I use a hotel hair dryer on my wavy hair?
Proceed with caution. Hotel dryers typically lack diffuser attachments and run very hot, both of which create frizz. If you must use one, select the lowest heat and speed settings and keep it moving rather than concentrating on one area. A travel diffuser attachment is a much better option.
What do I do if my hair is extremely tangled after a flight?
Never brush or comb dry, tangled hair aggressively. Apply generous amounts of conditioner or detangling spray to the knotted areas and let it sit for two to three minutes. Use your fingers to gently work through knots from the ends upward, taking your time to prevent breakage.
Does drinking more water on the plane really help my hair?
Absolutely. The cabin air dehydrates your entire body, including your hair follicles and scalp. Maintaining good hydration by drinking plenty of water during your flight helps combat this internal dehydration, making your hair less prone to dryness and brittleness when it’s already facing external environmental stress.
