Table of Contents
- How To Take Care Of Wavy Hair After Pool?
- The Science: What Pool Water Really Does to Your Wavy Hair
- The Preemptive Strike: How to Protect Wavy Hair Before You Swim
- The Ultimate Post-Pool Wavy Hair Care Routine: A Step-by-Step Guide
- Troubleshooting Common Post-Pool Wavy Hair Problems
- Building a Long-Term Strategy for Frequent Swimmers
- Embrace the Water Without Wrecking Your Waves
- Frequently Asked Questions
This blog post may contain affiliate links. As an Amazon Associate I earn from qualifying purchases.
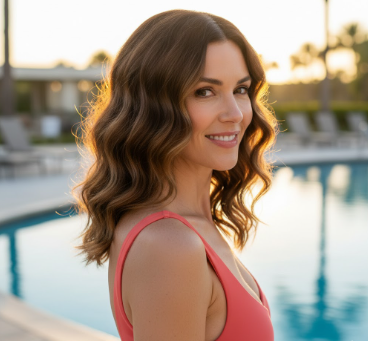
How To Take Care Of Wavy Hair After Pool?
If you have wavy hair and love swimming, you’ve likely experienced the frustration of stepping out of the pool only to find your beautiful wave pattern transformed into a frizzy, tangled mess. The telltale signs are all too familiar: waves that lose their definition and turn limp or stringy, frizz that seems to multiply exponentially, impossible tangles, and an overall dryness that makes your hair feel more like straw than silk.
This comprehensive guide addresses exactly how to take care of wavy hair after pool exposure, providing both prevention strategies and restoration techniques that actually work. The good news is that with the right knowledge and a consistent routine, you can enjoy all the swimming you want without sacrificing the health and beauty of your waves. Whether you’re an occasional summer swimmer or hit the pool multiple times per week, the science-backed steps in this article will help you maintain gorgeous, healthy wavy hair year-round.
The Science: What Pool Water Really Does to Your Wavy Hair
Understanding why pool water wreaks havoc on your waves is the first step toward protecting them. When you know what’s happening at a chemical level, you’ll understand why each step in your care routine matters and be more motivated to stick with it. The damage from chlorine isn’t just superficial; it penetrates deep into your hair’s structure, affecting both the outer protective layer and the inner bonds that create your wave pattern.
How Chlorine Strips and Damages the Hair Cuticle
Chlorine is an extremely powerful oxidizing agent, which is exactly why it’s so effective at keeping pools clean and bacteria-free. Unfortunately, that same oxidizing power doesn’t discriminate between harmful bacteria and the protective structures of your hair.
When chlorine comes into contact with your hair, it immediately begins stripping away the natural oils, primarily sebum, that coat each strand. Sebum acts as your hair’s first line of defense, providing a protective barrier that keeps moisture locked in and environmental stressors locked out.
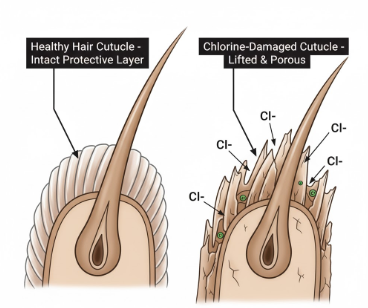
Once this protective oil layer is compromised, chlorine penetrates deeper and begins lifting the hair cuticle, which is the outermost layer of overlapping cells that should lie flat and smooth. Think of the cuticle like shingles on a roof when they’re flat and tightly arranged, your hair feels smooth, looks shiny, and retains moisture effectively. When chlorine lifts these cuticles, your hair becomes rough to the touch, loses its natural sheen, and becomes highly porous, allowing moisture to escape rapidly.
This increased porosity is the primary culprit behind that terrible dry, straw-like feeling you experience after swimming. Your hair literally cannot hold onto the moisture it needs because the protective structure has been compromised. The lifted cuticles also catch on each other, creating tangles that can lead to breakage when you try to comb through wet hair.
The Impact on Wavy Hair’s Unique Structure
Wavy hair occupies a middle ground between straight and curly textures, but this middle position doesn’t mean it escapes the challenges of either type. In fact, wavy hair often faces unique difficulties that make it particularly vulnerable to chlorine damage.
The natural wave pattern means that your hair’s shape creates areas where the cuticle naturally lifts slightly, particularly along the curves of each wave. This makes wavy hair inherently more prone to dryness than straight hair because moisture has more opportunities to escape along the bends and curves of each strand.
Chlorine damage compounds this problem significantly. Beyond just creating surface roughness, chlorine attacks the protein bonds within your hair shaft, specifically the disulfide bonds that are responsible for giving your hair its shape and structure. These bonds are what create and maintain your S-shaped wave pattern.
When chlorine weakens these bonds, your waves lose their structural integrity. Some sections may become limp and fall flat, while others might frizz outward in unpredictable directions. Many wavy-haired swimmers notice that their wave pattern becomes inconsistent after pool exposure, with some pieces maintaining definition while others turn stringy or shapeless. This inconsistency happens because chlorine doesn’t damage hair uniformly; certain areas may be more exposed or vulnerable than others.
The protein structure of wavy hair also makes it more susceptible to breakage when compromised by chlorine, especially during the detangling process when hair is wet and at its most vulnerable. Wet hair can stretch up to 50 percent beyond its normal length, and when the protein bonds are already weakened, this stretching can cause permanent damage.
Chlorine vs. Saltwater vs. Bromine Pools: Is There a Difference?
While chlorine is the most common pool sanitizer and the most damaging to hair, it’s not the only option swimmers encounter. Understanding the differences between sanitizers can help you adjust your hair care routine accordingly.
Chlorine remains the most aggressive chemical for hair. Its strong oxidizing properties make it highly effective at sanitization but equally destructive to hair proteins and natural oils. Regular exposure without proper protection can lead to cumulative damage that becomes increasingly difficult to repair.
Saltwater pools, despite their name, still use chlorine; they just generate it differently through electrolysis of salt. While the chlorine levels may be slightly lower and more stable than traditionally chlorinated pools, saltwater is still significantly dehydrating. The salt itself can leave mineral deposits on your hair shaft, creating a gritty texture and further contributing to dryness. Many swimmers find saltwater pools slightly gentler, but they still require a thorough post-swim routine.
Bromine is less common but gaining popularity as a pool sanitizer, particularly in hot tubs and indoor pools. While chemically similar to chlorine, bromine is generally considered less harsh on hair and skin. It has a less aggressive odor and doesn’t break down as quickly in warm water or sunlight. However, bromine can still strip natural oils and lift the cuticle, so protective measures and post-swim care remain important.
Ocean saltwater presents yet another scenario. Without added chemicals, ocean water is less damaging than chlorinated pools, but the high salt concentration is extremely dehydrating. Salt draws moisture out of the hair shaft through osmosis, and when combined with sun exposure and wind, can leave wavy hair feeling dry, brittle, and tangled. The minerals in ocean water can also build up on the hair over time, weighing down waves and creating dullness.
The Preemptive Strike: How to Protect Wavy Hair Before You Swim
Prevention is always easier and more effective than repair when it comes to chlorine damage. Taking just a few minutes to protect your hair before entering the pool can dramatically reduce the amount of damage and make your post-swim routine much more effective. Think of pre-swim protection as building a shield around each strand the stronger your shield, the less work you’ll need to do afterward.
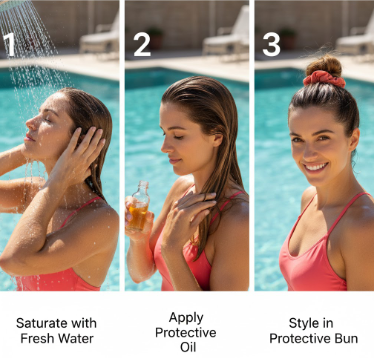
The Saturate and Seal Method: Your First Line of Defense
The saturate and seal method is based on a simple principle: hair is like a sponge. A dry sponge readily absorbs whatever liquid it encounters first, while a saturated sponge has limited capacity to absorb additional liquid. By completely saturating your hair with clean, fresh water before swimming, you dramatically reduce the amount of chlorinated water your hair can absorb.
This step alone can reduce chlorine absorption by up to 50 percent. The key is to make sure your hair is thoroughly wet not just damp. Take a few minutes under the pool shower or rinse your hair completely with a water bottle. Pay special attention to the ends of your hair, which tend to be the driest and most porous.
The second step is to seal the hair shaft by applying a protective layer that creates a physical barrier between your hair and the pool water. This sealing layer should be hydrophobic, meaning it repels water, preventing chlorinated water from penetrating the hair shaft even when your initial fresh water rinse begins to dissipate.
Apply your chosen protective product generously from mid-length to ends, where hair is most vulnerable. Don’t be shy with the application you want a substantial coating. Some swimmers even reapply their protective product halfway through long swim sessions for maximum protection.
Best Products to Seal Your Hair Pre-Swim
Choosing the right product to seal your hair depends on your hair’s porosity, thickness, and how frequently you swim. Here are the most effective options:
Leave-in conditioner creates a moisture barrier while also providing some conditioning benefits. Look for products with ingredients like dimethicone or other silicones that create a water-resistant coating. Leave-in conditioners work well for wavy hair because they provide protection without weighing down your wave pattern.
Hair oils are naturally hydrophobic and provide excellent protection against water penetration. Coconut oil is particularly popular among swimmers because its molecular structure allows it to penetrate the hair shaft slightly, providing protection from both the outside and within. Jojoba oil closely mimics the hair’s natural sebum and creates a protective film without feeling greasy. Argan oil is rich in vitamin E and fatty acids, offering both protection and nourishment. For best results, warm a small amount between your palms and distribute evenly through damp hair.
Specialized swimmer’s creams and pre-swim products are formulated specifically to create a protective barrier against chlorine. Brands like SwimSpray, Triswim, and SOLV offer pre-swim products that contain chelating ingredients to prevent chlorine bonding as well as conditioning agents. These products are particularly worthwhile for frequent swimmers or those with color-treated or chemically processed hair.
Some experienced swimmers combine products for maximum protection, layering a leave-in conditioner followed by an oil for a double barrier effect. Experiment to find what works best for your hair type and swimming frequency.
The Power of a Protective Hairstyle
Simply putting your hair up before swimming can significantly reduce the amount of damage your waves sustain. Protective hairstyles minimize your hair’s surface area exposure to chlorinated water and reduce the likelihood of tangles, matting, and breakage.
A high bun or topknot keeps the majority of your hair out of the water, especially if you’re swimming laps and not submerging your head with every stroke. Secure the bun with a soft scrunchie rather than a tight elastic, which can create creases and breakage points in your wave pattern.
Braids are another excellent option, particularly for longer wavy hair. A single braid down the back, two French braids, or even multiple small braids all work to contain your hair and limit water exposure. Braiding also helps prevent the tangling that wavy hair is prone to when wet and tossed around in the water. The wave pattern you get when you take down braids can actually be a pleasant bonus, giving you defined, enhanced waves.
For those who want to keep hair completely off the neck, a braided bun combines both techniques. Create one or two braids and then coil them into a bun at the crown or nape of your neck.
Remember to braid gently and not too tightly, as wet hair is vulnerable and excessive tension can cause breakage. Apply your protective oil or conditioner before styling for maximum benefit.
To Swim Cap or Not to Swim Cap?
The swim cap question divides swimmers, but from a hair protection standpoint, the answer is clear: a swim cap provides the ultimate protection for your waves. However, whether you choose to wear one depends on your priorities, comfort level, and swimming frequency.
A properly fitted swim cap creates a barrier that keeps most though not all water away from your hair. While some water will inevitably seep in around the edges, a cap dramatically reduces overall exposure. For competitive swimmers, those who swim daily or multiple times per week, or anyone with color-treated, bleached, or already damaged wavy hair, a swim cap is strongly recommended.
Silicone caps are the best choice for hair protection. Unlike latex caps, which can pull and snag hair, silicone caps are smooth, more comfortable, and create a better seal against water. They’re also more durable and don’t break down as quickly with exposure to chlorine and sun.
To maximize protection when using a swim cap, first put your pre-treated hair into a protective style like a bun or braid, then carefully tuck all your hair into the cap. Some swimmers apply a bit of leave-in conditioner around their hairline to prevent the cap from pulling or creating friction.
The downsides to swim caps are legitimate: they can feel tight and uncomfortable, create an unflattering appearance that some people dislike, and cause headaches if worn too tightly. If you choose not to wear a cap, commit to being extra diligent about the saturate and seal method and your post-swim routine.
A middle-ground option is to use a swim cap for serious training sessions but skip it for casual, recreational swimming where your head isn’t constantly submerged. This approach balances hair health with comfort and enjoyment.
The Ultimate Post-Pool Wavy Hair Care Routine: A Step-by-Step Guide
Even with perfect prevention, your hair will still have some exposure to chlorine and will need proper care afterward. This step-by-step routine is designed specifically for wavy hair’s unique needs, addressing both the damage caused by chlorine and the specific requirements for maintaining your wave pattern. Consistency is key following this routine after every swim will keep your waves healthy, defined, and beautiful.
Step One: Rinse Immediately with Fresh Water
The single most important thing you can do for your hair after swimming is to rinse it with fresh water as quickly as possible. This step is so critical that it should happen immediately before you even leave the pool area.
Do not let pool water dry in your hair. As chlorinated water evaporates, it leaves behind concentrated chlorine and other chemicals that continue damaging your hair long after you’ve left the pool. These chemicals can crystallize on and within the hair shaft, causing ongoing oxidation and protein degradation.
Head to the poolside showers and rinse your hair thoroughly for at least two to three minutes. Use lukewarm water and really work your fingers through your hair to flush out as much chlorine as possible. Focus on the scalp and roots, where chemicals can accumulate, as well as the lengths and ends.
If your pool doesn’t have showers or you’re swimming at a location without facilities, bring a large water bottle or jug filled with fresh water specifically for rinsing your hair. Many dedicated swimmers keep a gallon jug in their swim bag for exactly this purpose.
This immediate rinse removes the majority of surface-level chlorine before it has time to penetrate deeper into your hair shaft. It’s a simple step that takes just minutes but makes an enormous difference in minimizing long-term damage.
Step Two: Cleanse with the Right Shampoo
Once you’re home or in a proper shower facility, it’s time to shampoo your hair. However, not just any shampoo will effectively remove chlorine and mineral buildup from your waves. The type of shampoo you use should be determined by how frequently you swim and how much buildup your hair tends to accumulate.
Regular daily shampoos, even high-quality ones, often aren’t formulated to remove the specific chemical and mineral deposits that pool water leaves behind. This is where specialized cleansing products become important for maintaining healthy wavy hair as a swimmer.
When to Use a Clarifying or Chelating Shampoo
Understanding the difference between clarifying and chelating shampoos helps you choose the right product for your needs. A clarifying shampoo is designed to remove product buildup, excess oils, and surface-level impurities. It provides a deep clean that leaves hair feeling squeaky clean and ready to absorb conditioning treatments.
A chelating shampoo goes a step further. Chelating shampoos contain specific ingredients like EDTA (ethylenediaminetetraacetic acid), which bind to metal ions and minerals like chlorine, copper, calcium, and magnesium. These ingredients quite literally grab onto these deposits and pull them out of the hair shaft. This makes chelating shampoos particularly effective for swimmers because they address the specific type of buildup that pool water creates.
For frequent swimmers who are in the pool three or more times per week, a chelating shampoo should be used after every swim. Look for products specifically marketed to swimmers or containing EDTA, phytic acid, or citric acid in the ingredient list. Brands like Malibu C, Paul Mitchell Shampoo Three, and Ultraswim make excellent chelating formulas.
Apply the chelating shampoo to wet hair and massage thoroughly into the scalp and through the lengths. Let it sit for two to three minutes to allow the chelating agents to work before rinsing completely. You may need to shampoo twice if you swam for an extended period or if your hair feels particularly coated or slippery.
The Gentle Sulfate-Free Approach for Less Frequent Swimmers
If you only swim occasionally once a week or less and you rinse your hair immediately after swimming, you may be able to use a gentle, sulfate-free moisturizing shampoo instead of a harsh clarifying or chelating formula.
Sulfate-free shampoos clean without stripping away all of your hair’s natural oils, which is beneficial for wavy hair that’s already prone to dryness. Look for formulas that contain mild surfactants like cocamidopropyl betaine or sodium cocoyl isethionate, and include moisturizing ingredients like glycerin, aloe vera, or coconut oil.
However, pay attention to how your hair feels over time. If you notice your waves becoming weighed down, dull, or difficult to style, or if your hair feels gummy or coated even after washing, these are signs that you have chlorine or mineral buildup that a gentle shampoo isn’t removing. In this case, do a clarifying or chelating treatment to reset your hair, then return to your gentle shampoo.
Many occasional swimmers find success alternating between a gentle sulfate-free shampoo for regular post-swim washes and a clarifying treatment once every two to three weeks to prevent buildup accumulation.
Step Three: Deep Condition to Restore Moisture and Repair
Deep conditioning after swimming is non-negotiable for wavy hair. Chlorine is incredibly dehydrating, and a deep conditioner or hair mask is essential to replenish lost moisture, repair surface damage, and restore your hair’s elasticity and strength.
While a regular conditioner provides surface-level moisture and detangling, a deep conditioning treatment contains higher concentrations of moisturizing and protein ingredients that can penetrate the hair shaft to repair damage from within. After chlorine exposure has lifted your cuticles and increased porosity, your hair is actually in an optimal state to absorb these beneficial ingredients.
Look for deep conditioners that contain a balance of moisturizing and strengthening ingredients. Humectants like glycerin, honey, and aloe vera draw moisture into the hair shaft and help it stay there. Emollients like shea butter, coconut oil, and avocado oil smooth the hair surface and seal in moisture. Proteins like hydrolyzed wheat protein, silk protein, and keratin help rebuild the damaged protein structure that gives your waves their shape.
Ceramides are another powerhouse ingredient for wavy hair. These lipid molecules help repair the hair’s natural protective layer and reduce porosity, making your hair better able to retain moisture long-term.
Apply your deep conditioner generously from roots to ends, focusing especially on the mid-lengths and ends where damage tends to be most severe. Use your fingers to work the product through your hair, making sure every strand is coated.
Leave the treatment on for at least 15 to 20 minutes. Many swimmers use this time to complete other shower tasks or even leave the treatment on while they get dressed and prepare for the day. For severely damaged hair, leaving a deep conditioner on for 30 to 45 minutes provides even better results.
Heat enhances the effectiveness of deep conditioning treatments. If possible, cover your hair with a shower cap and apply gentle heat with a hair dryer for five to ten minutes, or simply let the steam from a hot shower create a warm environment. Heat helps the hair cuticle open slightly, allowing the beneficial ingredients to penetrate more deeply.
Step Four: Detangle with Extreme Care
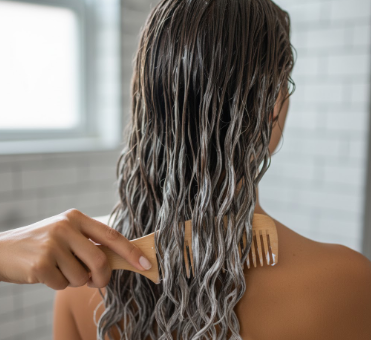
Detangling wavy hair after swimming requires patience and the right technique. Hair is at its most fragile when wet, and post-chlorine hair with lifted cuticles is even more vulnerable to breakage. Rushing through this step or using the wrong tools can cause significant damage and breakage that compromises your wave pattern.
The best time to detangle is while your deep conditioner is still in your hair. The slip provided by the conditioner allows your detangling tool to glide through your hair more easily, reducing friction and breakage.
Start by using your fingers to gently separate any major tangles or clumps. Work slowly and carefully, starting from the very ends of your hair and gradually working your way up toward the roots. This bottom-to-top approach prevents you from dragging tangles down the hair shaft, which makes them tighter and more difficult to remove.
Once you’ve finger-detangled, use a wide-tooth comb or a specialized wet-detangling brush like a Tangle Teezer or Wet Brush. These tools have flexible bristles that bend and give when they encounter resistance, rather than pulling and breaking the hair.
Again, start from the ends and work up in small sections. If you encounter a stubborn tangle, don’t force it. Apply more conditioner to that section and use your fingers to gently work the tangle loose before attempting to comb through again.
For severely tangled hair, some people find that adding a bit of conditioner to a spray bottle with water and misting their hair creates additional slip that makes detangling easier.
Never brush or comb wavy hair when it’s dry, and avoid brushing vigorously even when wet. Wavy hair gets its definition from natural clumps and groupings of strands, and excessive brushing disrupts these clumps, leading to frizz and loss of wave pattern.
Step Five: Apply Leave-In Products and Style for Wave Definition
After rinsing out your deep conditioner, it’s time to apply styling products that will seal in the moisture you’ve just replenished and help your wave pattern reform into defined, frizz-free curls. This step is crucial because how you treat your hair in its wet state determines how it will look once dry.
The goal is to encourage your hair’s natural wave pattern while providing enough hold to combat frizz and maintain definition as your hair dries. For those interested in exploring different styling approaches that work with your natural texture, resources like Care About Your Hair offer valuable insights into working with your hair’s unique characteristics.
Layering Products on Soaking Wet Hair
The key to successful wavy hair styling is applying products to soaking wet hair. Many people make the mistake of squeezing out excess water before applying products, but for wavy hair, maximum water content is your friend. Water helps distribute products evenly and dilutes them slightly so they don’t weigh down your waves.
After rinsing out your deep conditioner, gently squeeze your hair to remove only the dripping water, but leave it thoroughly wet. Your hair should still be dripping when you apply your styling products.
The LOC method, which stands for Leave-in, Oil, Cream, or the LCO method, Leave-in, Cream, Oil, are popular layering techniques that work well for wavy hair. These methods ensure that your hair receives multiple layers of moisture and hold.
Start with a leave-in conditioner. Apply a generous amount, focusing on the mid-lengths and ends. Leave-in conditioner provides a base layer of moisture and makes your hair more receptive to the products that follow. Look for lightweight leave-ins that won’t weigh down your waves ingredients like aloe vera juice, marshmallow root extract, and lightweight proteins work well.
Next, apply either an oil or a cream, depending on which method you’re following. A lightweight oil like argan or grapeseed oil helps seal the hair cuticle and lock in moisture. Use just a small amount too much oil can make wavy hair look greasy and weigh down the wave pattern.
Finally, apply your styling product. For wavy hair, gels and mousses tend to work better than heavy creams. Gels provide hold without weight, helping your waves maintain their shape as they dry while reducing frizz. Look for gels with humectants like glycerin or flaxseed extract, which help your hair retain moisture. Mousses add volume and lift at the roots while providing light to medium hold throughout the lengths.
Apply your gel or mousse by raking it through your hair with your fingers, then follow up with scrunching to encourage wave formation. Use more product than you think you need wavy hair often requires generous product application for best results.
Styling Techniques to Revive Your Wave Pattern
Once your products are applied, styling techniques help coax your wave pattern back to life and ensure your hair dries with maximum definition and minimum frizz.
Scrunching is the foundation technique for wavy hair. Cup sections of your hair in your palm and gently squeeze upward toward your scalp, holding for a few seconds before releasing. This motion encourages your hair to form clumps and waves. Scrunch until you hear a slight squelching sound and your hair starts to form defined wave patterns.
Plopping is a technique that involves using a microfiber towel or a soft cotton t-shirt to absorb excess water while maintaining your wave pattern. Lay the towel or t-shirt flat on a surface, flip your wet hair into the center, then wrap the fabric around your head and secure it. Leave your hair plopped for 15 to 30 minutes. This technique helps set your wave pattern, reduces frizz by preventing the hair from being disturbed as it dries, and cuts down on drying time.
Glazing is useful for smoothing the hair’s canopy, the top layer that’s most visible and most prone to frizz. Take a small amount of gel or mousse, rub it between your palms until your hands are just barely coated, then gently glide your hands over the surface of your hair without disturbing the clumps underneath. This technique tames flyaways without weighing down your waves.
For air drying, resist the urge to touch your hair as it dries. Every time you touch your hair while it’s drying, you disrupt the forming wave pattern and create frizz. Let your hair dry completely untouched.
If you use a hair dryer, attach a diffuser and use low heat and low airflow. Cup sections of your hair in the diffuser bowl and hold the dryer still for 30 to 60 seconds before moving to the next section. Avoid moving the dryer around continuously, as this creates frizz.
Once your hair is completely dry, you may notice it feels crunchy from the gel. This is normal and desired. Gently scrunch your hair with your hands or with a small amount of oil on your palms. This technique, called “scrunching out the crunch,” breaks the gel cast and leaves your waves soft, touchable, and defined.
Troubleshooting Common Post-Pool Wavy Hair Problems
Even with a solid routine, you may encounter specific challenges that require targeted solutions. Understanding how to troubleshoot these common issues will help you adapt your approach and achieve consistently great results. Different hair problems have different root causes, and identifying what’s actually happening with your hair allows you to address the issue effectively rather than just treating symptoms.
Help! My Waves Are Limp and Undefined
If your waves are falling flat and losing their shape after swimming, despite following a proper routine, you’re likely experiencing one of two common issues: moisture-protein imbalance or product buildup.
Hair needs both moisture and protein to maintain its structure and elasticity. Moisture provides hydration and softness, while protein provides strength and structure. When hair has too much moisture and not enough protein, it becomes overly soft, mushy, stretchy, and limp. This is called moisture overload, and it’s common after excessive conditioning or if you’re using only moisturizing products without any protein.
If your hair feels very soft, almost gummy, and your waves won’t hold their shape, you likely need a protein treatment. Look for products containing hydrolyzed proteins like hydrolyzed wheat protein, keratin, collagen, or silk amino acids. Apply a protein treatment as you would a deep conditioner, leave it on for the recommended time, and follow with a moisturizing conditioner to prevent your hair from becoming stiff.
Start with a light protein treatment and assess how your hair responds before using stronger treatments. Some people need protein after every swim, while others only need it once a week or every other week. Pay attention to how your hair feels when balanced, it should have some body and bounce while still feeling soft.
The opposite problem, protein overload, occurs when you use too many protein-rich products. Hair becomes stiff, brittle, and prone to breakage. If this happens, focus on moisturizing treatments and avoid protein temporarily until your hair regains its flexibility.
Product buildup is another common cause of limp waves. Even if you’re using the right products, over time, conditioning agents, oils, and styling products can accumulate on your hair shaft, weighing it down and preventing your wave pattern from forming properly. If your hair feels coated, looks dull even when wet, or feels slippery but not clean, you have buildup.
The solution is a clarifying treatment. Use a clarifying or chelating shampoo to strip away all the accumulated products, then follow with a deep conditioning treatment and start fresh with your styling routine. Many wavy-haired swimmers find they need to clarify every two to three weeks to prevent buildup from recurring.
How to Banish Post-Swim Frizz and Flyaways
Frizz after swimming is one of the most common and frustrating problems for wavy hair. The root cause is the lifted, damaged cuticle that chlorine creates, but several strategies can help minimize and control frizz even after chlorine exposure.
Deep conditioning is your first line of defense. Consistently using a moisturizing deep conditioner after every swim helps smooth the cuticle and reduce the rough texture that causes frizz. The more you can repair and smooth your hair’s surface, the less frizzy it will be.
Using the right styling products also makes a significant difference. Look for products with anti-humectant properties if you live in a humid climate. Ingredients like dimethicone and other silicones create a protective film that prevents atmospheric moisture from penetrating the hair shaft and causing frizz. While some people avoid silicones, they can be particularly beneficial for swimmers because they provide protection against both pool chemicals and humidity.
Ensure you’re applying enough product. Wavy hair often needs more product than people initially think, especially when compromised by chlorine. If you’re experiencing frizz, try increasing the amount of leave-in conditioner and gel you use.
The way you dry your hair also impacts frizz levels. Air drying generally produces less frizz than heat styling, but if you must use a dryer, always use a diffuser on low heat and low speed. Never rough-dry wavy hair with a towel or rub it vigorously, as this creates friction that lifts the cuticle and causes frizz.
A final cool water rinse after conditioning can help seal the hair cuticle and reduce frizz. Cool water encourages the cuticle scales to lie flat, creating a smoother surface. After your final conditioning step, rinse your hair for 30 to 60 seconds with the coolest water you can comfortably tolerate.
Managing frizz is an ongoing process, especially for swimmers. Be patient with your hair and consistent with your routine, and you’ll see improvement over time.
Dealing with Green Hair: A Fix for Blondes and Light-Haired Waves
If you have blonde, gray, or light brown hair and notice a greenish tint developing after swimming, you’re experiencing a common but fixable issue. Contrary to popular belief, chlorine itself doesn’t turn hair green. The green color comes from copper and other metal ions present in pool water, which oxidize and bond to the hair shaft, creating a greenish tint.
This problem is most noticeable on lighter hair colors but can affect anyone with chemically lightened or porous hair. The copper oxidizes when exposed to chlorine, and the oxidized copper attaches to the proteins in your hair, causing the characteristic green color.
Several solutions can remove this unwanted tint and prevent it from returning.
Specialized swimmer’s shampoos are formulated specifically to remove mineral deposits and the green tint they create. Brands like UltraSwim, Malibu C Hard Water Wellness Shampoo, and Paul Mitchell Shampoo Three contain chelating ingredients that bind to metal ions and remove them from the hair. Use these shampoos as directed, often requiring you to lather, leave on for several minutes, and rinse thoroughly. You may need to shampoo two or three times for severe discoloration.
The tomato or ketchup mask is a surprisingly effective home remedy backed by science. The acid in tomatoes neutralizes the green copper oxide, breaking its bond with your hair. To use this method, apply plain tomato ketchup or tomato juice generously to your dry hair, focusing on the areas with the most green tint. Cover your hair with a shower cap and leave it on for 15 to 30 minutes. The stronger the green tint, the longer you should leave it on. Rinse thoroughly with warm water, then shampoo and condition as normal. You may need to repeat this treatment several times for severe greening.
The aspirin rinse is another acidic treatment that can help strip mineral deposits. Dissolve six to eight aspirin tablets in warm water, creating a saturated solution. After shampooing, pour the aspirin solution over your hair and let it sit for 10 to 15 minutes. The salicylic acid in aspirin helps break down the metal deposits. Rinse thoroughly and follow with a deep conditioner to counteract any drying effects.
Prevention is always better than treatment. If you’re prone to green hair, wearing a swim cap is highly recommended. Additionally, always wet your hair with fresh water and apply a protective oil or conditioner before swimming. These preemptive measures create a barrier that prevents copper from bonding to your hair in the first place.
If the green tint persists despite home treatments, a professional color correction service may be necessary. Hair stylists have access to stronger chelating treatments and can remove stubborn mineral deposits that home remedies can’t address.
Building a Long-Term Strategy for Frequent Swimmers
If swimming is a regular part of your fitness routine or lifestyle, managing your wavy hair requires more than just individual post-swim treatments. A comprehensive long-term strategy helps you maintain your hair’s health despite repeated chlorine exposure. This approach balances effective cleansing with intensive conditioning and incorporates cutting-edge treatments that repair damage at a molecular level.
Your Weekly Wavy Hair Care Schedule
Creating a structured weekly routine takes the guesswork out of hair care and ensures your waves get the consistent treatment they need to stay healthy. Here’s a sample schedule for someone who swims three to four times per week, which you can adjust based on your swimming frequency and how your hair responds.
After each swim session, always rinse immediately with fresh water at the pool, then follow with a full wash routine once you’re home. Use a chelating or clarifying shampoo after every swim to prevent chlorine and mineral buildup. This frequent clarifying is necessary for regular swimmers, even though it might seem excessive compared to non-swimmer routines.
Follow every clarifying wash with a deep conditioning treatment. This consistent pattern of cleansing and conditioning helps maintain your hair’s moisture-protein balance despite the harsh effects of repeated chlorine exposure.
On non-swim days, if your scalp needs cleansing, consider a co-wash instead of shampooing. Co-washing means using a cleansing conditioner that gently cleanses the scalp without stripping oils from your hair. This gives your hair a break from the clarifying shampoo while still maintaining scalp health.
Incorporate a protein treatment once a week or every other week, depending on how your hair responds. Schedule this for a day when you have more time, and pay attention to how your waves hold their shape afterward. If your hair feels stiff or brittle, reduce protein frequency. If waves are limp and undefined, increase it.
Once a month, consider a particularly intensive treatment day. This might include a pre-shampoo oil treatment where you coat your hair in coconut or olive oil for several hours before washing, followed by a clarifying treatment, deep conditioning, and careful styling. This monthly reset helps address any cumulative damage and gives your hair an extra boost.
Remember that this schedule is a starting point. Everyone’s hair is different, and factors like your natural hair porosity, the length and thickness of your hair, and the specific conditions of your pool will affect what works best for you. Pay attention to how your hair looks and feels, and adjust your routine accordingly.
The Role of Bond-Building Treatments
Modern hair science has produced a category of treatments that work at a molecular level to repair the broken disulfide bonds that chlorine damages. These bond-building treatments represent a significant advancement beyond traditional conditioning and offer serious swimmers a powerful tool for maintaining hair health.
Products like Olaplex, K18, and Redken Acidic Bonding Concentrate work by chemically reconnecting the broken bonds within the hair shaft. When chlorine breaks down the disulfide bonds that give your hair its structure and strength, these bonds don’t naturally repair themselves. Traditional conditioners can’t fix this type of damage they only provide surface-level smoothing and moisture.
Bond-building treatments contain patented molecules that seek out broken bonds and rebuild them, essentially restoring your hair’s internal structure. This results in hair that’s stronger, more elastic, and better able to maintain its natural wave pattern.
For swimmers, these treatments are particularly valuable because they address the specific type of protein damage that chlorine causes. Regular use can prevent the cumulative weakening that eventually leads to breakage and loss of wave definition.
Most bond-building treatments are used as a standalone step in your routine, not as a replacement for conditioner. For example, Olaplex No. 3 is applied to damp hair before shampooing and left on for at least 10 minutes or overnight for intensive treatment. K18 is applied to clean, towel-dried hair and left in without rinsing.
The frequency of use depends on the product and the condition of your hair. Many swimmers use a bond-building treatment once a week or after every few swim sessions. If your hair is severely damaged, you might start with more frequent use and then reduce to a maintenance schedule once your hair’s condition improves.
While these products represent an investment, many swimmers find them worthwhile because they allow you to maintain a regular swimming schedule without sacrificing your hair’s integrity. The ability to actually repair damage rather than just managing symptoms makes a significant difference in long-term hair health.
Trichologists and professional stylists who work with swimmers frequently recommend bond-building treatments as part of a comprehensive care routine. The combination of proper cleansing, intensive conditioning, and molecular repair creates a multi-layered approach that keeps wavy hair healthy despite the harsh conditions of regular pool swimming.
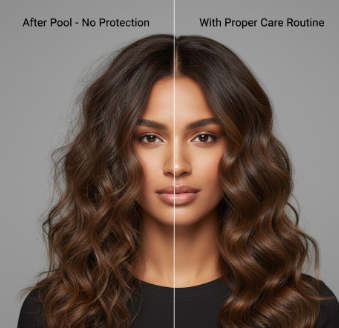
Embrace the Water Without Wrecking Your Waves
Taking care of wavy hair after pool exposure doesn’t have to be complicated or time-consuming, but it does require consistency and the right approach. The key takeaways are straightforward: protect your hair before swimming with the saturate and seal method, rinse immediately after swimming to flush away chlorine, use a clarifying or chelating shampoo to remove chemical buildup, deep condition after every swim to replenish moisture and repair damage, and be gentle when detangling and styling to preserve your wave pattern.
With these science-backed strategies, you can enjoy all the physical and mental benefits of swimming without sacrificing the health and beauty of your waves. Whether you’re training for competitions, swimming for fitness, or just enjoying leisurely pool time, your hair care routine should support your lifestyle rather than limit it.
Remember that hair care is personal and requires attention to how your unique hair responds. The techniques and products that work perfectly for one wavy-haired swimmer might need adjustment for another. Pay attention to your hair’s signals, adjust your routine based on what you observe, and don’t be afraid to experiment to find your perfect combination of products and techniques.
Swimming is too enjoyable and too beneficial for your overall health to avoid because of hair concerns. With the knowledge and strategies in this guide, you can dive in with confidence, knowing that your waves will emerge healthy, defined, and beautiful. For more guidance on customizing hair care approaches to your specific needs, exploring whether personalized systems are right for you through resources like Is Prose Worth It can provide additional insights into tailoring your routine.
Your wavy hair is resilient and capable of withstanding regular pool exposure when given the proper care. Embrace the water, follow your routine, and enjoy gorgeous, healthy waves all year round.
Frequently Asked Questions
How do I restore my waves after the pool?
Immediately rinse your hair with fresh water, then wash with a clarifying or chelating shampoo to remove chlorine. Follow with a 20-minute deep conditioning treatment to replenish moisture and repair damage, which helps your wave pattern bounce back.
Should I use a clarifying shampoo every time I swim?
For frequent swimmers who are in the pool multiple times per week, yes, using a chelating or clarifying shampoo after every swim is recommended to prevent buildup. For occasional swimmers, a high-quality sulfate-free shampoo may suffice if you rinse immediately, but use a clarifying shampoo whenever your hair feels gummy, dull, or weighed down.
Can I just rinse my hair with water after swimming and wash it later?
While a fresh-water rinse is a crucial first step, it’s not sufficient on its own. Chlorine can crystallize in your hair as it dries, causing ongoing damage. It’s best to shampoo and condition your hair as soon as possible after your final rinse to remove all traces of chemicals.
How do I protect my wavy hair from chlorine before swimming?
The best protection method is to completely wet your hair with clean water, then apply a layer of leave-in conditioner or coconut oil. This saturate and seal technique creates a barrier that prevents your hair from absorbing as much chlorinated water.
Why is my wavy hair so frizzy and dry after the pool?
Chlorine strips the natural protective oils from your hair and lifts the hair’s outer layer, called the cuticle. This allows moisture to escape rapidly. For wavy hair, which is already prone to dryness due to its shape, this results in significant frizz and a brittle feeling.
Will chlorine permanently damage my wavy hair?
Occasional exposure with proper aftercare is unlikely to cause permanent damage. However, chronic exposure without protection and repair can lead to severe protein loss, split ends, and breakage that is irreversible and will need to be trimmed off.
What is the fastest way to get a green tint out of my hair?
The quickest home remedy is to apply tomato ketchup or juice to the affected hair for 15 to 30 minutes before shampooing. The acidity helps neutralize the copper minerals that cause the green color. For severe cases, a specialized chelating swimmer’s shampoo is most effective.
Is saltwater better than chlorine for wavy hair?
Saltwater is generally less chemically harsh than chlorine. However, it is still very dehydrating and can leave mineral deposits that make your hair feel dry and gritty. A proper post-swim hair care routine is still necessary after ocean swimming, though the damage is typically less severe than with chlorinated pools.
