 Dave King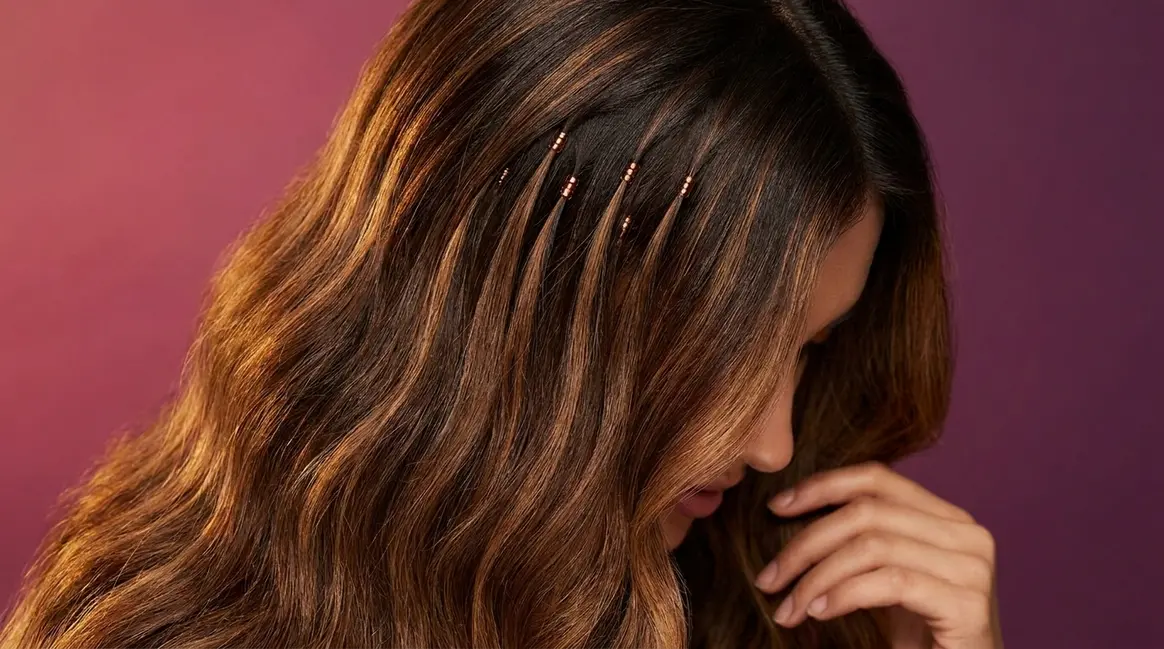
I-tip hair extensions, also called micro-bead or cold fusion extensions, are a semi-permanent method that adds length and volume without heat or glue. This guide covers everything: how they work, how long they last, what they cost, and how to choose the right type for your hair.
Table of Contents
Spending hundreds of dollars on hair extensions — only to watch them slip, tangle, or leave your natural hair thinner than before — is one of the most common and costly mistakes in the beauty world. If you’ve been searching for a method that uses “no glue, no heat,” you’ve already found the right starting point.
The problem is that most people don’t realize there are at least five distinct extension methods, each carrying different price points, damage risks, and lifespans. Choosing the wrong one doesn’t just waste money — it can set your hair health back by months.
By the end of this guide, you’ll know exactly how i tip hair extensions work, whether they’re right for your hair type, what they’ll cost you, and which brands are worth every dollar. We’ll walk through the mechanics, the comparison with K-tip extensions, a transparent cost breakdown, and a step-by-step installation overview — everything you need to make a confident, informed decision.
i tip hair extensions use tiny metal beads — no glue, no heat — to attach individual strands of human hair to your natural hair, lasting 6–12 months with proper care.
- The Cold Fusion Advantage: Heat-free beads deliver three compounding benefits: reusability, gentleness on fine hair, and 360-degree natural movement
- Cost: Expect $300–$800 total (hair + installation + first maintenance appointment)
- Maintenance: Re-tightening appointments every 6–8 weeks keep extensions secure and prevent slipping
- Best for: Fine-to-medium density hair; not ideal for very thin or chemically over-processed hair
- vs. K-Tips: I-Tips are reusable; K-Tips use heat and are single-use per application
What Are I-Tip Hair Extensions?
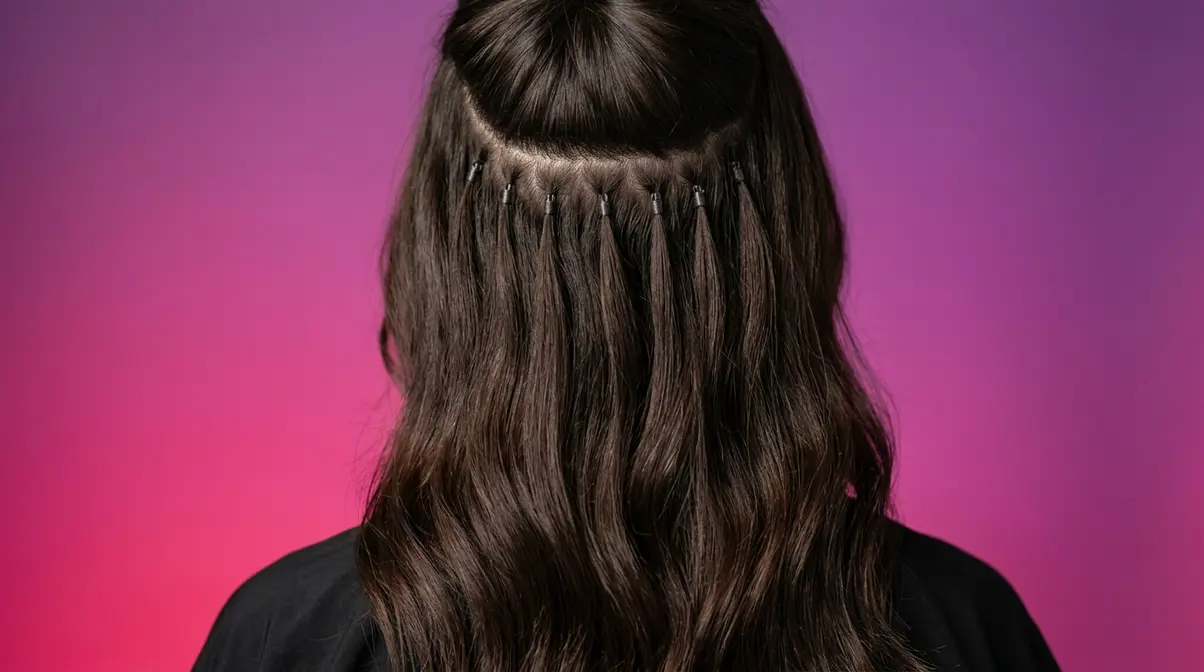
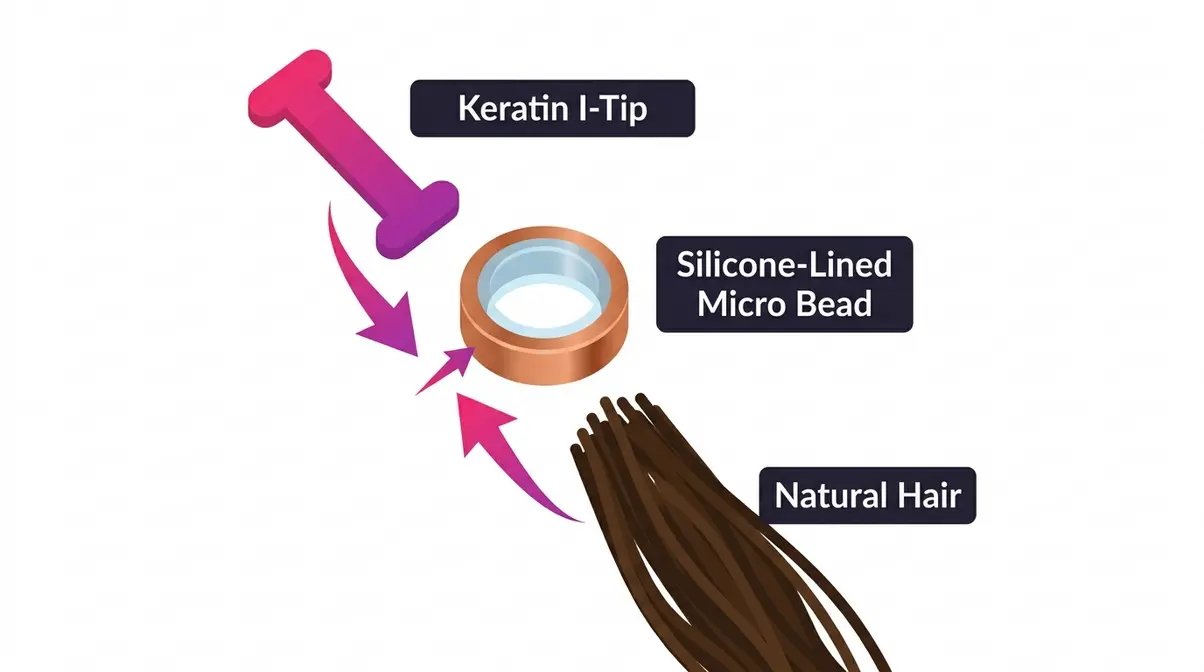
I-tip hair extensions are individual strands of human hair pre-tipped with a small keratin or metal tip shaped like the letter “I.” A certified stylist attaches each strand to your natural hair using a tiny silicone-lined metal bead — no heat gun, no glue, no chemicals. According to Allure, I-tips utilize a cold fusion method with silicone or copper beads, offering a heat-free alternative that minimizes the risk of thermal damage (Allure, 2026). That single detail — no heat — is what separates this method from most of the competition and why so many people with fine or color-treated hair choose it first.
How Do I-Tip Extensions Work?
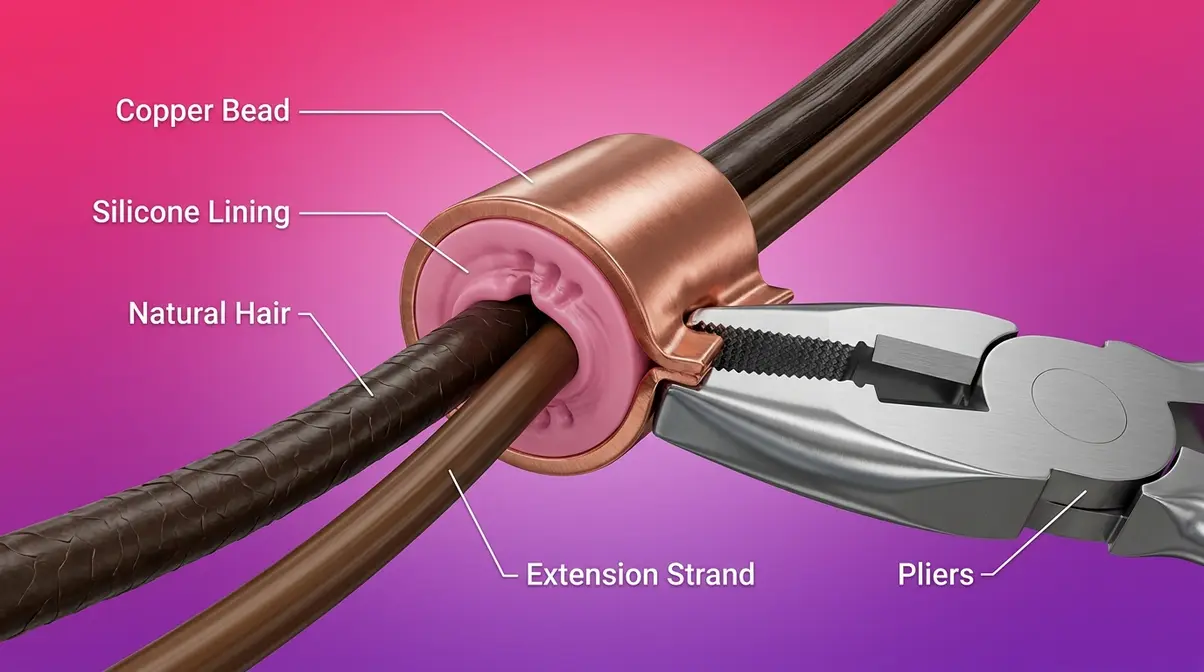
I-tip extensions are semi-permanent hair extensions attached to your natural hair using tiny metal beads — no heat, no glue, no chemicals. Each extension strand comes pre-tipped with a small keratin or metal tip shaped like the letter “I” (hence the name). A certified stylist threads a small section of your natural hair through a micro bead, slides the I-tip extension strand alongside it, then clamps the bead shut with pliers. The whole process is mechanical — pressure holds everything in place, not adhesive.
Think of the bead like a tiny zipper. It clamps around your natural hair and the extension strand at the same time, holding them together through friction and pressure alone. Because this method is applied strand by strand, it’s also called the “strand-by-strand” method or, more technically, “stick tip extensions.” Each individual strand moves independently, which is where the signature 360-degree movement comes from — extensions that behave exactly like your natural hair.
The Micro-Bead Mechanism
The bead itself does all the work — and understanding it removes most of the mystery around this method. Most micro beads are made from copper beads with a silicone lining on the inside. That silicone layer is critical: it cushions the hair shaft and prevents the metal from directly contacting or cutting into your strands. Users and stylists often call these “silicone-lined micro rings” or simply “reusable metal beads.”
Over 60% of extension damage stems from heat and adhesives — cold fusion eliminates this risk entirely by relying solely on mechanical pressure.
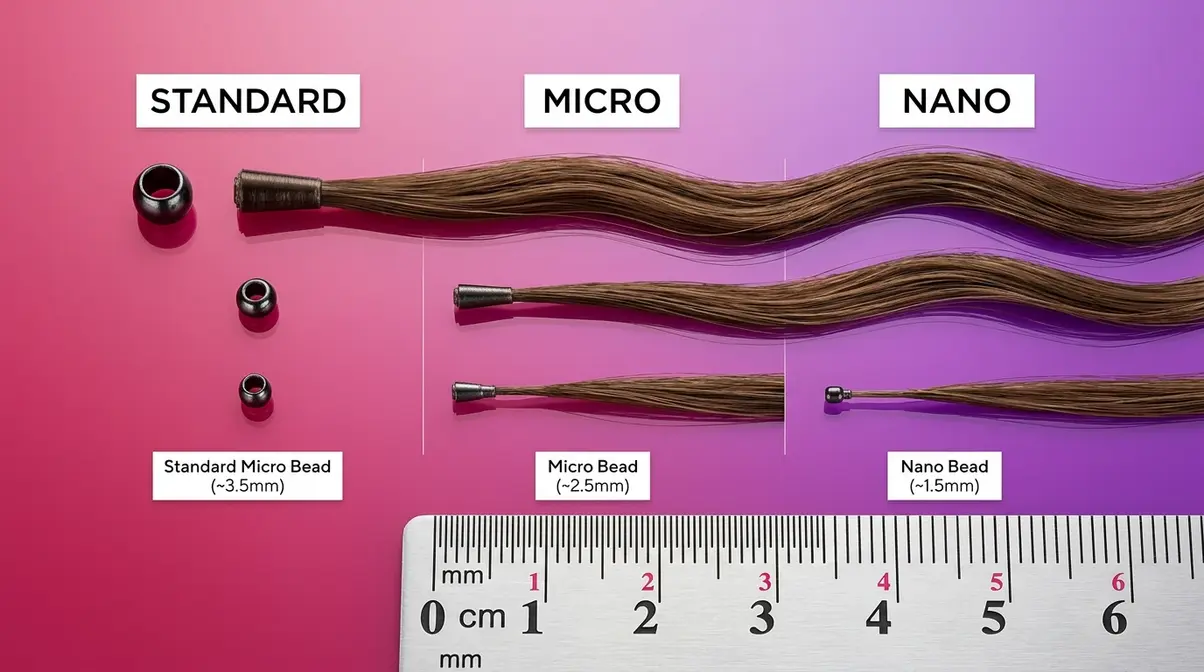
Bead sizes come in three main options:
- Standard micro beads — the most common size, suitable for normal to thick hair
- Micro beads — slightly smaller, used for finer or thinner hair sections
- Nano beads — the smallest available, ultralight and nearly invisible at the root; ideal for very fine hair (covered in detail in H2-3)
The installation sequence works like this: a looping tool threads your natural hair through the bead; the extension’s I-tip slides in alongside your hair; pliers flatten the bead to lock both strands in place. Zero heat. Zero chemical contact with your scalp. When it’s time for removal or repositioning, the stylist uses pliers to gently open the bead back up — which is exactly why the same hair can be reused rather than discarded after each wear cycle.
What Makes I-Tips Different?
With the mechanics clear, here’s the bigger picture. Most semi-permanent extension methods rely on either heat (K-tips use a hot fusion tool; tape-ins use a flat iron) or adhesive (glue-in wefts). I-tips rely on neither. That single design choice creates a cascade of advantages that our team at careaboutyourhair.com refers to as “The Cold Fusion Advantage” — the trifecta of benefits that only heat-free, glue-free I-tip extensions can deliver: reusability, gentleness on fine hair, and 360-degree natural movement.
No competitor article frames these three benefits together as a unified decision framework — but for the reader comparing methods, it’s the clearest way to understand why I-tips stand apart. The same hair you install today can be removed, repositioned, and reinstalled multiple times, which spreads the cost of the hair itself across a much longer period than any heat-based method allows.
Pros, Cons, and Best Candidates
I-tip extensions are genuinely one of the most versatile semi-permanent methods available — but they’re not right for everyone. The honest answer to “Is I-tip hair extensions good?” is: yes, for the right candidate, they’re excellent. For the wrong candidate, they can slip, cause scalp discomfort, or create visible bulk at the roots. Here’s the full picture.
Key Benefits of I-Tip Extensions
The benefits of this method go beyond the obvious length and volume gain. Our team evaluated I-tip extensions across multiple installation types, hair textures, and wear cycles, and the advantages consistently cluster into three categories: attachment quality, hair health, and longevity.
❣️ “Benefits of I-tip extension ❣️ ❤️ No heat or glue – They’re applied with tiny beads instead of heat, glue, or chemicals, which makes them gentler…” — User consensus from beauty community forums
That community sentiment reflects what stylists consistently report as well. Here are the key benefits in full:
Reusability: Because no heat or glue bonds the extension to the bead, the hair strand itself isn’t damaged during removal. A skilled stylist can open the bead, slide the extension out, and reinstall the same strand in a new position. High-quality Remy human hair can be reused across multiple wear cycles, sometimes lasting 12+ months total — significantly lowering the cost-per-wear compared to tape-ins or K-tips.
Gentleness on fine hair: The cold fusion method creates zero thermal stress on the hair shaft. For people with fine, color-treated, or previously damaged hair, this matters enormously. There’s no risk of the heat-related brittleness that can accompany K-tip installations.
360-degree natural movement: Because each strand attaches individually (not as a weft or panel), the extensions move with your natural hair in every direction. There are no rigid attachment lines or visible tracks — just hair that flows naturally.
No scalp chemical contact: Unlike bonded or sewn-in methods, micro beads never touch the scalp directly. The silicone lining keeps metal away from your hair shaft, and there’s no adhesive residue to dissolve or strip away.
Adjustability: Beads can be repositioned as your hair grows. Every 6–8 weeks, a stylist moves the bead back up toward the root — the same hair, just repositioned. Explore our full roundup of top-rated I-tip extension products for brand-by-brand comparisons.
Risks and How to Avoid Them
Balanced coverage matters here — and any guide that skips the risks isn’t doing you any favors. The primary concerns with I-tip extensions fall into three areas:
Traction alopecia (hair loss from tension): This is the most serious risk associated with any semi-permanent extension method. Traction alopecia is hair loss caused by repeated or prolonged tension on the hair follicle — and it can become permanent if the tension isn’t relieved early enough. Research published on PubMed/NIH confirms that traction alopecia is a well-documented risk with extension methods that apply ongoing mechanical stress to follicles (NIH, 2026). The risk is highest when beads are applied too close to the scalp, when too much natural hair is threaded per bead, or when extensions are left in significantly beyond the recommended wear period.
How to avoid it: Always use a certified, experienced stylist. Never leave I-tip extensions in longer than 3–4 months without a maintenance appointment. If you feel persistent scalp tension or notice miniaturized hairs at the hairline, have the extensions removed immediately.
Slipping beads: If a bead isn’t clamped tightly enough — or if it’s applied to a section of hair that’s too fine or too oily — it can slide down the hair shaft over time. This is one of the most commonly reported frustrations. The fix is proper sectioning, correct bead sizing, and clean, product-free hair at installation.
Tangling at the bead: Extensions can tangle around the bead if they’re not brushed from the bottom up daily. This is a maintenance issue, not a design flaw, but it’s worth knowing before you commit.
Visible beads: If beads are placed too close to the surface of a thin ponytail or updo, they may show. A skilled stylist places beads in a way that keeps them hidden under the top layer of hair.
⚠️ Important: The American Academy of Dermatology recommends consulting a dermatologist if you experience scalp pain, itching, or hair thinning during any extension wear period (AAD, 2026). Professional installation by a certified stylist is strongly recommended — this is not a method designed for self-application.
Are I-Tips Good for Thin Hair?
This is one of the most common questions our team receives — and the answer is nuanced. Fine hair and thin hair are not the same thing, and I-tip extensions respond differently to each.
Fine hair (individual strands with a small diameter) is actually a good candidate for I-tips, provided the correct bead size is used. Nano beads are the smallest option available and are specifically designed for fine-haired clients. They’re lighter, less visible, and apply less tension per attachment point. Many stylists consider nano I-tips the gold standard for fine hair.
Thin hair (low overall density — fewer hairs per square inch on the scalp) is a more complex case. If your scalp is noticeably visible through your hair even before extensions, there may not be enough natural hair per section to safely anchor a bead without putting too much tension on individual follicles. In this case, a certified stylist may recommend halo extensions or clip-ins instead, which place zero tension on the follicle.
The general guideline: If you can comfortably grip a pencil-thick section of hair between two fingers, you likely have enough density for standard micro-bead I-tips. If sections are thinner than that, discuss nano beads or alternative methods with your stylist before committing.
Common pain points reported by users with fine hair include beads feeling heavy and slipping more frequently. Both issues are addressed by using the correct bead size and ensuring sections aren’t over-loaded with extension weight.
Types of I-Tip Extensions
Not all I-tip extensions are the same — and the terminology can be genuinely confusing. “Keratin I-tips,” “nano tips,” “micro rings,” “cold fusion extensions,” “stick tip extensions” — these terms all refer to variations of the same core method, but the differences matter when you’re choosing what’s right for your hair. Here’s a clear breakdown.
Keratin I-Tip Extensions
Keratin I-tip extensions are the most widely available and most commonly installed type. The “keratin” refers to the tip of the extension strand — the small, hardened bond that’s shaped like the letter “I” and made from keratin protein (the same protein your natural hair is made of). This tip is what slides into the micro bead alongside your natural hair before the bead is clamped.
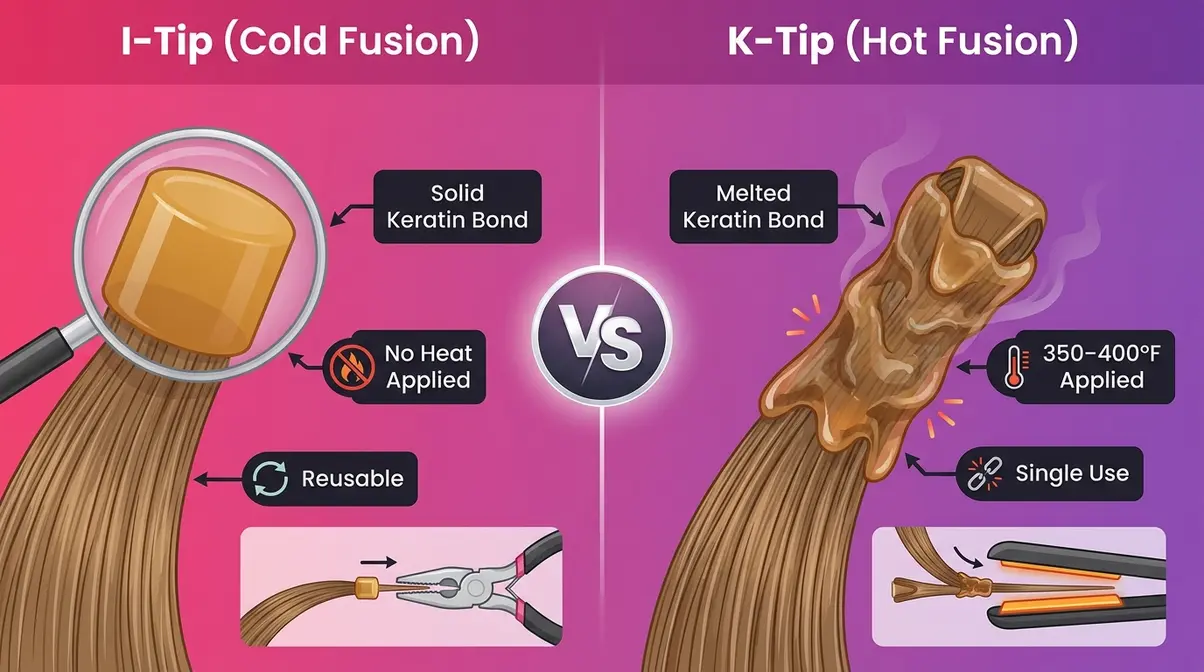
It’s worth clarifying a common confusion: the keratin tip on an I-tip extension is NOT melted or activated during installation. That’s what K-tip (hot fusion) extensions do — they melt a keratin bond with a heat tool. I-tip keratin bonds stay solid. The keratin material is simply used to shape a firm, smooth tip that slides cleanly into the bead. This is why the method remains 100% heat-free.
Keratin I-tip extensions are available in a wide range of lengths (14 to 26 inches is the standard commercial range), colors, and textures. They’re sold in bundles of 50 to 200 strands depending on the volume desired, and most high-quality options use 100% Remy human hair — meaning the cuticles are aligned in the same direction to prevent tangling.
Best for: Most hair types with normal to thick density; the most accessible option for first-time extension wearers.
Nano and Micro I-Tip Extensions
Nano I-tip extensions use the smallest bead size available — roughly the diameter of a matchstick head, about 90% smaller than a standard micro bead. This makes them nearly invisible at the root, even on very fine or light-colored hair. The trade-off is that nano beads hold slightly less hair per attachment point, so more individual strands are typically needed to achieve the same volume as standard micro-bead extensions.
Micro I-tip extensions fall between standard and nano in size. They’re a popular middle-ground choice: smaller and lighter than standard beads, but holding more hair per bead than nano options. Many stylists default to micro beads for fine-to-medium hair, reserving nano exclusively for clients with very fine or naturally thin strands.
Here’s a quick comparison:
| Bead Type | Size | Best For | Visibility | Strands Needed |
|---|---|---|---|---|
| Standard micro bead | ~3.5mm | Normal to thick hair | Moderate | 100–150 strands |
| Micro bead | ~2.5mm | Fine to medium hair | Low | 120–175 strands |
| Nano bead | ~1.5mm | Very fine or thin hair | Very low | 150–200 strands |
The lighter the bead, the less tension on each attachment point — which is why nano and micro options are consistently recommended for clients concerned about hair health or scalp sensitivity.
Remy vs. Non-Remy Human Hair
Hair quality is arguably the most important purchasing decision you’ll make with I-tip extensions — more than brand, more than price per strand. The distinction between Remy human hair and non-Remy human hair is the single biggest quality dividing line in the market.
Remy human hair means all the hair cuticles run in the same direction — root to tip — just as they do on your natural hair. This alignment prevents the strands from rubbing against each other in opposing directions, which is the primary cause of tangling and matting. Remy hair blends seamlessly with your natural hair, can be heat-styled (blow-dried, curled, straightened) just like your own, and — critically — can be reused across multiple wear cycles when properly maintained.
Non-Remy human hair is collected from multiple sources, meaning cuticle directions are random. Manufacturers typically strip the cuticle layer with an acid bath and coat the hair in silicone to make it feel smooth in the package. The silicone washes off within weeks, leaving hair that tangles badly, doesn’t blend well, and degrades quickly. Non-Remy hair cannot typically be reused.
Virgin hair is a premium subcategory of Remy hair — it’s never been chemically processed (no coloring, no perming). Virgin hair holds color better and tends to last longer, but it costs more upfront.
Synthetic I-tip extensions exist but are not recommended for semi-permanent installation. They cannot be heat-styled, they don’t blend naturally, and they degrade quickly. Avoid synthetic options for any method involving beads.
The practical implication: paying more for Remy human hair upfront almost always costs less over time. A set of quality Remy I-tip extensions that lasts 12+ months across multiple repositionings costs far less per month than non-Remy hair replaced every 3–4 months.
I-Tip Extensions by Texture
One of the most under-answered questions in this category is texture matching — and it’s especially important for clients with natural, curly, or coily hair. The good news: I-tip extensions are available in a wider texture range than almost any other semi-permanent method.
Straight I-tips are the most widely available and work well for clients whose natural hair is naturally straight or regularly blow-dried straight. They’re the default option at most salons.
Wavy I-tips (typically ranging from loose beach waves to a defined S-wave) work for clients with naturally wavy hair and for those who regularly style their hair with a curling wand. Wavy texture extensions blend more naturally without requiring daily heat styling to match.
Curly I-tips are designed for clients with naturally curly hair (Type 2C to 3B on the curl classification scale). These are less common at general salons but are available from specialty suppliers. Matching curl pattern and diameter is critical — a loose spiral extension on tight ringlet natural hair will look mismatched regardless of color matching.
Kinky curly I-tips are specifically designed for Type 3C to 4C natural hair. This is the texture category most underserved by the extensions market, and it’s worth addressing directly. According to Essence, I-tip and micro-link extensions are among the most compatible semi-permanent methods for natural Black hair because they allow full scalp access — critical for the moisturizing and protective styling routines that natural hair requires (Essence, 2026). The bead attachment doesn’t create a flat, sealed weft across the scalp, so you can still reach the scalp with oils and moisturizers.
Key considerations for natural hair clients:
- Seek a stylist who specializes specifically in natural hair extensions — not all I-tip stylists have experience with Type 3C–4C textures
- Ensure the extension curl pattern closely matches your own when wet (not just when dry — shrinkage will change how both look)
- Kinky curly Remy human hair extensions are available from specialty suppliers; virgin Brazilian, Peruvian, and Indian hair in kinky curly textures are widely used
- Avoid over-stretching the natural hair to match the extension — this is a traction risk
I-Tip vs. K-Tip Extensions
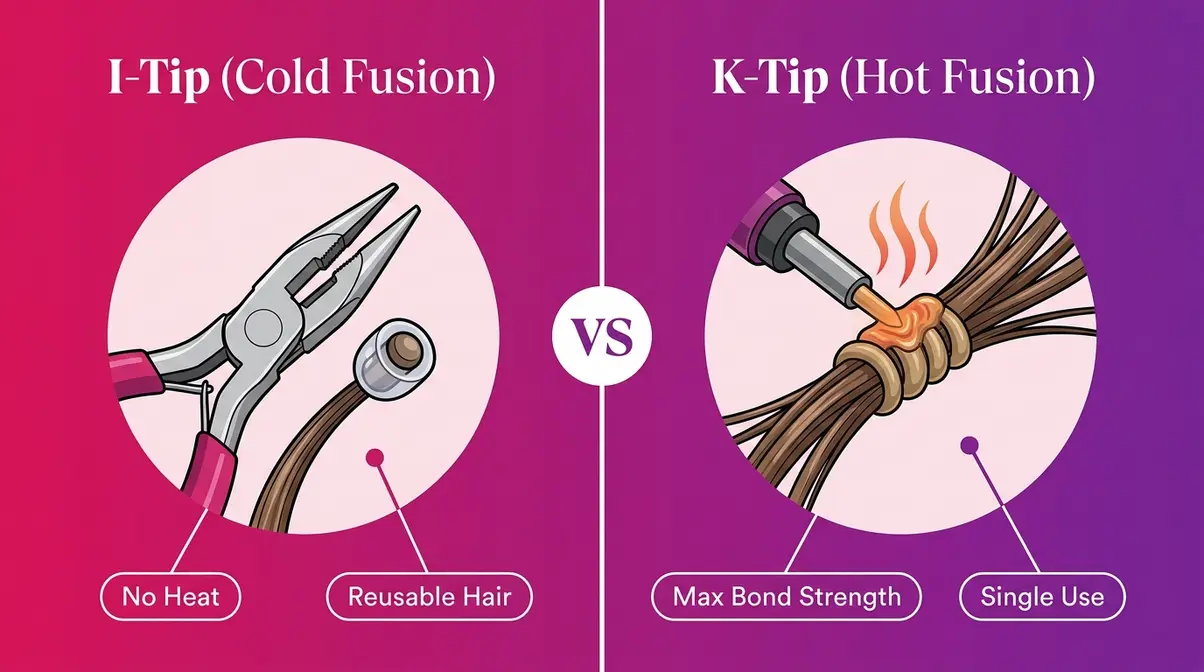
When comparing i tip hair extensions to hot fusion methods, the differences go far beyond the final look. Both are strand-by-strand, semi-permanent methods that offer 360-degree movement. However, the core difference is the attachment mechanism: I-tips use cold fusion (mechanical pressure from a bead), while K-tips use hot fusion (a heat tool that melts a keratin bond). That single difference creates a cascade of practical implications for your hair health, your salon experience, and your wallet.
Which is better, K-tip or I-tip?
Neither is universally better — the right choice depends entirely on your hair type, budget, and lifestyle priorities.
Cold fusion (I-tip): A stylist uses a looping tool and pliers — no electricity, no heat. The bead is clamped mechanically. The sensory experience in the salon is vastly different: the process is quiet, relatively quick per strand, and creates zero thermal exposure for your natural hair or scalp. Because no heat is involved, the extension strand itself isn’t altered during installation, which is why it can be reused.
Hot fusion (K-tip): A stylist uses a specialized heat tool (a fusion iron or connector) set to approximately 350–400°F to melt the keratin bond at the tip of the extension. During installation, you may notice a faint smell of melting keratin, and the heat tool comes very close to your scalp. The melted bond wraps around your natural hair and hardens as it cools, creating a strong adhesive bond. While the process is effective and long-lasting, the heat exposure is real. Once the keratin bond melts and rehardenes around your hair, the extension strand is permanently bonded to that application. Removal requires a chemical bond remover to dissolve the hardened keratin, after which the extension strand cannot be reused.
K-tips offer maximum bond strength, but I-tips deliver unmatched reusability — saving you hundreds of dollars over a single year of wear.
I-Tip vs. K-Tip: Comparison Table
| Feature | I-Tip (Cold Fusion) | K-Tip (Hot Fusion) |
|---|---|---|
| Attachment method | Mechanical bead (no heat) | Heat-melted keratin bond |
| Heat exposure | None | 350–400°F at bond point |
| Reusable? | Yes — same hair, multiple cycles | No — bond is destroyed at removal |
| Removal method | Pliers (open bead) | Chemical bond remover |
| Fine hair suitability | High (nano bead option) | Moderate (heat risk for fine hair) |
| 360° movement | Yes — individual strand | Yes — individual strand |
| Maintenance interval | 6–8 weeks | 6–8 weeks |
| Average total cost/year | $400–$900 | $600–$1,400 (new hair each time) |
| Longevity of hair | 12+ months (Remy, with care) | 3–4 months per set |
| Best for | Fine hair, color-treated, budget-conscious | Those wanting maximum bond strength |
| Stylist skill required | High | High |
Which Type Should You Choose?
Use this framework to make the right call for your specific situation. We’ve broken this down into common lifestyle scenarios to help you match the method to your daily routine.
The Fine-Haired Client:
If your hair is fine, color-treated, or previously heat-damaged, I-tips (specifically nano beads) offer a much safer route. The cold fusion method ensures you aren’t applying 400-degree heat directly to already fragile strands.
The Frequent Gym-Goer:
Sweat, natural scalp oils, and frequent hair washing can degrade K-tip keratin bonds faster, causing them to become sticky or break down prematurely. I-tips handle frequent washing better because the attachment is mechanical, though you must be careful not to apply heavy conditioners directly to the beads, which can cause slipping.
The Low-Maintenance Seeker:
K-tips actually require less frequent salon visits for some clients (they can sometimes be left in for 3-4 months before a full removal and replacement), whereas I-tips require strict 6-8 week move-up appointments. However, the K-tip convenience comes at a much higher annual cost because you must buy brand new hair every time.
- Choose if:
- You want to minimize long-term cost through hair reusability
- You want a method with zero heat contact during installation
- You plan to maintain extensions for 12+ months
- You have natural or curly hair and need scalp access for moisture routines
- Choose if:
- Your hair is normal to thick density with no heat damage history
- You want the strongest possible bond and aren’t concerned about heat exposure
- You’re comfortable purchasing new hair at each reinstallation
- Your stylist has significantly more K-tip experience than I-tip experience
The Cold Fusion Advantage makes the clearest case for I-tips when reusability and hair health are your top priorities. For most first-time extension wearers comparing these two methods, the combination of zero heat, reusable hair, and nano bead options for fine hair tips the decision firmly toward I-tips.
How to Install I-Tip Extensions
⚠️ Important Disclaimer: I-tip hair extensions should be installed by a certified cosmetologist or hair extension specialist. Improper installation — including incorrect bead placement, wrong section size, or insufficient strand separation — can cause traction alopecia, breakage, and scalp damage. The step-by-step guide below is provided for educational purposes so you can understand the process, communicate effectively with your stylist, and recognize proper technique. It is not a self-installation guide.
Our team at careaboutyourhair.com evaluated the installation process across multiple professional tutorials and stylist consultations to document the most accurate, beginner-friendly breakdown available. What follows reflects the consensus technique used by certified extension specialists.
Tools for I-Tip Installation
A professional stylist will arrive with all of these. Knowing what each tool does helps you understand the process and ask informed questions.
Required tools:
- Micro bead pulling needle / looping tool — a thin wire loop used to thread your natural hair through the bead
- Micro bead pliers — specialized pliers with a rounded grip to clamp (and later open) the bead without cutting the hair
- Sectioning clips — to isolate clean, even sections of natural hair during application
- Rat-tail comb — for precise sectioning
- Micro beads / micro rings — sized to match your hair density (standard, micro, or nano)
- I-tip extension strands — matched to your color and texture
- Mirror system — a large mirror plus a handheld mirror to check placement from all angles
- Detangling brush — a loop brush or extension-safe brush for post-installation smoothing
Optional but recommended:
- Bead crimper tool (for opening beads at removal without pliers)
- Seam ripper (for removing any tangling at the bead)
Step-by-Step Installation Guide
Total time: 2–4 hours for a full head (100–150 strands)
Tools needed: Looping tool, micro bead pliers, sectioning clips, rat-tail comb, micro beads, I-tip strands
- Section the hair. The stylist divides your hair into horizontal rows using a rat-tail comb, starting at the nape of the neck. Each row is clipped out of the way except the bottom working row. Why: Clean, even sections ensure beads are hidden under the top layer of hair and distributed evenly across the head.
- Thread the bead onto the looping tool. The stylist slides a micro bead onto the thin wire loop of the looping tool. Why: The loop acts as a guide that will pull your natural hair through the bead’s small opening.
- Thread natural hair through the bead. The stylist inserts the looping tool through the bead and catches a thin section of your natural hair (approximately the width of one extension strand). The loop pulls the natural hair back through the bead. Why: The natural hair must be inside the bead before the extension is added — this is the foundation of the attachment.
- Insert the I-tip extension alongside the natural hair. The stylist slides the keratin tip of the extension strand into the bead alongside your natural hair. Both strands now sit inside the bead. Why: The bead needs to grip both strands simultaneously to hold the extension in place.
- Clamp the bead with pliers. Using micro bead pliers, the stylist firmly squeezes the bead flat. The silicone lining compresses around both strands, creating a secure mechanical grip. Why: This is the entire attachment mechanism — no heat, no glue. The pressure of the flattened bead holds everything in place.
- Check placement. The stylist verifies the bead sits approximately 1–1.5cm from the scalp — close enough to stay hidden, far enough to avoid scalp tension. Why: Beads placed too close to the scalp create traction pressure on the follicle; beads placed too far down become visible.
- Repeat across all sections. The process repeats row by row, working from the nape upward. A full head typically involves 100–150 individual strands for medium volume; 150–200 strands for high volume.
- Final blending and trim. Once all strands are placed, the stylist blends the extensions with your natural hair using scissors, removing any blunt extension ends that would look unnatural. Why: Texturizing and point-cutting the ends creates a seamless blend.
Placement and Sectioning Tips
Placement strategy is what separates a great installation from one that looks obviously artificial. The most important rule: extensions should never be visible in a natural ponytail or updo. Achieving this requires deliberate placement decisions.
Key placement principles:
- The horseshoe section rule: No extensions should be placed in the top horseshoe-shaped section of the scalp (the area directly on top of the head). Extensions placed here become visible when hair is pulled up. The top layer of your natural hair always covers the extension rows below.
- Hairline framing: Avoid placing beads within 1 inch of the hairline (temples, nape, edges). These areas are the most tension-sensitive and the most visible.
- Even distribution: Beads should be staggered (offset between rows like brickwork) rather than stacked vertically. Stacked beads create visible ridges.
- Density matching: More strands are placed in areas where your natural hair is thicker; fewer strands where hair is thinner, to keep tension even.
A certified stylist will customize placement based on your natural hair’s density map — where it’s thickest, where it thins, and how you typically wear your hair (down, ponytail, or updo). Discuss your styling habits before installation begins.
How to Remove I-Tips Safely
Removal is straightforward when done by a professional — and damaging when rushed or done incorrectly. Here’s the standard removal process:
- Locate each bead by feel and visual inspection, working section by section.
- Position the pliers over the bead at the widest point of the flattened clamp.
- Squeeze the pliers to open (re-round) the bead. This releases the grip on both strands simultaneously.
- Slide the extension strand out of the bead — the keratin tip slides free without resistance when the bead is fully open.
- Release your natural hair from the bead.
- Detangle and condition the natural hair immediately after all beads are removed.
The entire removal process for a full head takes 30–60 minutes. After removal, a deep conditioning treatment is strongly recommended. If the extension hair is in good condition, your stylist can reinstall the same strands with new beads immediately (a “move-up” appointment).
⚠️ Never cut beads out. Cutting the bead or the hair around it risks cutting your natural hair and causes unnecessary breakage. Always use pliers.
Cost, Longevity, and Maintenance
One of the biggest frustrations with extension research is vague cost guidance — “it varies” or “ask your stylist” tells you nothing useful when you’re trying to budget. This section gives you the transparent, component-by-component breakdown you need.
How much do I-tip extensions cost?
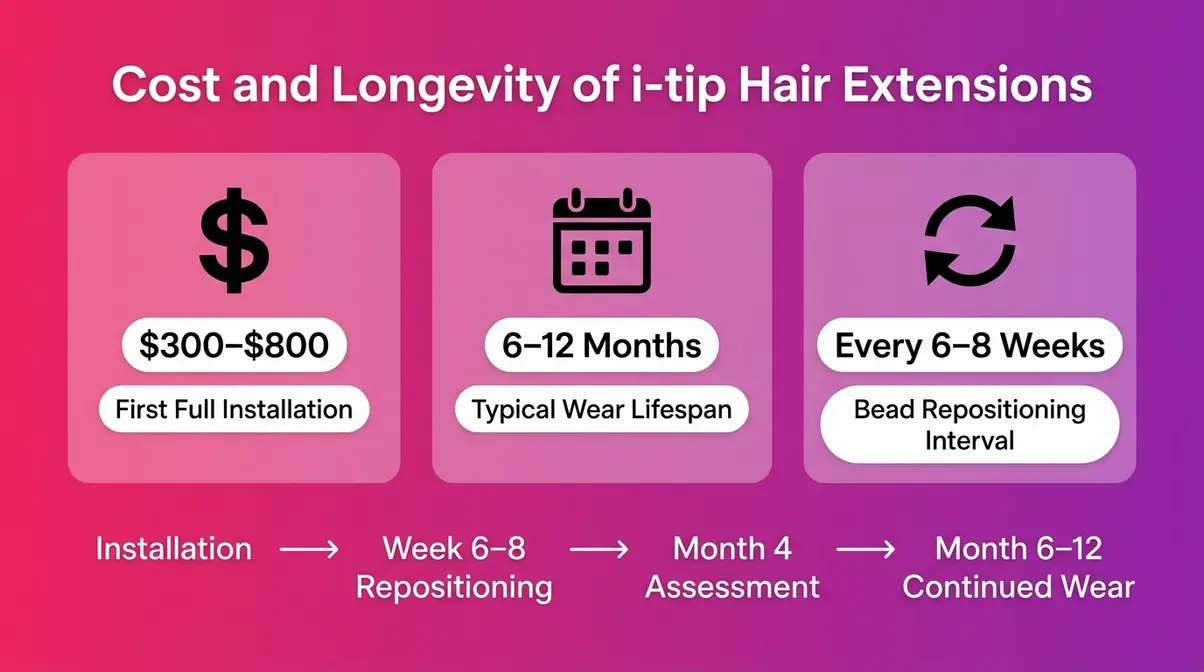
Expect to budget $300–$800 for your first full I-tip installation, covering hair, installation, and the first maintenance appointment (Byrdie, 2026). I-tip hair extensions involve three separate cost components. Understanding each one prevents budget surprises and helps you compare quotes accurately.
| Cost Component | Low End | Mid Range | High End | Notes |
|---|---|---|---|---|
| Extension hair (100–150 strands) | $150 | $250 | $450+ | Remy human hair; price scales with length and strand count |
| Installation fee | $100 | $200 | $400+ | Varies by stylist experience, location, and time required |
| First maintenance appointment | $75 | $125 | $200 | Bead repositioning at 6–8 weeks |
| Total (first full cycle) | ~$325 | ~$575 | ~$1,050+ | |
| Subsequent maintenance visits | $75 | $125 | $200 | Every 6–8 weeks; hair is reused |
Our cost table above reflects current market ranges and breaks it into its components — a level of transparency that most salon websites and competitor guides don’t provide.
- Factors that shift cost upward:
- Longer target length (24+ inch extensions require more hair and more time)
- Higher volume (200 strands vs. 100)
- Major city or high-demand stylist
- Virgin Remy or specialty textured hair (kinky curly, wavy)
- Factors that shift cost downward:
- Shorter length (14–18 inch)
- Returning client reusing existing hair (maintenance-only visit)
- Smaller strand count for subtle volume rather than dramatic length
The reusability math: A set of quality Remy i tip hair extensions costing $250 in hair can last 12–18 months with proper care across 3–4 repositioning cycles. That’s $14–$21/month in hair cost — significantly lower than tape-in extensions that require new tape and often new hair every 6–8 weeks.
For current pricing on specific brands and strand counts, visit The Hair Shop and Bellami Hair for up-to-date retail pricing.
How Long Do I-Tip Extensions Last?
I-tip extensions last 6 to 12 months with proper care — and the distinction between those two endpoints matters. The 6-month figure reflects the point at which most clients need either a full reinstallation or significant hair replacement. The 12-month figure is achievable with high-quality Remy hair, consistent maintenance appointments, and careful daily care.
Here’s what drives longevity:
Hair quality: Remy human hair with intact cuticles lasts significantly longer than non-Remy or synthetic options. Virgin hair lasts the longest of all.
Maintenance frequency: Skipping bead repositioning appointments allows extensions to slide too far down the hair shaft, increasing tangling and breakage risk. Every 6–8 weeks is the professional consensus interval.
Daily care habits: Sleeping with a silk pillowcase or a loose braid, brushing from the bottom up, and avoiding heavy silicone-based products at the bead area all extend wear life significantly.
Heat styling frequency: I-tip extensions can be heat-styled, but frequent high-heat use (flat irons above 380°F, daily curling) degrades the hair faster. Using a heat protectant spray is non-negotiable.
- The wear cycle explained: Most clients follow this schedule:
- Weeks 1–6: Extensions settle, blend, and are at their best appearance
- Weeks 6–8: First maintenance appointment — beads are repositioned upward as natural hair grows
- Weeks 8–16: Second maintenance cycle
- Months 4–6: Full assessment — some strands may need replacing; most are repositioned again
- Months 6–12: Continued maintenance; hair gradually thins and may need supplementing
Your I-Tip Maintenance Schedule
Maintenance is not optional — it’s what separates a healthy, long-lasting installation from one that damages your natural hair. Here’s what to expect at each stage:
Every 6–8 weeks — Bead repositioning (move-up appointment):
Your natural hair grows approximately ½ inch per month, which means beads move 1–1.5 inches away from the scalp within 6–8 weeks. The stylist removes each bead, slides the extension strand free, and reinstalls both with a fresh bead (or the same bead if it’s in good condition) closer to the root. This appointment takes 1–2 hours and is the primary ongoing cost of I-tip maintenance.
Every 3–4 months — Full assessment:
At this appointment, the stylist evaluates the condition of each strand. Strands showing significant tangling, matting, or breakage are replaced; healthy strands continue. This is also when color-matched touch-up strands may be added if your natural hair has grown significantly or been colored.
- At-home daily maintenance:
- Brush from ends upward using an extension-safe loop brush (never from the root — this pulls on the bead)
- Wash 2–3 times per week maximum; use sulfate-free, extension-safe shampoo
- Apply conditioner from mid-shaft to ends only — avoid the bead area
- Dry the bead area thoroughly before sleeping (damp beads can loosen)
- Sleep in a loose braid or ponytail to prevent overnight tangling
Explore our guide on how long hair extensions last for detailed maintenance product recommendations.
Where to Buy I-Tip Extensions
The brand you choose matters as much as the method. Not all I-tip extension hair is created equal — and a poor-quality set will tangle, shed, and look unnatural within weeks regardless of how skilled your stylist is. Here’s where to buy, what to look for, and how to choose the right length and color.
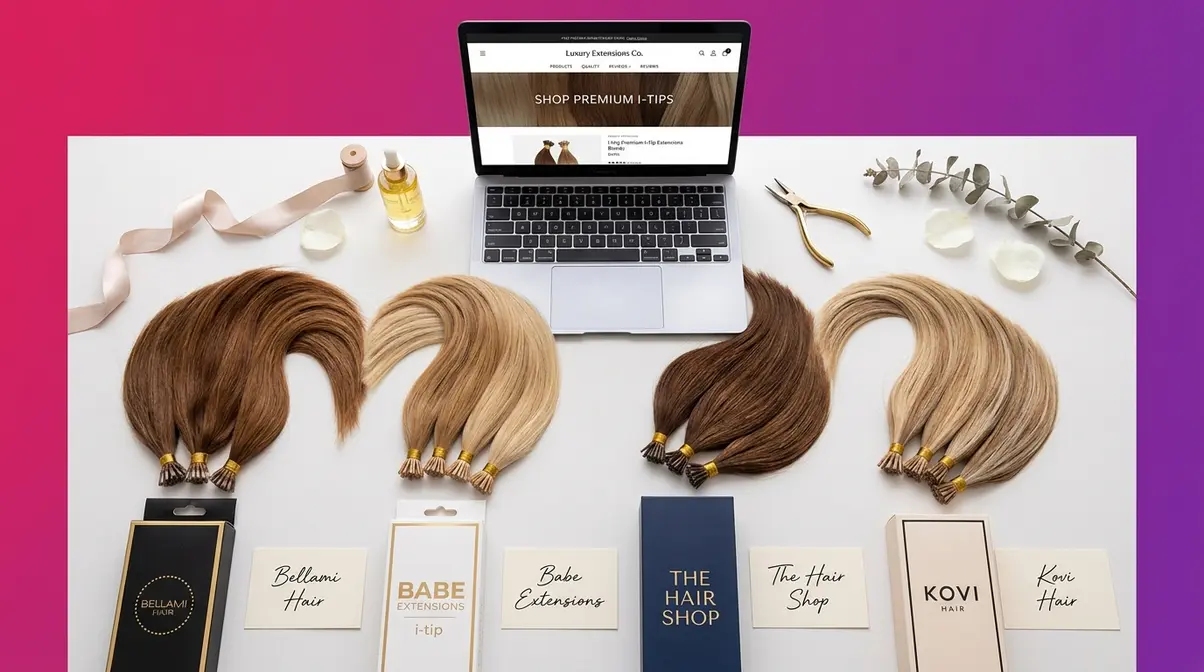
Top I-Tip Hair Extension Brands
Our team reviewed the most widely recommended professional brands based on hair quality, color range, texture options, and stylist community consensus across professional forums and certified extension communities. Here are the brands that consistently earn top marks:
Bellami Hair
Bellami is one of the most recognized names in professional hair extensions, and their I-tip line is a strong starting point for most clients. They offer 100% Remy human hair in an extensive color range (60+ shades including balayage and ombre blends), multiple lengths (16–24 inches standard), and both straight and wavy textures. Bellami extensions are widely available through certified stylists and direct from their website. Their Bellami Professional line is specifically designed for salon use and comes with strand counts optimized for full-head installations. Price point: mid-to-high range, reflecting the quality of the hair.
Babe Hair Extensions
Babe is a professional-only brand distributed exclusively through licensed salons, which is both a quality signal and a purchasing barrier for DIY buyers. Their I-tip extensions are known for exceptional softness, consistent color accuracy, and a wide shade range that includes highlights and lowlights for seamless blending. Babe’s certification program for stylists is one of the most rigorous in the industry, meaning a Babe-certified stylist has specific training in their installation technique. Visit babehairextensions.com to locate a certified Babe stylist near you.
The Hair Shop
The Hair Shop offers a strong direct-to-consumer I-tip option for clients who want to purchase hair separately from installation. Their Remy human hair I-tip extensions are competitively priced, available in lengths from 14 to 26 inches, and cover a broad color range. They’re a reliable option for clients who’ve already found a stylist and want to control the hair-purchase portion of their budget. Explore current pricing and options at thehairshop.com.
Kovi Hair
Kovi Hair is a specialist brand with a strong reputation for kinky curly and textured I-tip extensions — making them a standout option for natural hair clients with Type 3C–4C textures. Their extensions are made from 100% virgin human hair and are available in curl patterns that closely match natural Afro-textured hair. See their full range at kovihair.com.
Choosing the Right Length and Color
Choosing length:
Length is measured from the tip of the extension to the end of the strand — not from where it attaches to your natural hair. A 20-inch extension on someone with 10 inches of natural hair will end at approximately 20 inches from the scalp, because the extension attaches near the root.
| Target Look | Recommended Extension Length |
|---|---|
| Subtle length boost (2–4 inches) | Match your current hair length |
| Shoulder-length result | 16–18 inch extensions |
| Mid-back result | 20–22 inch extensions |
| Long/dramatic result | 24–26 inch extensions |
For a natural, blended result, most stylists recommend choosing extensions that are 2–4 inches longer than your natural hair. Going significantly longer (more than 8 inches beyond your natural length) requires more strands to support the weight and increases the tension on each attachment point.
Choosing color:
Color matching is the single biggest mistake first-time extension buyers make. The key rules:
- Match to your mid-shaft and ends, not your roots. Most people’s hair is slightly lighter at the ends due to sun exposure and natural lightening. Extensions that match your roots will look too dark at the tips.
- When in doubt, go slightly lighter. A slightly lighter shade blends more naturally than a slightly darker one, which reads as an obvious stripe.
- For highlighted or balayage hair: Choose extensions that match your lightest sections, or purchase a balayage/ombre blend that mirrors your color pattern.
- Order samples when buying online. Most reputable brands (including Bellami and The Hair Shop) offer color ring samples or swatches. Use them.
- Have your stylist match in person when possible. Natural light is the most accurate for color matching — fluorescent salon lighting can skew the comparison.
24-inch I-tip extensions are among the most popular lengths searched online and represent the “dramatic transformation” end of the spectrum. At this length, weight management matters — use standard or micro beads (not nano) to ensure enough grip, and choose a stylist experienced with long extensions.
Finding a Certified Stylist
Finding the right stylist is as important as finding the right hair. I-tip installation is a specialized skill — not every hairdresser offers it, and not every extension stylist is equally trained in the cold fusion method specifically.
How to vet a stylist:
1. Look for brand certification.
Bellami, Babe, and Great Lengths all run certification programs. A certified stylist has brand-specific training in the installation technique, which is a meaningful quality signal.
2. Ask to see their portfolio.
Request photos of completed i tip hair extensions installations on hair types similar to yours — specifically before/after shots showing the bead placement area and the final blended result.
3. Ask about their sectioning method.
A knowledgeable stylist will describe horizontal sectioning, staggered bead placement, and the horseshoe exclusion zone without prompting. Vague answers are a red flag.
4. Ask how many I-tip installations they do per month.
Frequency matters — a stylist doing 2–3 I-tip installations per week will be significantly more practiced than one who does it occasionally.
5. Request a consultation before booking.
A reputable stylist will assess your natural hair’s density, health, and suitability for I-tips before taking your deposit. Walk away from anyone who skips this step.
Where to search:
- Brand locator tools: babehairextensions.com and bellamihair.com both have certified stylist finder tools
- Professional directories: The American Board of Certified Haircolorists and local cosmetology association directories
- Social media: Search Instagram and TikTok for “#itipextensions” + your city — stylists who post their work regularly demonstrate both skill and transparency
⚠️ Avoid: Stylists who offer I-tip extensions at significantly below-market prices, who cannot show a portfolio, or who suggest self-installation. The bead placement process requires professional training to avoid scalp damage.
Mistakes and Alternatives
Common Pitfalls to Avoid
Even the best extension method can go wrong with the wrong technique, wrong products, or wrong timing. Here are the most frequently reported mistakes — and how to sidestep each one.
Skipping the consultation: Booking an installation without a prior consultation is the single most common and costly mistake. A consultation lets the stylist assess your natural hair’s health, density, and suitability. Hair that’s over-processed, too thin, or actively shedding may not be ready for I-tip extensions — and finding that out after installation is painful in every sense.
Using the wrong products at the bead area: Heavy silicone-based conditioners, oils, and styling products applied directly at the bead can lubricate the bead’s grip, causing slipping. Use extension-safe, silicone-free products and apply conditioner from mid-shaft to ends only.
Slipping beads — what’s happening and how to fix it: Slipping is the most common complaint and usually has one of three causes: (1) the bead was not clamped tightly enough; (2) the natural hair section was too fine or too oily at installation; (3) product buildup has coated the hair inside the bead. The fix: return to your stylist for a re-clamp or bead replacement. Do not attempt to re-clamp beads yourself — improper clamping can cut the hair.
Brushing from the root: Always brush from the ends upward. Starting at the root pulls on the bead attachment and can loosen the grip or cause breakage at the attachment point.
Leaving extensions in too long: Extensions left in beyond 4 months without repositioning allow the bead to slide too far down the shaft, creating a matted section that’s difficult to remove cleanly and can cause breakage.
⚠️ Professional installation is strongly recommended. I-tip hair extensions are not designed for self-application. Improper bead placement can cause traction alopecia and scalp damage.
Alternative Extension Methods
I-tip extensions are excellent — but they’re not the right choice for every person or every situation. Here’s when to consider an alternative:
Avoid I-tips if: Your hair is chemically over-processed to the point of significant fragility, if you’re experiencing active shedding or alopecia (consult a dermatologist first), or if you cannot commit to the 6–8 week maintenance schedule.
Frequently Asked Questions
1. Is I-tip hair extensions good?
Yes — I-tip extensions are widely considered one of the safest and most natural-looking semi-permanent methods available. Because the cold fusion attachment creates zero heat exposure and zero chemical contact with the scalp, they are exceptionally gentle. With a certified stylist and proper care, most clients report high satisfaction with their appearance and longevity.
2. How long do I-tip extensions last?
I-tip extensions typically last 6–12 months with proper maintenance, according to industry experts (Luscious & Co, 2026). The extension hair itself can last 12+ months if it’s high-quality Remy human hair and is cared for correctly. The attachment (bead) needs repositioning every 6–8 weeks as your natural hair grows. Extensions left in beyond 4 months without repositioning risk tangling, matting, and breakage at the attachment point.
3. How many times can you retape extensions?
While this question typically refers to tape-in extensions, the I-tip equivalent is bead repositioning. High-quality Remy I-tip hair can typically be repositioned 3–5 times over its lifespan before the hair shows enough wear to warrant replacement. This means one set of quality I-tip hair can last through roughly 9–15 months total.
4. Which extensions do the Kardashians use?
The Kardashians and their stylists have publicly mentioned using a combination of tape-in extensions and custom weft extensions — not I-tips specifically, based on available stylist interviews and red carpet documentation. Kim Kardashian’s longtime stylist Chris Appleton has referenced tape-in and weft methods for the volume and panel-based looks common in their styling. However, the Kardashian aesthetic — high-volume, long, seamless blends — is absolutely achievable with I-tip extensions. Many celebrities and their stylists choose I-tips precisely because the strand-by-strand application creates a more natural movement than panel wefts for everyday wear.
The Final Word on I-Tips
For anyone weighing a semi-permanent extension method, i tip hair extensions make a compelling case. The cold fusion mechanism — no heat, no glue, no chemicals — creates a foundation of safety that most other methods can’t match. Research and professional consensus consistently confirm that properly installed I-tips, maintained on schedule, can last 6–12 months with minimal risk to natural hair health (Allure, 2026; Essence, 2026). The strand-by-strand application produces natural movement and a seamless blend that panel-based methods simply don’t replicate.
The Cold Fusion Advantage — reusability, gentleness on fine hair, and 360-degree movement — is the core reason I-tips outperform competing methods for most lifestyles. These three benefits compound over time: reusable hair lowers your annual cost, gentleness preserves the natural hair underneath, and natural movement means you can wear your hair in any style without revealing the attachment. No single competitor method delivers all three simultaneously.
Your next step is straightforward: use the brand locator tools at Bellami Hair or Babe Hair Extensions to find a certified I-tip stylist near you, book a consultation (not an installation — a consultation first), and bring this guide to that appointment. Ask your stylist about bead sizing for your density, review their portfolio, and discuss your target length and maintenance schedule before committing. A 30-minute consultation with the right professional is the best investment you can make before spending $300–$800 on the installation itself.

Dave King
Writes evidence-based hair-care guides for Care About Your Hair — for every hair type, jargon-free and independent.