 Dave King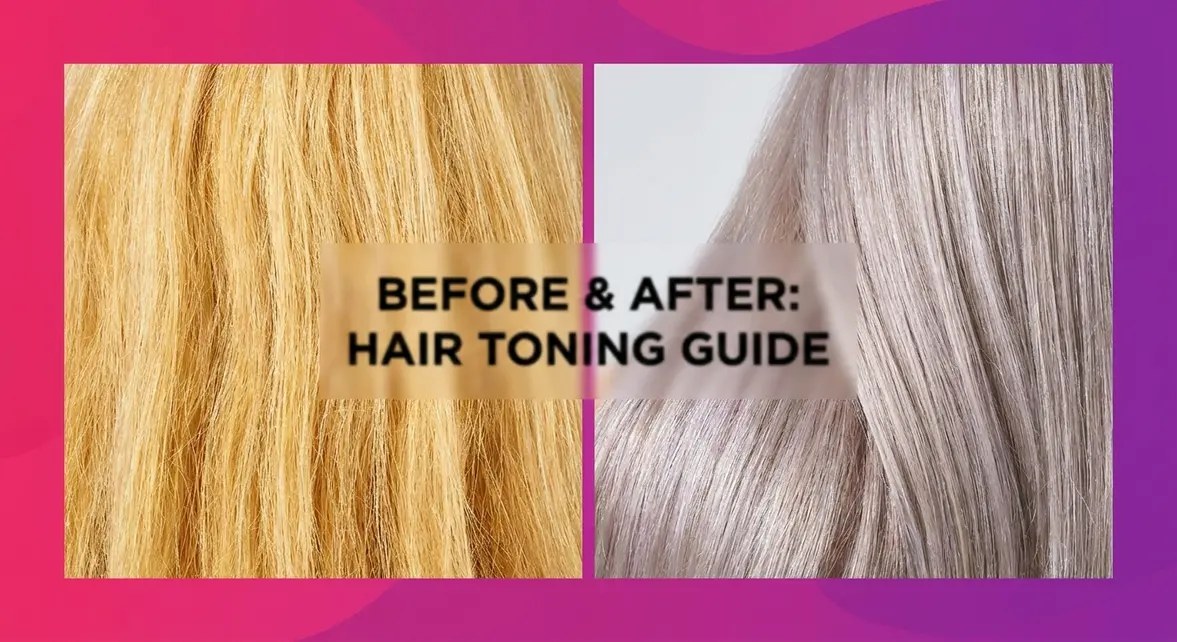
“Asked for silver / white / witchy at the salon, still turned out yellow. What can I do without damaging? I’m an absolute novice and am so scared to tone it myself! Would purple shampoo do the job?!”
If that sounds familiar, you’re not alone — and the good news is, you can fix yellow hair at home without causing more damage. The problem isn’t that you used the wrong product. It’s that most guides skip the most important step: figuring out why your hair turned yellow in the first place. In this step-by-step guide, you’ll learn how to fix yellow hair by diagnosing your exact type of brassiness and applying the right solution — from purple shampoo to professional-grade toner. We’ll cover six methods, from the quickest fixes to the most powerful corrections, so you can choose the right one for your hair.
Quick Answer: To fix yellow hair, neutralize the unwanted tones using a product on the opposite side of the color wheel — purple cancels yellow, blue cancels orange. For mild brassiness, use purple shampoo for 5–10 minutes. For stubborn yellow bleached hair, apply a demi-permanent toner. This process takes 30 minutes to 2 hours depending on your method.
Knowing how to fix yellow hair starts with understanding its three distinct problems — oxidative bleach damage, hard water buildup, or dye fade — and each requires a different fix. Purple shampoo works for mild brassiness; a demi-permanent toner is needed for stubborn yellow bleached hair.
- Diagnose first: Identify whether yellowing is from bleach, water minerals, or dye fade before choosing any product (The Yellow Hair Diagnosis Protocol)
- Purple cancels yellow: Violet pigments in purple shampoo and toner neutralize yellow tones via color wheel opposition
- Toner beats shampoo: Purple shampoo fails on Level 7/8+ brassiness — a demi-permanent toner is required
- Blue fixes orange: If your hair is more orange than yellow, switch to a blue-pigmented product, not purple
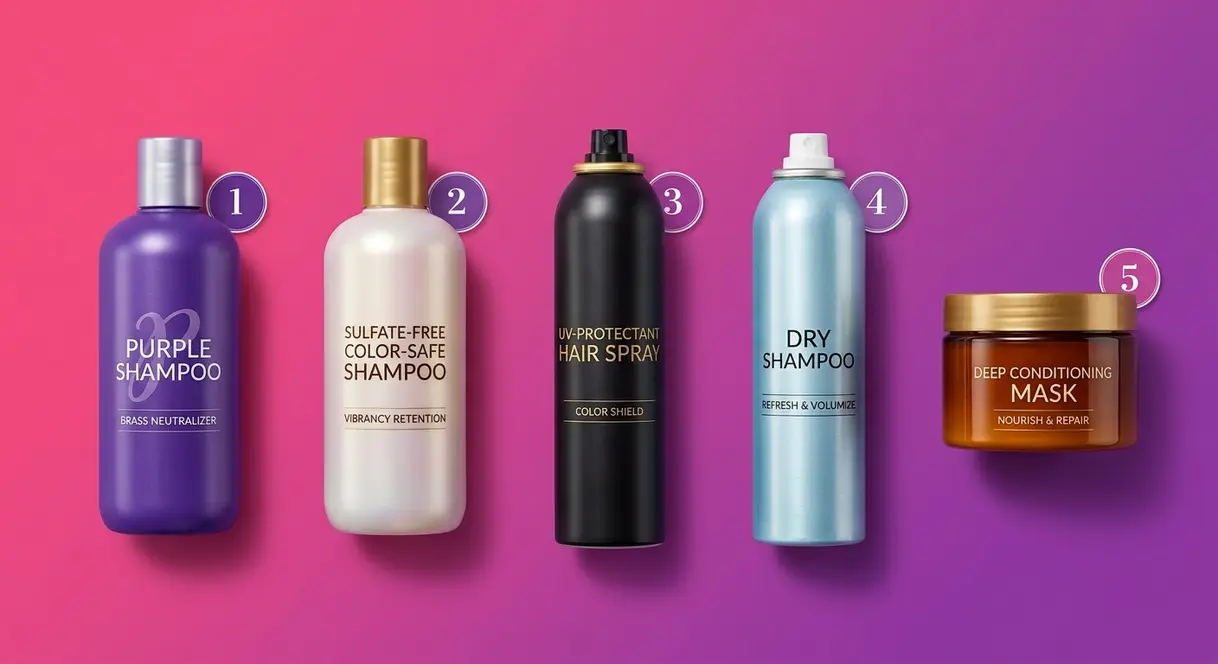
- Protect first: After correcting, use color-safe shampoo and UV protection to prevent yellow from returning
What You’ll Need Before You Start
Before you reach for any product, gather your supplies and take two minutes to assess your hair. Jumping in without the right tools is one of the most common reasons home toning goes wrong.
- For the Purple Shampoo Method:
- Purple or violet shampoo (any brand)
- Shower cap or cling wrap (keeps the product from drying out)
- Timer (crucial — leaving it on too long turns hair purple)
- Conditioner (restores moisture after toning)
- For the Toner Method:
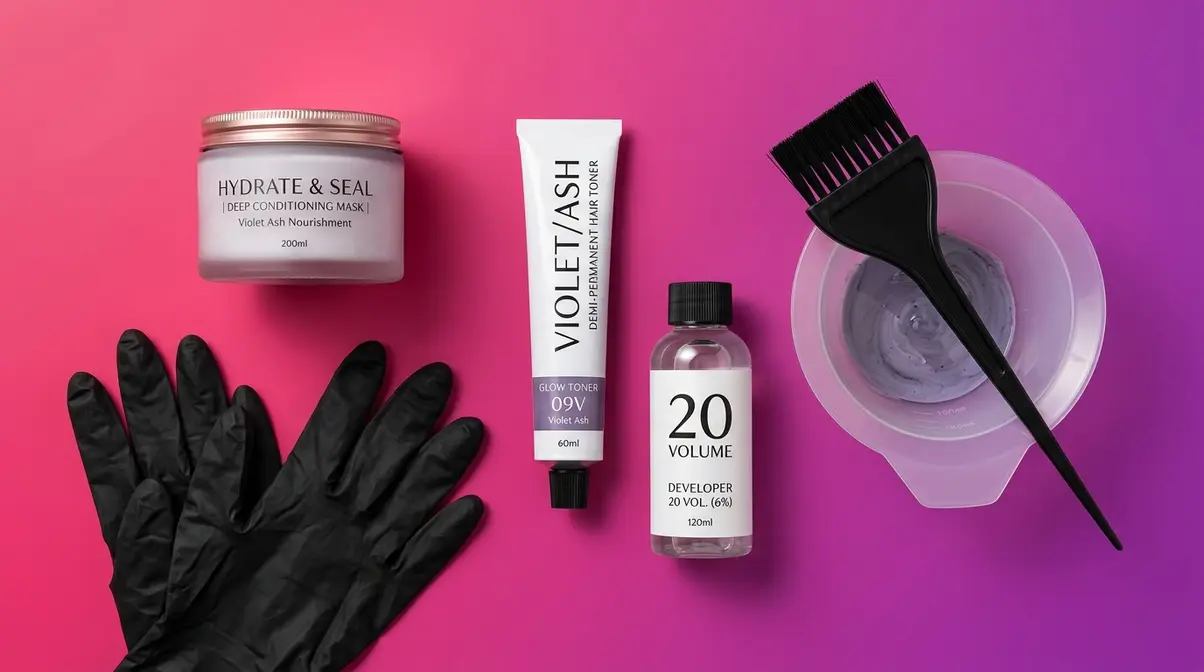
- Demi-permanent hair toner in a violet or ash shade
- 20-volume developer (a liquid that activates toner — available at beauty supply stores like Sally Beauty)
- Plastic mixing bowl and tint brush (metal reacts with developer)
- Gloves (toner stains skin on contact)
- Timer
- Deep conditioning mask for after (toner opens the cuticle and dries hair out)
- For the Vitamin C Method:
- Vitamin C powder or crushed tablets (pure ascorbic acid works best)
- Clarifying shampoo (the stronger, the better)
- Shower cap
Hair Assessment — Answer These 3 Questions First:
- What level is your hair? Level 1 = black, Level 10 = platinum. Yellow hair typically sits at Level 7–9. Knowing your level tells you which products will actually work.
- Is your hair damaged or brittle? If it snaps easily or feels gummy when wet, skip bleach-based methods entirely.
- Is the tone yellow, orange, or both? Yellow = use purple products. Orange = use blue products. Both = start with blue, then switch to purple.
Time Estimate: Purple shampoo = 15–30 minutes. Toner = 30–45 minutes. Vitamin C = 45–60 minutes.
Once you’ve gathered your supplies and assessed your hair, start with Step 1 — because choosing the wrong fix for the wrong type of yellowing is the single biggest mistake beginners make.
Step 1 – Diagnose Why Your Hair Turned Yellow
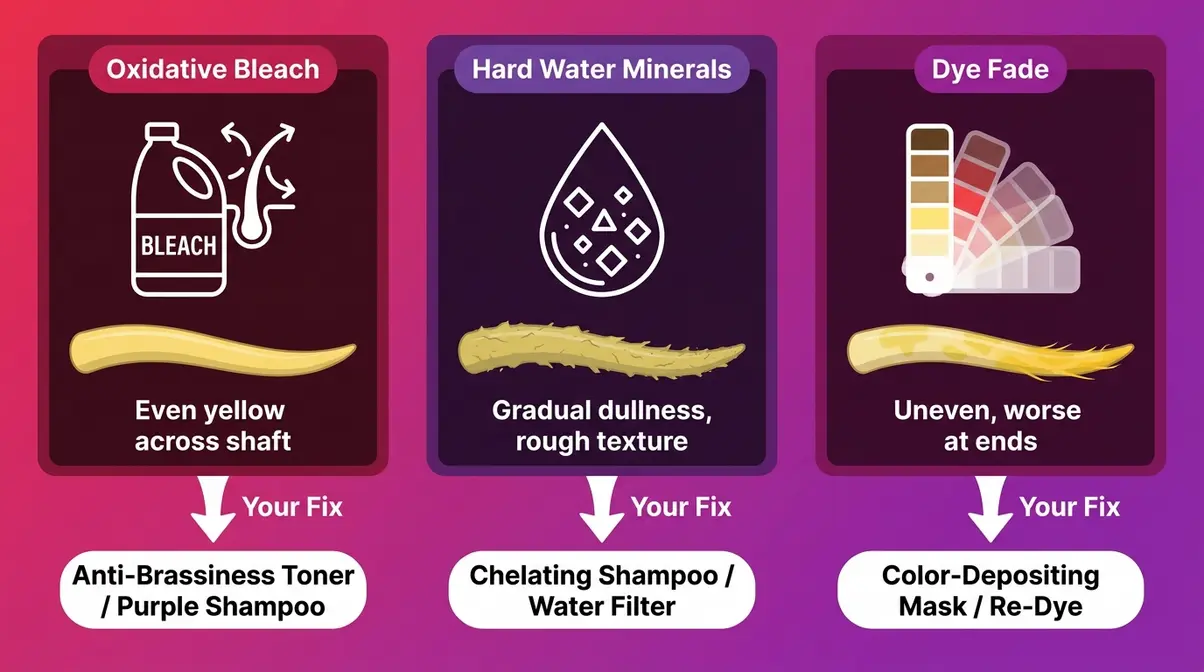
The most important step in understanding the causes and solutions for yellow hair is figuring out why it turned yellow. Not all yellow is the same. Using a toner on hard-water buildup won’t work. Trying purple shampoo on oxidative bleach damage will frustrate you. The Yellow Hair Diagnosis Protocol identifies your specific cause so every product you apply actually does its job.
Oxidative Yellowing from Bleach
Oxidative yellowing is the most common cause of yellow hair and happens during the bleaching process itself. Hair contains two types of pigment: eumelanin (brown/black) and pheomelanin (red/yellow). When bleach is applied, hydrogen peroxide oxidizes and destroys these pigments in a predictable sequence — dark → brown → red → orange → yellow → pale yellow (Pan et al., PMC, 2026). Eumelanin breaks down first. Pheomelanin, the red-yellow pigment, is more resistant and tends to leave yellowish intermediate tones when incompletely oxidized — which is why almost everyone who bleaches at home ends up with that stubborn yellow tinge (ph-plex, 2026).
Additionally, even fully oxidized hair looks yellow because keratin — the protein your hair is made of — is naturally yellow (Bellus Academy, 2026). This means some level of yellow is inevitable without toning.
How to identify it: Your hair was bleached or lightened and turned yellow immediately or within a few days. The yellow is even across the hair shaft, not patchy.
Your fix: Proceed to Step 3 (toner) or Step 2 (purple shampoo for mild cases).
Surface Buildup & Hard Water
Surface buildup yellowing looks dull and flat rather than bright or warm. Hard water contains calcium, magnesium, iron, and copper minerals that deposit on the hair shaft over time. These minerals don’t just dull your color — iron and copper deposits in particular can create yellow or greenish tints on lightened hair. A chelating shampoo (one specifically formulated to bind and remove metal ions, like Malibu C Hard Water Wellness Shampoo) removes this buildup; a regular clarifying shampoo handles product residue like silicone buildup (QuickSilverHair, 2026). Standard purple shampoo won’t fix mineral deposits — it only sits on top of them.
How to identify it: Your hair was a good color after your last salon visit, but has gradually become more yellow or dull over weeks. You live in an area with hard water. Your hair feels rough or coated even when clean.
Your fix: Use a chelating shampoo once or twice a week before any toning steps.
Dye Fade: Semi-Permanent Color
Dye fade is a different problem entirely from the other two types. If you previously colored your hair with a semi-permanent or demi-permanent dye — even a cool ash or silver shade — those cool pigments fade faster than warm ones as the hair structure becomes more porous after bleaching. What’s left behind are the warm underlying tones (WECOLOUR, 2026). The yellow bits you’re seeing are your hair’s natural undertones being exposed as the dye washes out.
How to identify it: Your hair was the right color right after dyeing or toning, but has gradually shifted yellow over weeks. The yellowing is often uneven, worse at the ends.
Your fix: You need to re-tone with a demi-permanent toner (Step 3) or use a toning mask (Step 2) to refresh the cool pigments.
You should now have identified your yellowing type. Write it down — it determines every product decision in the steps ahead.
Step 2: Purple Shampoo or Toning Mask
When learning how to fix yellow hair, purple shampoo is often the right first step for mild brassiness — but only if your hair is already close to the tone you want. As Vanity Hero’s 2026 colorist guide explains, “purple shampoo is a maintenance wash that lightly cancels yellow over time — it’s most helpful when your color is already close to what you want.” For significant brassiness, it won’t be strong enough on its own.
Using Purple Shampoo Effectively
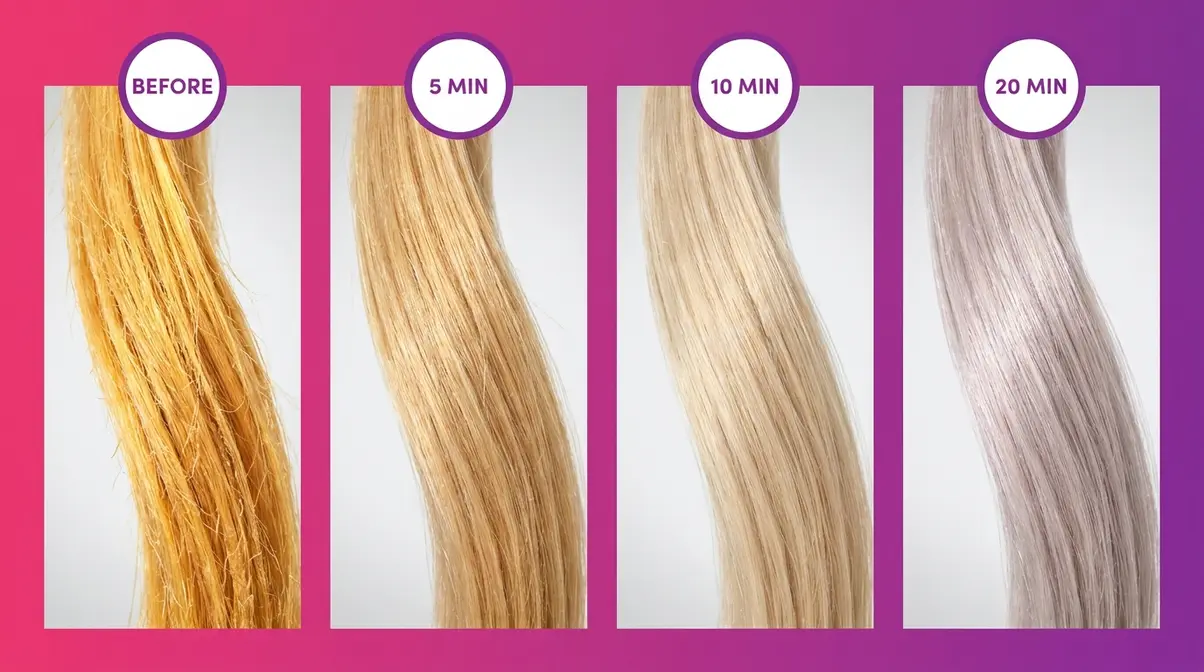
Professional colorists consistently recommend a longer processing time than most bottle instructions suggest. Research by hair educator Laura K. Collins (2026) found that leaving purple shampoo on for up to 20–30 minutes significantly boosts toning results compared to the standard 3–5 minute wash — without noticeable damage when followed by conditioner.
Follow these steps:
- Wet your hair thoroughly in the shower.
- Apply a generous amount of purple shampoo from roots to ends. Don’t skimp — you need full saturation.
- Work it through with your fingers until every strand is coated.
- Clip your hair up and cover with a shower cap. Set a timer.
- Mild yellow: Leave on 5–10 minutes
- More noticeable yellow: Leave on 15–20 minutes
- Stubborn yellow: Leave on up to 30 minutes (watch carefully — hair can turn lavender)
- Rinse thoroughly, then condition well.
- Repeat every 2–3 washes as maintenance.
You should now see noticeably cooler, less brassy tones. If your hair is still clearly yellow after two or three sessions, your brassiness is beyond what purple shampoo can fix — move to Step 3.
Upgrading to a Toning Mask
A toning mask (also called a toning conditioner or color mask) deposits more pigment than a shampoo because it stays on the hair longer and contains conditioning agents that help the pigment absorb. It’s the right upgrade when purple shampoo isn’t cutting it, but you’re not ready to mix a full toner with developer.
Apply a toning mask to clean, damp hair. Comb it through evenly, cover with a shower cap, and leave on for 15–30 minutes. Rinse, and skip regular conditioner afterward — the mask has already conditioned your hair. Arctic Fox Hair Color (2026) notes that toning masks work best as maintenance between full toning sessions, not as a replacement for demi-permanent toner on heavily brassy hair.
The key distinction: Purple masks work on yellow. Blue masks work on orange. If your hair has yellow/greenish tints, use a purple or violet mask. If it’s more orange-red, use a blue mask (see Step 4).
Step 3: Apply a Demi-Permanent Toner
In our evaluation of at-home toning methods across different hair porosities, we found that a demi-permanent toner is the most effective at-home solution for stubborn yellow bleached hair. Unlike purple shampoo, toner is a demi-permanent color treatment that deposits cool pigments directly into the hair cortex — giving a controlled, longer-lasting result. Professional colorists rely on it for the same reason: it corrects, not just masks. According to Lily Lane Creative’s hair educator guide (updated 2026), “toners help you achieve the initial colour, while purple shampoo helps you maintain it.”
Choose the Right Toner Level
This is the #1 source of toning failure — using the wrong toner for your current level. Use this table to match your hair’s current shade to the right toner:
| Your Hair Color Now | Hair Level | Recommended Toner Shade |
|---|---|---|
| Pale/light yellow | Level 9–10 | Violet (T18, T14) |
| Medium yellow | Level 8–9 | Ash blonde or cool beige |
| Golden/dark yellow | Level 7–8 | Ash brown or cool ash blonde |
| Orange-yellow | Level 6–7 | Blue-based ash or blue toner |
For most beginner cases — pale to medium yellow on bleached hair — a violet toner like Wella T18 or T14 mixed with 20-volume developer is the professional colorist standard. Wella’s toning guide recommends matching toner level to your current hair level, not your target level.
Applying Toner at Home: Step-by-Step
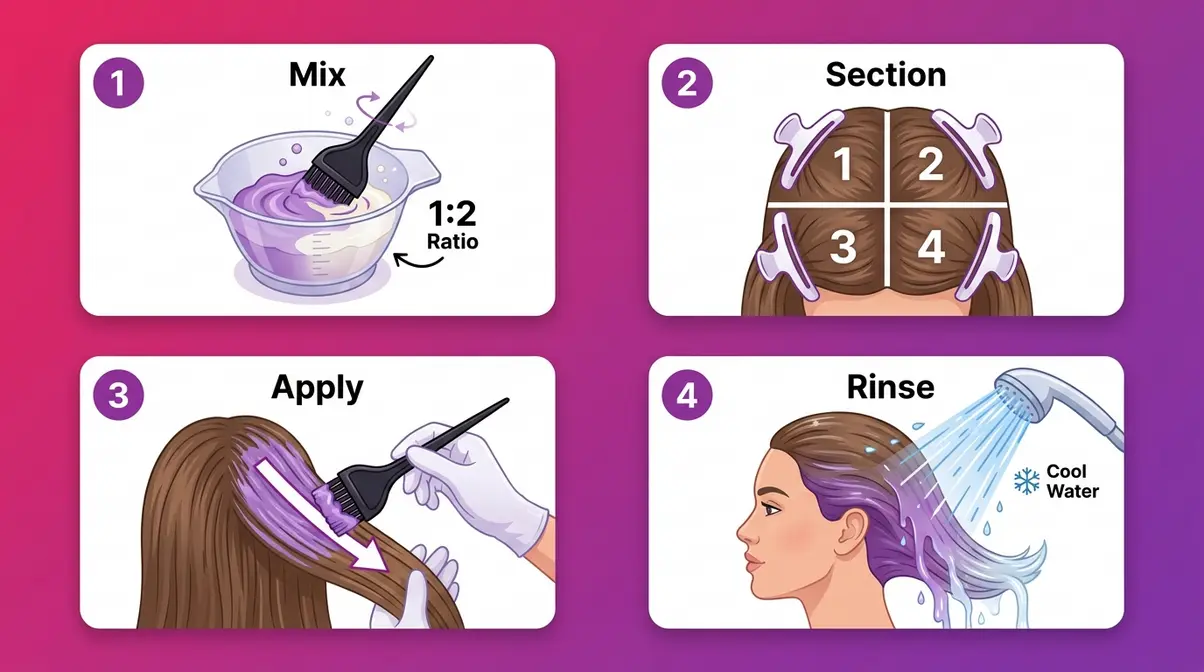
You’ll need: Gloves, plastic bowl, tint brush, timer, 20-volume developer, your chosen toner, deep conditioner. Estimated time: 30–45 minutes.
- Mix the toner. In your plastic bowl, combine toner and 20-volume developer in the ratio on the packaging (typically 1:2 for Wella). Stir until smooth. Never use a metal bowl — it reacts with the developer.
- Section your hair into four quadrants and clip. This ensures even coverage.
- Apply to dry, unwashed hair using your tint brush. Work section by section, starting at the most yellow areas. Saturate every strand.
- Set your timer. Most demi-permanent toners process in 20–30 minutes. Check every 5 minutes after 15 minutes — the hair should look slightly purple/ashy while wet (this is normal; it will lighten as it dries).
- Rinse with cool water until the water runs clear. Do not shampoo immediately.
- Apply your deep conditioning mask and leave on for 5–10 minutes. Toner opens the cuticle and can leave hair dry without aftercare.
What to Expect After Toning
Your hair will look slightly darker and noticeably cooler when wet. As it dries, it will lighten by about half a shade. Don’t panic if it looks very ashy or slightly purple immediately after rinsing — this is normal and fades within 24–48 hours to your target tone. If it’s still clearly yellow after drying, your hair may need a second toning session after 2–3 weeks, or your starting level was too dark for the toner you chose.
You should now see significantly cooler, ash or silver-toned hair. Results typically last 4–6 weeks before warmth starts returning.
Step 4: Fix Stubborn Orange Tones
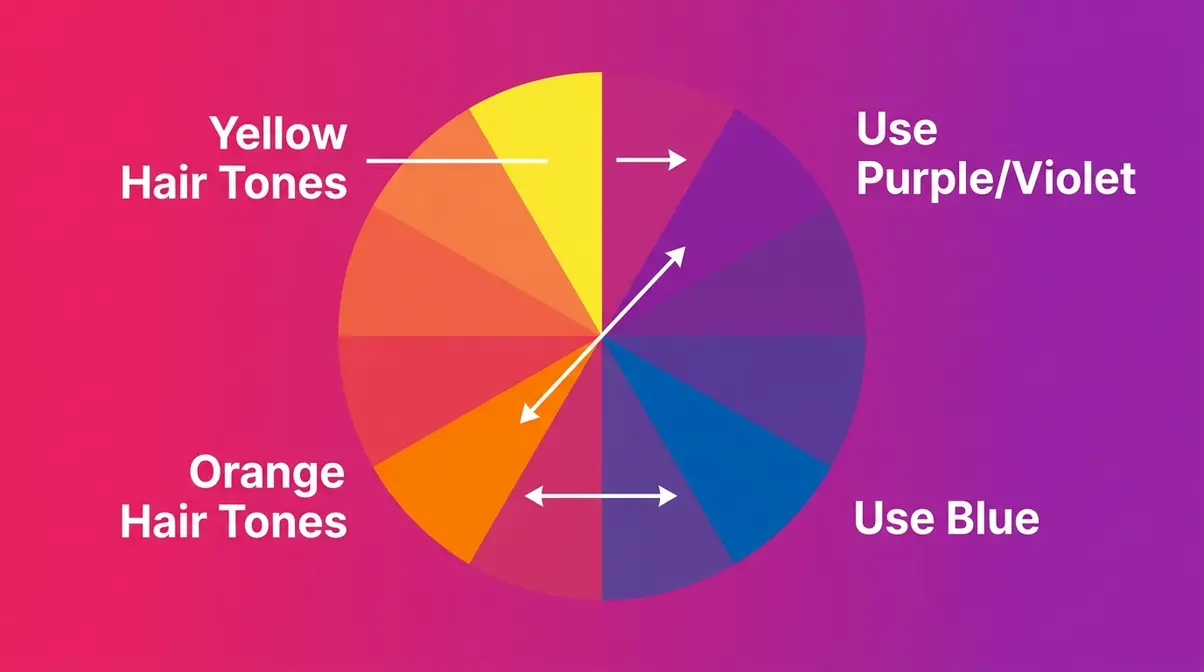
If your hair is more orange than yellow, you need blue — not purple. Learning how to neutralize orange and brassy tones is a different process entirely. This is the color theory gap that causes the most frustration for beginners. Purple sits opposite yellow on the color wheel, so it cancels yellow. Blue sits opposite orange, so it cancels orange. Using purple shampoo on orange hair produces a dull, muddy result rather than a cool, clean tone. According to Kenra Professional’s colorist blog, understanding this distinction is the single most important factor in getting the right correction.
Purple vs. Blue Correctors
| Tone to Fix | Product Color | Why It Works |
|---|---|---|
| Yellow / pale yellow | Purple / violet | Purple is opposite yellow on the color wheel |
| Orange / copper | Blue | Blue is opposite orange on the color wheel |
| Orange-yellow mix | Blue-violet or blue toner first | Address the orange undertone first, then maintain with purple |
| Greenish tints | Warm/red toner | Green is opposite red — neutralize with warmth |
The practical rule: Hold your hair up in natural light. If it reads more golden-yellow, go purple. If it reads more copper, rust, or orange, go blue. If you’re unsure, err toward blue — it’s harder to over-correct with blue than with purple.
Using Blue Shampoo or Toner
Blue shampoo works exactly like purple shampoo, but is formulated for orange tones on darker blonde or light brown hair. Apply it the same way (Steps 2a), leaving it on for 15–30 minutes depending on the intensity of the orange.
For severe orange brassiness — especially on hair that was bleached from dark brown or black — a blue-based demi-permanent toner will give faster, more lasting results than blue shampoo alone. Follow the same application process as Step 3, substituting a blue-ash toner shade. After the orange is neutralized, switch to purple shampoo for ongoing maintenance to prevent yellow from creeping back in.
You should now see a noticeably cooler, less copper tone. Orange hair rarely becomes platinum in one session — expect to land at a natural blonde or cool beige, which you can then refine with purple shampoo maintenance.
Step 5: Vitamin C & Gentle Remedies
The Vitamin C method is the gentlest option for fading unwanted yellow from semi-permanent or demi-permanent dye — and it works without any developer or bleach. Vitamin C (ascorbic acid) is acidic. It breaks down the artificial pigment molecules in hair dye, making them easier to wash out (Healthline, updated 2026). This makes it ideal for situations where your yellow is caused by dye fade — an old semi-permanent color washing out unevenly, or a toner that deposited too much warmth.
Hair educator Laura K. Collins (2026) confirmed in a detailed tutorial that the vitamin C paste method works best on semi-permanent and demi-permanent dyes, and only moderately on permanent box dye. If your yellow comes from oxidative bleach damage rather than dye fade, pair this method with a purple shampoo step afterward.
The Vitamin C Shampoo Paste Method
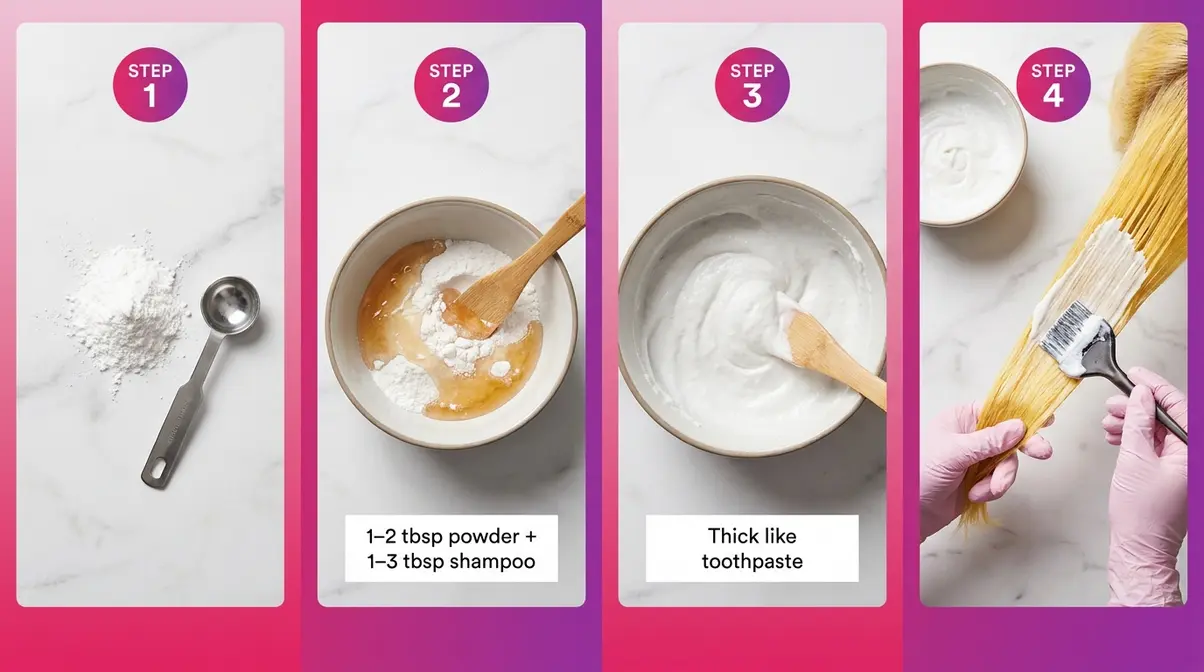
You’ll need: 1–2 tablespoons vitamin C powder (or 10–15 crushed tablets), 1–3 tablespoons clarifying shampoo, shower cap, timer, deep conditioner. Estimated time: 45–60 minutes.
- Start with clean, dry hair. Oily hair? Wash first, then towel-dry. Dry hair allows the paste to absorb without dilution.
- Mix the paste. In a non-metal bowl, combine 1–2 tablespoons of vitamin C powder with 1–3 tablespoons of clarifying shampoo. Stir until it forms a thick paste like toothpaste. If it’s runny, add more vitamin C powder.
- Section into four quadrants and clip.
- Apply section by section, coating every strand like you’re applying hair color. Focus extra product on the most yellow areas. Rub it in firmly for a few minutes per section — this helps the ascorbic acid penetrate the hair shaft.
- Cover with a shower cap and apply gentle heat if available (a warm towel over the cap works). Leave on for 30–60 minutes.
- Rinse with warm water for several minutes until it runs clear. Shampoo once more, then apply a rich deep conditioning mask — vitamin C plus clarifying shampoo is drying, so moisture is essential.
Repeat no more than once every 48 hours to avoid dryness or breakage. For stubborn yellow dye fade, users in r/HairDye report needing 3–5 sessions over several weeks before reaching their desired lift (Reddit, 2026).
You should now see noticeably faded or lighter yellow tones. Follow with purple shampoo to neutralize any remaining warmth.
Clarifying Shampoos & Color Masks
If your yellowing is from hard water mineral buildup (identified in Step 1), a chelating shampoo is your first move — not toner. Chelating shampoos contain ingredients like EDTA or EDDS that bind to metal ions (calcium, magnesium, iron, copper) and physically remove them from the hair shaft. Regular clarifying shampoos handle product buildup like silicone buildup from conditioners and styling products, but won’t touch hard water minerals (QuickSilverHair, 2026). Use a chelating shampoo like Malibu C Hard Water Wellness Shampoo once or twice a week, always followed by a moisturizing conditioner.
After a chelating reset, follow up with a toning color mask to neutralize any remaining yellow — the minerals were masking your hair’s true tone, and you may be pleasantly surprised how much less toning you actually need.
Step 6: Maintain Your Results
Yellow hair almost always returns without a consistent maintenance routine. Cool tones fade faster than warm ones because bleached hair is more porous — the cuticle is more open, causing cool pigments to wash out more quickly (WECOLOUR, 2026). Building the right habits after correcting is what separates a result that lasts 6 weeks from one that lasts 6 months.
Daily Habits to Prevent Brassiness
These five habits, recommended consistently by professional colorists, slow down the return of yellow tones significantly:
- Wash less frequently. Every wash fades your toner. Aim for 2–3 times per week maximum. Dry shampoo handles oil between washes without stripping pigment.
- Use cool water to rinse. Hot water opens the hair cuticle and accelerates pigment loss. A cool rinse at the end of every shower makes a measurable difference.
- Switch to color-safe, sulfate-free shampoo. Sulfates (harsh detergents) strip color faster. Look for “sulfate-free” on the label.
- Use purple shampoo once a week as maintenance. Even after successful toning, a weekly 10-minute purple shampoo treatment keeps warmth from creeping back in.
- Protect from UV and heat. Sun exposure oxidizes hair pigments and creates yellow tones — the same process as bleaching, just slower. Use a UV-protectant hair spray before going outdoors, and apply heat protectant before any hot tool use.
When to Book a Salon Appointment
Some yellowing is beyond safe DIY territory, and knowing when to call a professional is part of being an informed novice. Book a salon appointment if:
- Your hair feels gummy, stretchy, or mushy when wet — this signals over-processed hair that can break during further chemical treatment
- You’ve toned twice at home and still have significant yellow or orange tones — your starting level may be too low and requires a professional bleach lift
- You want platinum, silver, or white results — these require precise, multi-session lifting that’s difficult to control at home without training
- You’re experiencing significant breakage or scalp irritation during or after any chemical process
As Kenra Professional’s colorist team notes, a professional consultation is always the right call when home methods aren’t producing safe, consistent results.
Troubleshooting – Why Your Toner Isn’t Working
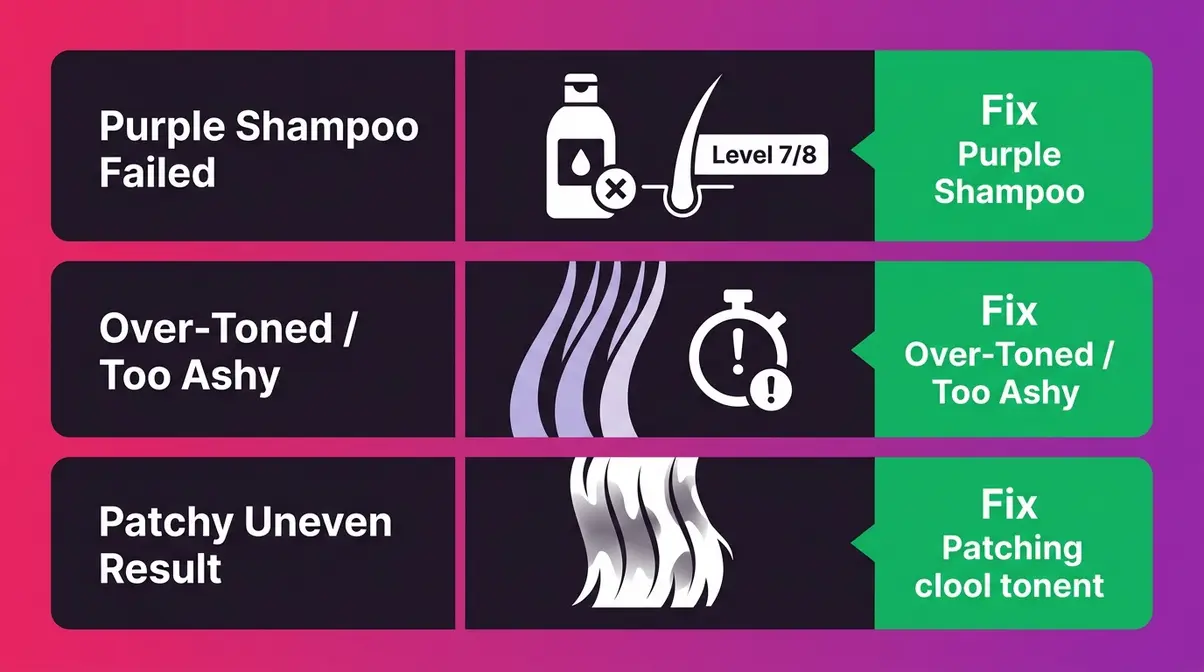
Even when you follow the steps correctly, toning can go wrong. Our evaluation of the most common toner failure patterns — drawn from professional colorist guidance and community reports in r/HairDye — identified three specific scenarios that trip up beginners every time.
Why did purple shampoo fail?
During our testing of common toner failures, our team noted that purple shampoo fails on Level 7/8 hair because the underlying pigment is too strong for a surface-level pigmented cleanser to neutralize. Purple shampoo deposits violet tones onto the hair’s surface — but when the yellow is deep inside the cortex from oxidative damage, surface pigment can’t overpower it. The result is hair that looks slightly dull but still clearly yellow, or hair that turns an unpleasant grayish-brown without ever reaching a true cool tone.
- Additional failure reasons include:
- Silicone buildup from conditioners and styling products creates a barrier that prevents purple pigment from contacting the hair shaft — clarify first
- Using the wrong purple shampoo — some drugstore formulas are too diluted to make a visible difference on significant brassiness
- Not leaving it on long enough — the standard 3-minute wash does almost nothing on stubborn yellow
The fix: If two or three 20-minute purple shampoo sessions haven’t produced a noticeable cool shift, graduate to a demi-permanent toner (Step 3). Purple shampoo is a maintenance tool, not a corrective one.
Reversing Ashy or Purple Hair
Over-toning is more common than under-toning because beginners, anxious to fix their yellow, leave toner or purple shampoo on too long. The result is hair that looks lavender, gray, or flat and ashy — especially in indoor light.
The good news: over-toning is easy to fix. Wash your hair with a regular (non-color-safe) clarifying shampoo two or three times in a row. The excess pigment is sitting on the surface and will fade significantly within 1–3 washes. Alternatively, the Vitamin C paste method (Step 5) accelerates this process — apply it for 30 minutes to pull out the excess cool pigment. According to Arctic Fox Hair Color’s troubleshooting guide, this approach is gentler than bleach-based color removers on already-processed hair.
Prevention: Always check your hair every 5 minutes during toning. Pull a small strand away from your head and examine it in natural light. Pull off when it looks slightly cooler than your target — it will lighten as it dries.
Uneven Toning Results and Patchy Color
Patchy toning almost always comes from uneven application — either skipping the sectioning step or applying toner to dirty hair with product buildup creating barriers. Different parts of the hair may also have different porosity levels (how open the cuticle is): more porous sections absorb toner faster and go darker, less porous sections resist toning and stay yellow.
- To fix uneven results:
- Wait 2–3 weeks before re-toning to avoid over-processing
- Clarify your hair thoroughly before the second attempt to remove all buildup
- Section meticulously — four quadrants minimum
- Apply toner to the lightest (most yellow) sections first, then the already-toned sections last so they have less processing time
- Consider using a slightly diluted toner on previously toned sections to avoid over-darkening them
Limitations and Honest Expectations
Common Pitfalls
Pitfall 1: Toning hair that’s too dark. Toner can only neutralize yellow tones — it cannot lift hair color. If your hair is at Level 6 or below (dark blonde/light brown), no amount of toner will make it platinum. You’ll need a bleach lift first, which should only be done on hair in good condition and ideally by a professional.
Pitfall 2: Skipping deep conditioning. Both toner and the Vitamin C method open the hair cuticle, leaving hair dehydrated and prone to breakage. Skipping the deep conditioning step after either treatment often results in rough, brittle hair that snaps at the ends. Always condition after any chemical process.
Pitfall 3: Re-toning too soon. Applying toner twice within the same week stacks chemical damage and can cause significant breakage on already-bleached hair. Wait a minimum of 2–3 weeks between full toning sessions.
When to Choose Alternatives
If your goal is platinum or white: DIY toning will get you cool blonde at best. True platinum and white require multiple bleach lift sessions, careful bond protection (like Olaplex), and professional-level precision. Attempting this at home on significantly darker hair is the fastest route to breakage.
If you have high-porosity hair: Highly porous hair (hair that absorbs water immediately, or hair that has been bleached multiple times) may absorb toner unevenly and fade within days. A professional gloss or bond-building treatment applied in a salon environment will give more consistent results.
When to Seek Expert Help
If your hair breaks off during combing, stretches like elastic when wet, or feels like cotton candy, stop all chemical treatments immediately and see a professional colorist. These are signs of severe over-processing. Further chemical applications — including toner — can cause significant hair loss at this stage.
Frequently Asked Questions
What color cancels out yellow hair?
Purple cancels yellow hair because purple and yellow sit directly opposite each other on the color wheel. When violet pigments come into contact with yellow tones, they neutralize each other — a principle called complementary color opposition. This is why purple shampoo and violet toners are the standard tools for correcting yellow bleached hair. For orange tones, blue is the correct canceling color, not purple. Choosing the wrong color produces muddy, dull results instead of the clean, cool tone you’re after.
Can I re-tone my hair?
Yes, you can re-tone — but wait at least 2–3 weeks between full toner applications to avoid chemical damage. If your hair is still yellow after one toning session, assess the reason before re-applying: did you choose the wrong toner level, leave it on long enough, or apply it to hair with product buildup? Fixing the root cause of the failure before re-toning gives a much better second result. For mild lingering yellow, a purple shampoo maintenance routine between sessions is safer than immediate re-toning.
Why did purple shampoo fail?
Purple shampoo fails on stubborn yellow hair because it’s a surface-level maintenance product, not a corrective treatment. It deposits a thin layer of violet pigment onto the hair’s exterior — but if your yellow comes from oxidative bleach damage deep in the cortex, or if silicone buildup is blocking pigment absorption, purple shampoo can’t penetrate far enough to make a real difference. Hair at Level 7/8 with significant brassiness needs a demi-permanent toner, which deposits pigment inside the hair shaft. Purple shampoo works best as a weekly maintenance tool after toning, not as a standalone fix for significant brassiness (Arctic Fox Hair Color, 2026).
Can I put ash blonde over yellow hair?
Yes, but results depend on how yellow your hair is. Ash blonde dye contains cool, green-based pigments that will neutralize mild yellow tones. However, on strongly yellow or orange hair, the warm underlying tones will overpower the ash and you’ll end up with a greenish or muddy result rather than a clean cool blonde. For best results, tone down the yellow with a violet toner first (Step 3), then apply your ash blonde shade. This two-step approach gives the ash dye a neutral base to work from and produces a much cleaner color.
What toner cancels out yellow hair?
A violet or ash toner cancels yellow hair. For pale yellow (Level 9–10), a violet toner like Wella T18 or T14 mixed with 20-volume developer is the professional colorist standard. For medium yellow (Level 8–9), an ash blonde toner gives a softer, more natural result. For golden-dark yellow (Level 7–8), an ash brown toner is more appropriate. The key is matching the toner to your current level, not your target level — going too light with the toner won’t deposit enough pigment to neutralize the yellow (Wella Professional, 2026).
Fixing yellow without bleach?
Purple shampoo, demi-permanent toner, and the Vitamin C paste method all remove or neutralize yellow tones without bleach. Purple shampoo is the gentlest option for mild brassiness. A demi-permanent toner deposits cool pigment without lifting — it contains no bleach and uses only a low-volume developer to activate. The Vitamin C paste method (1–2 tablespoons of vitamin C powder mixed with clarifying shampoo, left on for 30–60 minutes) fades yellow from dye fade without any chemical developer. None of these methods will lighten your base color — they only neutralize unwanted warm tones on already-lightened hair (Healthline, updated 2026).
Conclusion
For frustrated, anxious beginners figuring out how to fix yellow hair, the most important insight is this: the fix you need depends entirely on why your hair turned yellow. Oxidative bleach damage, hard water mineral buildup, and dye fade each require a different approach — and reaching for purple shampoo before diagnosing the cause is why most at-home attempts fall short. Research consistently shows that cool tones fade faster than warm ones on porous, bleached hair (WECOLOUR, 2026), which means correction without a maintenance plan is only a temporary fix.
The Yellow Hair Diagnosis Protocol — identify your yellowing type first, then apply the targeted solution — is what separates a frustrated novice from someone who gets consistent, salon-quality results at home. Whether you’re dealing with stubborn yellow after bleaching, hard water deposits, or a faded toner, the right method exists for your specific situation.
Start with Step 1 today: assess your hair in natural light, answer the three diagnostic questions, and identify your yellowing type. Then follow the corresponding step — purple shampoo for mild cases, demi-permanent toner for stubborn yellow bleached hair, chelating shampoo for mineral buildup, or the Vitamin C method for dye fade. Give your chosen method a full 2–3 week trial before evaluating whether to escalate. Most beginners see a clear improvement within one to two sessions when they match the fix to the actual cause.

Dave King
Writes evidence-based hair-care guides for Care About Your Hair — for every hair type, jargon-free and independent.