Table of Contents
- Understanding the Science of Brown Hair Color
- Decoding Skin Tones and Undertones for Brunettes
- The Ultimate Brown Hair Color Chart and Trends
- Types of Brown Hair Dye Formulations
- How to Dye Hair Brown at Home: Step-by-Step Guide
- The Challenge of Going From Blonde to Brown
- The Challenge of Going From Black to Brown
- Hair Health and Maintenance for Brunettes
- Troubleshooting Common Brown Hair Dye Mistakes
- Conclusion: Embracing Your Best Brunette Self
- Frequently Asked Questions
This blog post may contain affiliate links. As an Amazon Associate I earn from qualifying purchases.
Brown hair has quietly become the most sought-after color in salons across the country, and for good reason. Far from being “just brown,” this spectrum offers endless possibilities, from icy mushroom tones to sun-drenched caramel and everything in between. The “Expensive Brunette” trend dominating social media proves that when done right, brown hair radiates sophistication, warmth, and effortless elegance that turns heads.
This guide walks you through every aspect of achieving your ideal brunette shade. Whether you’re refreshing your natural color, covering grays, or making a dramatic change from blonde or black, you’ll learn how to choose, apply, and maintain brown hair dye while keeping your strands healthy and vibrant. Understanding your skin tone, selecting the right formulation, and mastering application techniques will transform your relationship with brown hair color forever.
Psychologically, brunette shades convey reliability, intelligence, and timeless beauty. Unlike high-maintenance platinum or bold fashion colors, brown hair allows your features to take center stage while providing a frame that enhances rather than competes. Let’s explore how to find the brown that makes you feel like the best version of yourself.
Understanding the Science of Brown Hair Color
Before choosing a shade, understanding how hair color actually works helps you make smarter decisions and communicate better with stylists or understand product packaging.
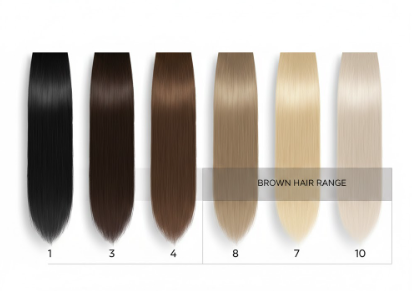
Hair color comes primarily from a pigment called eumelanin, which creates the brown-to-black spectrum in natural hair. The concentration and distribution of eumelanin determine whether your natural shade leans toward light brown, medium brown, or near-black. When you apply brown hair dye, you’re either depositing additional pigment, replacing existing pigment, or both.
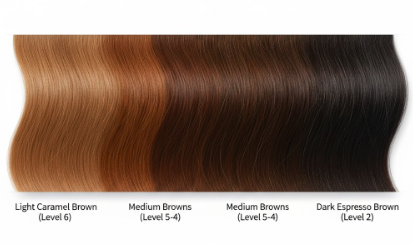
Professional colorists and product manufacturers use a standardized Level System to describe hair darkness. This scale runs from 1 (black) to 10 (lightest blonde), with brown hair typically falling between levels 2 and 6. When you see a box labeled “5N” or “4WN,” the number indicates the depth (how dark), while the letters describe the tone (warm, neutral, ash). A level 3 is deep espresso brown, level 4 is medium-dark chocolate, level 5 is medium brown, and level 6 is light brown approaching dark blonde territory.
Understanding this system prevents common mistakes. If your natural hair is level 3 and you want level 6, you need to lift (lighten) your hair, which requires developer with higher volume and possibly bleach. If you’re going darker, the process is simpler because you’re depositing pigment rather than removing it. Those who want to explore other color possibilities might also enjoy learning about blue hair dye options, which require a completely different approach involving pre-lightening for best results.
Decoding Skin Tones and Undertones for Brunettes
Choosing brown hair dye based solely on a celebrity photo or Pinterest board often leads to disappointment. The secret to stunning brown hair lies in matching your shade to your unique skin undertone.
The wrong brown can make your complexion look sallow, washed out, or ruddy. The right brown enhances your natural glow, makes your eyes pop, and creates harmony between your hair and face. This isn’t about following rigid rules but understanding the science of complementary colors.
Determining Your Skin Tone Temperature
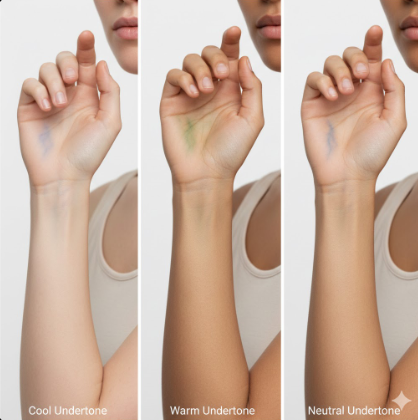
Your skin undertone falls into one of three categories: cool, warm, or neutral. Several simple tests help you identify yours accurately.
The vein test involves looking at the inside of your wrist in natural daylight. If your veins appear primarily blue or purple, you likely have cool undertones. Green-looking veins suggest warm undertones. If you see a mix of both, you’re probably neutral.
The jewelry test asks which metal makes your skin glow. Silver and platinum flattering your complexion indicates cool undertones, while gold and rose gold looking better suggests warm undertones. If both look equally good, you’re neutral.
The white paper test requires holding a bright white sheet of paper next to your bare face. If your skin looks pinkish or rosy against the white, you’re cool-toned. Yellowish or peachy tones indicate warmth. No strong pull toward either suggests neutral undertones.
Best Brown Shades for Cool Skin Tones
Cool undertones pair beautifully with brown shades that contain ashy, violet, or neutral bases. These tones neutralize any redness in your skin and create a sophisticated, modern look.
Ash brown has become incredibly popular for cool-toned individuals. This shade contains subtle gray or green undertones that counteract brassiness and create a muted, elegant finish. Mocha brown offers depth with cool violet undertones, perfect for those who want richness without warmth.
Mushroom brown sits on the cooler end of the brunette spectrum, featuring soft taupe and gray notes. This shade gained massive popularity for its lived-in, effortlessly chic appearance. Espresso with cool undertones provides deep, nearly black brown that reads sophisticated rather than harsh against pink-toned skin.
If your skin tends toward redness or has visible pink undertones, these cool browns create visual balance. They prevent the hair from emphasizing flushing and instead draw attention to your eyes and facial structure.
Best Brown Shades for Warm Skin Tones
Warm undertones sing when paired with brown shades containing gold, copper, red, or honey tones. These colors complement yellow and peachy complexions beautifully.
Golden brown catches light and creates dimension, especially in sunlight. This shade ranges from subtle gold flecks to full-on honey-dipped warmth. Honey brown bridges the gap between brown and blonde, creating the coveted “bronde” effect that looks naturally sun-kissed.
Chestnut brown incorporates red-orange undertones that warm up the face and add vibrancy. This shade works particularly well for those with hazel or brown eyes, creating harmonious warmth throughout. Caramel brown offers lighter, toffee-inspired warmth perfect for those wanting dimension without going too dark.
These warm browns enhance the natural glow in warm-toned skin, making the complexion appear healthy and luminous rather than competing with it.
Best Brown Shades for Neutral and Olive Skin Tones
Neutral skin tones have the most flexibility when choosing brown hair dye. Both warm and cool browns typically work, though true neutrals often look best in shades that are also neutral-based.
Medium chocolate brown without strong warm or cool pulls flatters neutral undertones beautifully. Natural brown shades labeled “N” (neutral) in the color code work well across the neutral spectrum.
Olive skin tones require special consideration. Olive undertones contain green and yellow, which can interact unexpectedly with certain brown dyes. Very ashy browns might enhance the green in olive skin, making it look sallow. However, some olive-skinned individuals embrace this effect for an intentionally cool, fashion-forward look.
For most olive complexions, warm browns with red or copper undertones brighten the face and prevent the muddy appearance that can happen with too-cool shades. Mahogany and auburn-leaning browns work exceptionally well, creating warmth that counteracts any gray or green in the skin.
The Ultimate Brown Hair Color Chart and Trends
Brown hair encompasses dozens of distinct shades, each with unique characteristics and maintenance requirements. Understanding the full spectrum helps you articulate exactly what you want.
Ash Brown and Mushroom Brown
These cool-toned browns dominate current trends, offering a modern, matte finish that photographs beautifully and reads as effortlessly chic.
Ash brown contains green or blue-gray undertones that neutralize red and orange. This shade suits those with cool undertones or anyone wanting a fashion-forward look. The challenge with ash brown lies in maintenance. Natural warmth tends to peek through as the color fades, requiring toning products or regular gloss treatments to maintain the cool finish.
Mushroom brown takes the ash trend further, incorporating soft taupe and gray notes. This shade creates a sophisticated, dimensional look that appears expensive and low-maintenance. It works particularly well as a balayage or lived-in color because the soft tones grow out gracefully.
Both shades require commitment to cool-toned maintenance products. Purple or blue shampoos help maintain ashiness, though overuse can create an unwanted gray cast. For those interested in comprehensive Care About Your Hair routines, understanding toning schedules becomes essential with these shades.
Golden and Honey Brown
Sun-kissed warmth defines these radiant browns, perfect for those wanting dimension that catches light and creates movement.
Golden brown ranges from subtle shimmer to full-on buttery warmth. This shade adds dimension to dark hair and creates natural-looking highlights when applied strategically. The gold tones reflect light beautifully, making hair appear healthier and more voluminous.
Honey brown sits at the intersection of brown and blonde, creating the beloved “bronde” effect. This shade works through balayage or highlights to create depth at the roots transitioning to lightness at the ends. Honey tones require some lifting for darker natural bases but create incredibly dimensional, lived-in results.
These warm browns tend to fade gracefully, with the warmth softening rather than turning unpleasant. They’re lower-maintenance than ash tones for naturally warm-toned individuals.
Chocolate and Chestnut Brown
Rich, indulgent, and universally flattering, these medium-brown shades offer warmth without veering into red territory.
Chocolate brown provides deep, saturated color that works across multiple skin tones. This shade offers the classic brunette look, reading as natural while providing depth and shine. True chocolate brown contains subtle warmth that prevents it from looking flat or dull.
Chestnut brown incorporates more obvious red-orange undertones, creating warmth that catches copper and auburn notes in sunlight. This shade has crossover appeal with the “Cowgirl Copper” trend, offering a warmer alternative for those not ready to commit to full red.
Both shades provide excellent gray coverage and tend to appear natural even on those with originally lighter hair. They’re forgiving shades that work well for at-home application.
Espresso and Dark Mocha
The deepest browns border on black while retaining warmth and dimension that pure black lacks.
Espresso brown offers near-black depth with subtle brown undertones that catch light. This shade creates drama without the stark, one-dimensional look that jet black can produce. Espresso works beautifully on olive and deep skin tones, providing intensity while allowing features to stand out.
Dark mocha incorporates the slightest warmth into deep brown, preventing the color from appearing flat. This shade photographs beautifully, reading as naturally deep hair rather than obviously dyed.
These deep browns require careful application to avoid over-depositing and creating an inky, unnatural appearance. They provide excellent coverage but can be challenging to lift later if you want a lighter color.
Auburn and Mahogany Brown
These hybrid shades incorporate red and violet pigments, creating multidimensional color that shifts between brown and red depending on lighting.
Auburn brown leans toward copper and red, creating warm, vibrant color that reads as naturally red-brown. This shade suits warm skin tones beautifully and creates exciting dimension. Auburn requires maintenance to prevent fading to brass, but color-depositing conditioners make upkeep manageable.
Mahogany brown incorporates deeper violet and burgundy tones, creating sophisticated warmth with wine-like depth. This shade works surprisingly well on cool undertones because the violet pulls prevent excessive warmth while still providing rich color.
Both shades fade faster than pure browns because red molecules are smaller and escape the hair shaft more quickly. Regular glossing treatments help maintain vibrancy.
Types of Brown Hair Dye Formulations
Not all brown hair dye works the same way. Understanding formulation differences helps you choose products that match your commitment level and damage concerns.
Permanent Hair Color
Permanent dye uses ammonia and developer to open the hair cuticle, remove some natural pigment, and deposit new color deep within the cortex. This formulation provides the longest-lasting results and best gray coverage.
The process works by mixing the dye with a developer (hydrogen peroxide) that activates the color molecules and enables them to penetrate the hair shaft. Lower volume developers (10-20) deposit color with minimal lift, while higher volumes (30-40) provide more lightening power.
Permanent color doesn’t wash out, though it does fade over time as color molecules break down from sun exposure, heat styling, and washing. Touch-ups become necessary every four to six weeks as roots grow in. The commitment is significant, but the payoff is reliable, long-lasting color.
Demi-Permanent and Semi-Permanent Glosses
These formulations offer color commitment without permanent alteration, making them ideal for color experimentation or refreshing faded ends.
Demi-permanent color uses low-volume developer to deposit color without fully opening the cuticle. The color molecules partially penetrate the hair, lasting through approximately 24-28 washes. This formulation works well for darkening hair, refreshing existing color, or adding gloss and shine between permanent touch-ups. Most demi-permanent options are ammonia-free, making them gentler on hair.
Semi-permanent color contains no developer at all. These products coat the hair shaft with color that washes out gradually over 8-12 shampoos. Semi-permanent options work best for those wanting to try a shade before committing or for refreshing color between salon visits.
Glossing treatments fall into this category, offering shine and tone correction without damage. Many salons offer express gloss services specifically to refresh brunette shades and add mirror-like shine.
Natural and Plant-Based Dyes
For those avoiding synthetic chemicals, plant-based options provide color through different mechanisms than conventional dyes.
Henna creates color by coating and staining the hair shaft rather than penetrating it. Pure henna produces reddish-brown shades, while henna mixed with indigo can create darker browns and near-black tones. The results are permanent and build with each application, creating deep, rich color over time.
The significant caveat with henna involves its interaction with synthetic dyes. Metallic salts in some henna products react badly with conventional color, potentially causing breakage or unexpected results. Removing henna to switch to conventional color is difficult and often requires growing out rather than stripping. Anyone considering henna should commit to the long term.
Other plant-based dyes using ingredients like cassia or walnut hull provide more temporary results but lack the coverage and vibrancy of henna or synthetic options.
Professional vs. Box Dye Differences
Understanding what separates salon color from drugstore boxes helps you make informed decisions about where to invest your money.
Professional color formulations typically use higher-quality ingredients and offer more customization. Stylists mix custom shades by combining multiple colors and choosing developer volumes based on your specific hair. This customization prevents the one-size-fits-all approach that sometimes leads to unsatisfactory box dye results.
Professional colorists also apply strategically, using techniques like balayage, foiling, or color melting that create dimension impossible to achieve at home. They can manage complex processes like corrective color, going from dark to light, or neutralizing unwanted tones.
Box dyes provide convenience and affordability but come with limitations. Many contain metallic salts or progressive dyes that build up over time and interact unpredictably with professional color. The included developer is standardized rather than customized, which can lead to over-processing or under-processing depending on your hair’s condition.
For simple root touch-ups or darkening hair, quality box dyes from reputable brands produce good results. Complex changes, lightening, or corrective work belong in professional hands.
How to Dye Hair Brown at Home: Step-by-Step Guide
Achieving salon-quality brown hair at home requires preparation, patience, and attention to technique. Following proper procedures prevents common mistakes and protects your hair health.
Preparation and Patch Testing
Never skip allergy testing, even if you’ve used hair dye before. Allergies can develop at any time, and reactions to PPD (paraphenylenediamine) found in most permanent dyes range from mild irritation to severe medical emergencies.
Perform a patch test 48 hours before full application. Mix a small amount of dye according to package directions and apply to a discreet area behind your ear or inside your elbow. Monitor for redness, itching, swelling, or any unusual reaction. If irritation occurs, do not use the product.
Strand testing helps you preview the final color before committing. Take a small section from underneath your hair (where mistakes won’t show) and apply the mixed dye. Process according to package timing, then rinse and dry to see the true result. This step is especially important when trying a new shade or if your hair has previous color, highlights, or chemical treatments.
Prepare your supplies before mixing the dye. You’ll need the color and developer, an applicator brush or bottle, sectioning clips, a mixing bowl (non-metallic), gloves, a timer, old towels, and petroleum jelly to protect your hairline from staining.
Sectioning and Application Techniques
Proper sectioning ensures even coverage and prevents the dreaded hot roots phenomenon where your roots end up lighter or more vibrant than your lengths.
Begin by parting dry hair into four sections: front left, front right, back left, and back right. Secure each section with clips. Working with one section at a time prevents the product from drying out before you finish and ensures thorough saturation.
When darkening natural hair or applying permanent color, start at the mid-lengths and ends rather than the roots. Scalp heat causes roots to process faster, so saving them for last produces more even results. Apply color to mid-lengths and ends first, then apply to roots during the last 15-20 minutes of processing time.
When covering gray or matching roots to previously colored hair, apply to new growth first since this area needs the most processing time. Work through the roots thoroughly, then pull color through the lengths in the final ten minutes to refresh without over-processing.
Use the applicator brush to paint small subsections, ensuring complete saturation from front to back of each strand. Don’t be stingy with product. Insufficient coverage leads to patchiness and uneven results.
Processing Time and Rinsing
Timing determines whether you achieve the shade on the box or end up with unexpected results. Follow manufacturer instructions precisely.
Set a timer as soon as you complete application. Resist the urge to leave color on longer for “better” results. Over-processing damages hair and can cause the color to go darker or develop unwanted tones. Under-processing leaves you with less coverage and a lighter result than expected.
Check timing guidelines for your specific situation. First-time application often requires longer processing than touch-ups. Gray coverage may need maximum time, while refreshing previously colored ends may need minimal processing.
When time expires, rinse with lukewarm to cool water until the water runs clear. Hot water opens the cuticle and allows color molecules to escape, so keep temperature low. Apply the conditioner included in most box kits. This seals the cuticle, locks in color, and provides crucial moisture after the chemical process.
Wait at least 48 hours before shampooing to allow color to fully oxidize and set. This waiting period significantly improves color longevity.
The Challenge of Going From Blonde to Brown
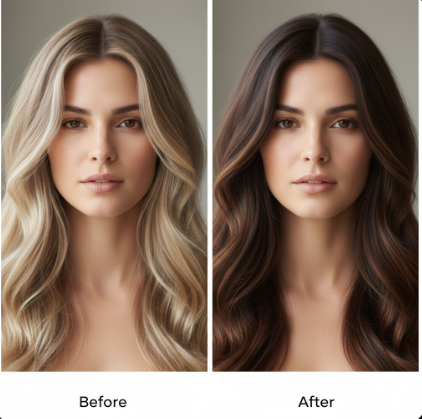
Transitioning from blonde to brown seems like it should be simple since you’re adding pigment rather than removing it. However, this color correction requires understanding underlying pigments to achieve natural-looking results.
Blonde hair, whether natural or bleached, lacks the underlying warm pigments present in natural brown hair. When you apply brown dye directly over blonde, the missing pigments cause the color to appear flat, ashy, muddy, or even greenish. The brown molecules have nothing to grab onto, resulting in hollow, unnatural color that fades quickly.
The solution involves a process called filling. Before applying your target brown shade, you must replace the missing underlying pigments, typically warm orange or red tones, that exist naturally in brown hair.
To fill blonde hair, apply a warm semi-permanent or demi-permanent color in copper, gold, or warm orange one to two levels lighter than your target shade. Process according to directions, rinse, and then apply your brown shade on top. The filler creates a base layer that allows the brown to appear rich, dimensional, and natural.
Some colorists use protein fillers, which are concentrated pigment solutions applied to porous, damaged, or lightened hair before dyeing. These products even out porosity and provide the underlying warmth needed for successful brown coverage.
The darker the brown you’re targeting, the more critical filling becomes. Going from platinum to dark chocolate brown without filler almost always produces disappointing results. Consulting a professional for this significant change prevents costly corrections later.
The Challenge of Going From Black to Brown
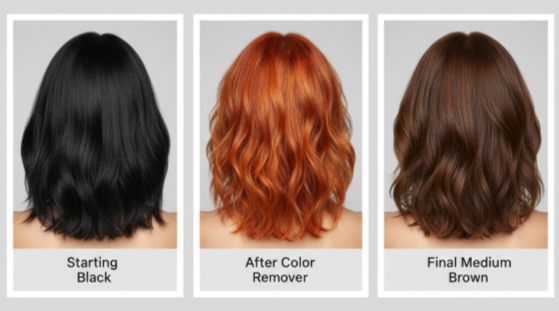
Going lighter from black or very dark brown hair presents the opposite challenge from blonde-to-brown transitions. A fundamental rule of hair coloring applies here: color cannot lift color.
Brown hair dye cannot lighten black hair. The dye deposits pigment but cannot remove the existing dark pigment in your hair. Applying medium brown dye over black hair results in minimal change because there’s no lifting action.
Achieving brown from black requires removing some of the existing dark pigment first. Several options exist depending on your hair’s condition and how much lighter you want to go.
Color removers (like Color Oops or Joico Color Eraser) shrink the dye molecules deposited by previous color, allowing you to wash them out. These products work best on hair colored with semi-permanent or demi-permanent dyes and work less effectively on naturally dark or heavily box-dyed hair. They don’t damage hair significantly because they’re not bleaching, but they may require multiple applications.
Bleach baths (also called soap caps) combine bleach powder, developer, and shampoo to create a gentler lightening mixture. This approach lifts black to a lighter level, typically red-orange, which can then be toned or colored to your desired brown shade. Bleach baths cause less damage than full bleach application but still require careful technique.
Full bleach application provides the most lifting power but also the most damage. This approach should be done professionally, especially on previously colored or compromised hair.
After lifting black to a lighter level (usually orange or copper), you may need to tone or fill before applying your target brown shade. The goal is achieving a clean, even base that accepts brown color predictably.
Those with 2C hair patterns or other wavy textures should take extra care with these chemical processes, as the curl pattern can be affected by lightening treatments. Deep conditioning before and after helps maintain pattern integrity.
Hair Health and Maintenance for Brunettes
Beautiful brown hair depends on ongoing maintenance to preserve color vibrancy and hair health. The right care routine extends time between touch-ups and keeps your brown looking fresh.
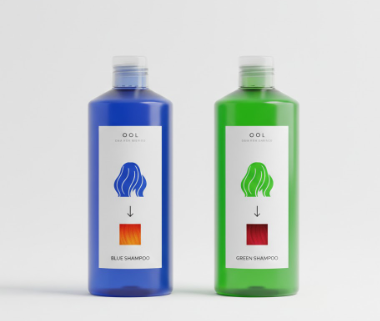
Fighting Fade and Red Undertones
Brown hair dye fades toward warmth over time because red and orange pigment molecules are larger and escape the hair shaft more slowly than cool tones. What starts as cool ash brown may reveal brassy undertones within weeks.
Understanding which toning shampoo to use prevents confusion. Blue shampoo neutralizes orange tones and works best on light to medium browns that turn brassy. Green shampoo (or blue-green combinations) neutralizes red tones and works better on darker browns or those specifically fighting red brassiness.
Use toning shampoos once or twice weekly, not daily. Overuse creates an ashy, dull appearance or even greenish tints. Alternate with your regular color-safe shampoo for best results.
Color-depositing conditioners provide another maintenance option. These products deposit small amounts of brown pigment with each use, refreshing color and extending time between dyeing sessions. Look for products matching your specific brown tone (ash, warm, neutral) for seamless color maintenance.
Hydration and Porosity Management
Colored hair requires extra moisture because the dyeing process opens the cuticle, affecting how hair absorbs and releases moisture. Proper hydration keeps brown hair shiny and prevents the dull, straw-like texture that screams “damaged.”
Deep conditioning masks should become a weekly ritual for color-treated hair. Look for products containing keratin, argan oil, or other penetrating proteins and lipids that repair and smooth the cuticle. Leave-in treatments provide ongoing protection throughout the week.
Porosity issues often develop after repeated coloring. High-porosity hair absorbs color quickly but loses it just as fast. If your color fades rapidly or appears patchy, porosity problems may be the culprit. Protein treatments help fill gaps in the hair shaft, evening out porosity and improving color retention.
Avoid hot water when washing hair. Warm to cool water keeps the cuticle sealed, preserving color molecules and preventing moisture loss. This simple change significantly impacts color longevity.
UV Protection and Heat Styling
Sun exposure and heat styling strip color molecules from hair, causing premature fading and damage. Protecting your investment requires conscious effort.
UV rays break down color molecules, which is why hair often turns lighter and brassier after summer months. Products with UV filters provide protection when spending time outdoors. Hats offer even better protection for extended sun exposure.
Heat styling poses particular risks for color-treated hair. Flat irons, curling wands, and blow dryers at high temperatures literally cook color out of the hair while simultaneously causing structural damage. Always use heat protectant products rated for color-treated hair before any heat styling.
Lower heat settings accomplish most styling goals with less damage. Modern styling tools with adjustable temperature settings allow you to find the minimum effective heat for your hair type. Fine hair rarely needs temperatures above 300°F, while thick, coarse hair may require more heat but benefits from fewer passes.
Root Maintenance and Touch-Ups
New growth becomes visible within two to three weeks of dyeing, creating the telltale “root line” that signals time for maintenance.
Between-dye solutions help extend time between full applications. Root concealing sprays and powders come in various brown shades and provide temporary coverage that washes out with your next shampoo. These products work well for special events or buying extra time before your scheduled touch-up.
When touching up roots, apply color only to new growth rather than pulling through the lengths. Repeatedly coloring already-processed hair causes buildup and damage. Reserve length refreshing for every third or fourth touch-up, using a quick five-minute pull-through rather than full reapplication.
Most permanent brown hair dye requires root touch-ups every four to six weeks. Those with rapid hair growth or high-contrast root colors (gray roots against dark brown, for example) may need more frequent maintenance. Demi-permanent color users can often stretch to six or eight weeks since the color fades rather than creating a hard line.
Troubleshooting Common Brown Hair Dye Mistakes
Even with careful preparation, hair color sometimes goes wrong. Knowing how to fix common issues prevents panic and saves trips to the salon for correction.
Hair Turned Too Dark or Inky
Applying brown dye that’s too dark or leaving permanent color on too long creates an unnaturally dark, flat result. The good news: dark color is usually fixable.
Clarifying shampoo provides the gentlest first approach. This deep-cleansing formula strips product buildup and some surface color molecules. Wash with hot water (just this once) and let clarifying shampoo sit for several minutes before rinsing. Repeat over several days for gradual lightening.
Vitamin C treatments offer a DIY lightening option. Crush Vitamin C tablets into powder, mix with clarifying shampoo to form a paste, apply to damp hair, cover with a shower cap, and leave for 30-60 minutes. The ascorbic acid helps break down color molecules. This method lightens semi-permanent and some demi-permanent colors effectively but has limited effect on permanent dye.
Professional color correction may be necessary if at-home methods fail. Colorists use specialized removers and techniques to safely extract unwanted pigment without destroying your hair.
Hair Turned Green or Muddy
Green or murky brown results typically occur when dyeing over bleached or highlighted hair without proper filling. The missing underlying warm pigments cause brown dye to appear hollow with greenish or olive undertones.
Adding warmth corrects this issue. Apply a warm toner in copper, gold, or strawberry blonde to neutralize the green. Let it process briefly (check every few minutes to avoid going too warm), then rinse. The warmth fills in the missing pigments, and you can reapply your brown shade over the corrected base.
The infamous ketchup trick works in emergencies. The red pigments in tomato ketchup can help neutralize green tones. Apply ketchup to affected areas, cover with a shower cap, leave for 20-30 minutes, then rinse thoroughly. Follow with a gloss or toner in your desired brown shade. This works best on minor green tints rather than severely problematic color.
Uneven Color and Patchiness
Patchy results stem from uneven application, product buildup, or varying porosity levels throughout the hair.
Product buildup from styling products, dry shampoo, or previous color creates barriers that prevent new color from absorbing evenly. Clarifying before coloring and sectioning hair properly for thorough saturation helps prevent this issue.
Porosity differences often occur when the ends of hair are more porous than the roots (common with length that’s been through years of heat styling and environmental exposure). Porous areas grab color more intensely and can end up darker. Applying color to less porous roots first and using a quick pull-through on porous ends rather than full saturation helps even things out.
To fix existing patchiness, apply color only to the lighter, under-processed areas. Avoid reprocessing the sections that absorbed too much color. Work in small sections for precise correction.
Conclusion: Embracing Your Best Brunette Self
Choosing the right brown hair dye involves understanding your unique skin undertone, selecting a shade that enhances your natural beauty, and committing to maintenance that keeps your color fresh and your hair healthy. The perfect brown exists for everyone, whether you gravitate toward cool mushroom tones, warm honey shades, or rich chocolate depth.
Starting with demi-permanent glosses allows experimentation without permanent commitment. These lower-stakes options help you discover which brown family suits you best before investing in permanent color. Once you find your signature shade, maintaining it becomes a rewarding ritual rather than a chore.
Healthy hair holds color better, reflects light beautifully, and makes any shade look more expensive. Prioritize hydration, protect against heat and UV damage, and touch up roots strategically. Your investment in proper care pays dividends in color longevity and overall hair quality.
Brown hair offers sophistication without high maintenance, warmth without overwhelming your features, and versatility that transitions effortlessly from season to season. Whether you’re enhancing your natural color or making a dramatic change, the right brown shade becomes part of your signature style.
Frequently Asked Questions
What is the most low-maintenance brown hair color?
Balayage and root-smudge techniques create the most low-maintenance brown looks. These methods blur the line between your natural color and the applied shade, allowing roots to grow in gracefully without a harsh demarcation line. Choosing a brown within two levels of your natural color also minimizes obvious regrowth.
Does brown hair dye damage your hair?
Brown hair dye causes less damage than bleaching but still affects hair structure. Permanent dye opens the cuticle and alters the hair cortex, which can lead to dryness and porosity changes over time. Demi-permanent and semi-permanent options cause minimal to no damage since they don’t fully penetrate the hair shaft. Using quality products and deep conditioning regularly minimizes potential damage.
How do I choose between light brown and dark brown dye?
Stay within two levels of your natural base color for the most flattering and natural-looking result. If your natural hair is level 4 (medium-dark brown), levels 3 through 6 will blend seamlessly with your roots and complement your features. Going significantly lighter requires lifting, while going much darker can look harsh against your complexion.
Can I dye my hair brown over highlights?
Yes, but highlighted hair requires filling first to prevent the blonde sections from appearing hollow, muddy, or green. Apply a warm semi-permanent color (copper or gold) to the highlights before your brown dye, or use a protein filler designed for porous hair. This step deposits the underlying warmth that natural brown hair contains.
How often should I touch up my brown roots?
Most people need brown root touch-ups every four to six weeks. However, this varies based on hair growth rate, how much contrast exists between your roots and dyed color, and whether you’re covering gray. Gray coverage typically requires more frequent touch-ups (every three to four weeks) because gray roots are more noticeable against brown.
What is the difference between ash brown and golden brown?
Ash brown contains cool undertones (gray, green, or blue-violet) that create a muted, modern finish and neutralize warmth. Golden brown contains warm undertones (yellow, gold, or orange) that catch light and create sun-kissed dimension. Ash browns suit cool skin tones, while golden browns complement warm complexions.
Why do my brown roots look orange?
Orange roots result from the “hot roots” phenomenon, where scalp heat causes the roots to process faster and lift more than expected. This exposes the underlying orange pigments naturally present in hair. To prevent this, apply color to mid-lengths and ends first, saving roots for the last 15-20 minutes of processing time.
Is box dye bad for brown hair?
Modern box dyes have improved significantly, and quality brands produce good results for straightforward applications. However, some box dyes contain metallic salts or progressive color that builds up with repeated use and can react unpredictably with professional color later. For simple root touch-ups or darkening, box dye works well. For complex corrections or lightening, professional color is safer.
How can I make my brown hair dye last longer?
Extend brown color by washing hair less frequently (every two to three days), using lukewarm to cool water, and switching to sulfate-free shampoo formulated for color-treated hair. Wait 48 hours after dyeing before the first shampoo. Use color-depositing conditioners weekly to refresh pigment. Protect hair from UV exposure and minimize heat styling.
What is the best brown hair dye for covering gray hair?
Neutral-based permanent dyes (labeled “N” in the shade code) provide the most reliable gray coverage. Fashion shades and trendy colors often lack the density of pigment needed to fully cover resistant gray hair. For stubborn grays, choose a permanent formula one shade darker than your target color, as gray hair can appear lighter than expected after processing.

1 thought on “The Definitive Guide to Brown Hair Dye: Finding Your Perfect Brunette Shade”