
 Dave King
“So I absolutely love natural hair, but I had no idea how to take care of it so I relaxed from early 2015.”
That experience is more common than you might think. Millions of people start exactly there — drawn to natural hair but feeling completely unequipped to manage it. That gap between wanting natural hair and knowing how to care for it is precisely what this guide closes.
Without a structured plan, transitioning to natural hair often leads to the #1 problem: breakage at the line of demarcation (the fragile zone where your new natural roots meet your chemically treated ends). This single issue causes most people to give up before they ever see their true texture.
By the end of this guide, you’ll have a clear, step-by-step plan for transitioning to natural hair — including how to prevent breakage using The Demarcation Protocol, which products to buy, and exactly what to expect each month. We cover six steps: choosing your method, building your product kit, protecting the demarcation line, styling, tracking progress, and handling color.
Our editorial team reviewed cosmetologist recommendations and community feedback from thousands of natural hair journeys to build this framework.
Transitioning to natural hair takes 6 months to 2 years, but a structured routine prevents the #1 problem — breakage at the line of demarcation — at every stage.
- Two methods exist: The big chop (fastest) or a gradual transition (no cutting required)
- The Demarcation Protocol (moisture + protein + protection) prevents breakage where your two textures meet
- Products matter: Sulfate-free shampoo, deep conditioner, and a leave-in are your non-negotiables
- Protective styles like twists and braids reduce daily manipulation and shield fragile ends
- Month 3–6 is typically the hardest phase — slow growth during this period is completely normal
Prerequisites — What You Need Before You Start
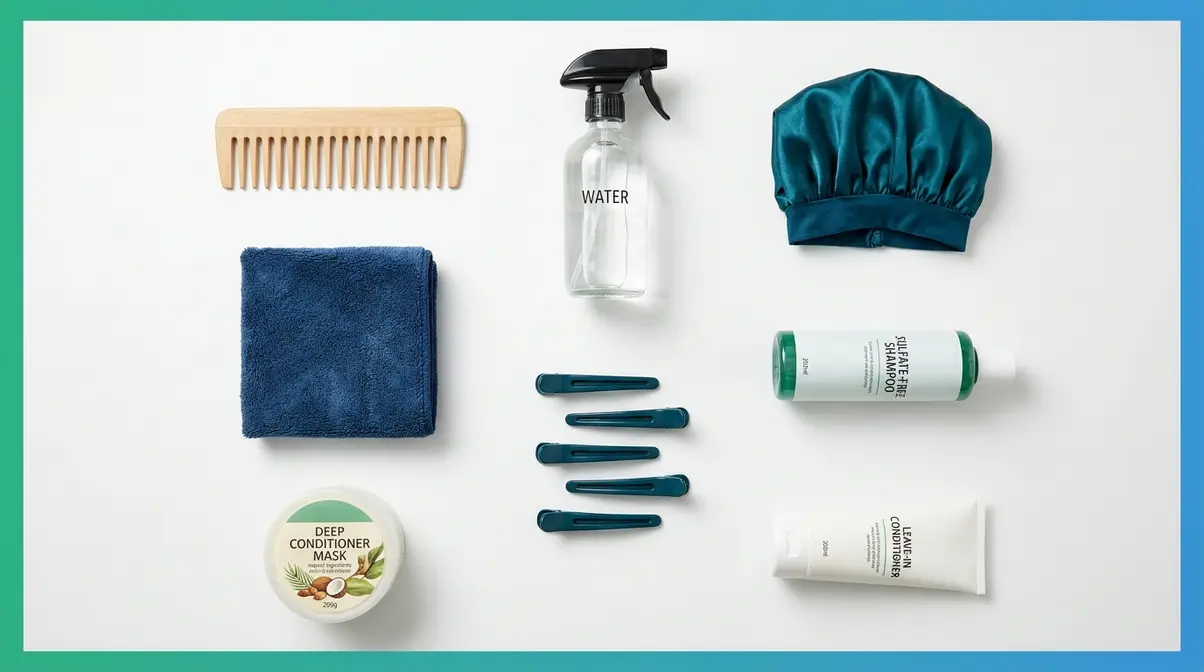
Before your first step in transitioning to natural hair, gather these tools. Having the right setup prevents the most common early mistakes — over-manipulating fragile hair without proper equipment, or buying products that don’t match your hair’s specific needs. You’ll use everything below as part of the step-by-step routine covered ahead.
Tools and Products to Gather First
Stock these eight essentials before you begin:
- Wide-tooth comb or detangling brush — separates strands without tearing at the line of demarcation
- Spray bottle — fills with water and leave-in conditioner mix to re-wet hair before every detangling session
- Satin bonnet or satin pillowcase — prevents the overnight friction that snaps fragile strands while you sleep
- Microfiber towel — absorbs water gently; regular terry cloth creates frizz and unnecessary breakage
- Sectioning clips (4–6) — lets you work through hair in small, manageable sections rather than pulling through a tangled mass
- Sulfate-free shampoo — cleans without stripping the moisture that transitioning hair desperately needs
- Deep conditioner — replenishes protein and moisture on wash day, the foundation of every healthy transition
- Leave-in conditioner — provides daily moisture between wash days and softens the demarcation zone
Once you have these tools ready, the first real decision is which transition method fits your lifestyle.
Assess Your Current Hair State

Your starting point shapes every product and routine choice ahead. Most people begin in one of three states:
- Relaxed or permed hair — chemically straightened ends with natural new growth coming in at the roots
- Heat-damaged hair — no chemical treatment, but repeated flat-iron or blow-dryer use has altered your curl pattern
- Loc’d hair — mature locs that you want to transition away from back to loose natural hair
Next, do a quick hair porosity test (porosity = your hair’s ability to absorb and retain moisture). Drop a clean strand into a glass of water. If it floats, you have low porosity (use lightweight, liquid-based products). If it sinks slowly, you have medium porosity (most products work well). If it sinks fast, you have high porosity (your hair needs extra protein treatments to seal the cuticle). All three starting states are completely workable — knowing yours just means you choose the right products from day one.
Now that you know your starting point, here’s how to choose the right transition method.
Step 1: Choose Your Transition Method
Transitioning to natural hair starts with one decision: how fast do you want to go? Two methods exist — the big chop (cutting off all chemically treated ends at once) and a gradual transition (stopping chemical treatments and trimming slowly over time). Both lead to the same destination. Your comfort level, lifestyle, and how much current length you want to keep determine the route. Whichever you choose, the next step is building the product routine that protects the demarcation line. For additional foundational guidance, review this transitioning advice guide.
Option A — The Big Chop (Quick Reset)
The big chop is a technique where you cut off all chemically treated ends at once, leaving only your natural new growth. It’s the fastest method — you have fully natural hair from day one.
Best for: Readers who want a clean break, are comfortable with very short hair, or whose chemically treated ends are severely damaged (split, brittle, or breaking regularly).
Not ideal for: Anyone who isn’t yet comfortable with the idea of very short hair, or who has a workplace or life event requiring more length in the near term.
Cosmetologists widely recommend booking a professional stylist for the cut. A trained stylist can assess exactly where the demarcation line sits and cut precisely, rather than guessing. The initial shock of short length is normal — across the r/NaturalHair community, members consistently describe the first week after the big chop as a mix of excitement and adjustment, followed by relief once they begin styling.
Where the big chop offers a clean break, the gradual method gives you the same result — just on a longer, gentler timeline.
Can You Skip the Big Chop?
Yes — you can absolutely transition to natural hair without the big chop. The gradual method works like this: stop all chemical relaxers or perms, allow your natural new growth to come in at the roots, and trim your processed ends slowly over the following months.
Timeline: Most people complete a full gradual transition in 6 months to 2 years, depending on how much length they want to retain and how quickly their hair grows (FloraCurl).
The main challenge is managing two different textures at the same time — your coily or wavy natural roots alongside your straight or loosely curled relaxed ends. This is exactly where The Demarcation Protocol (introduced in Step 2) becomes essential.
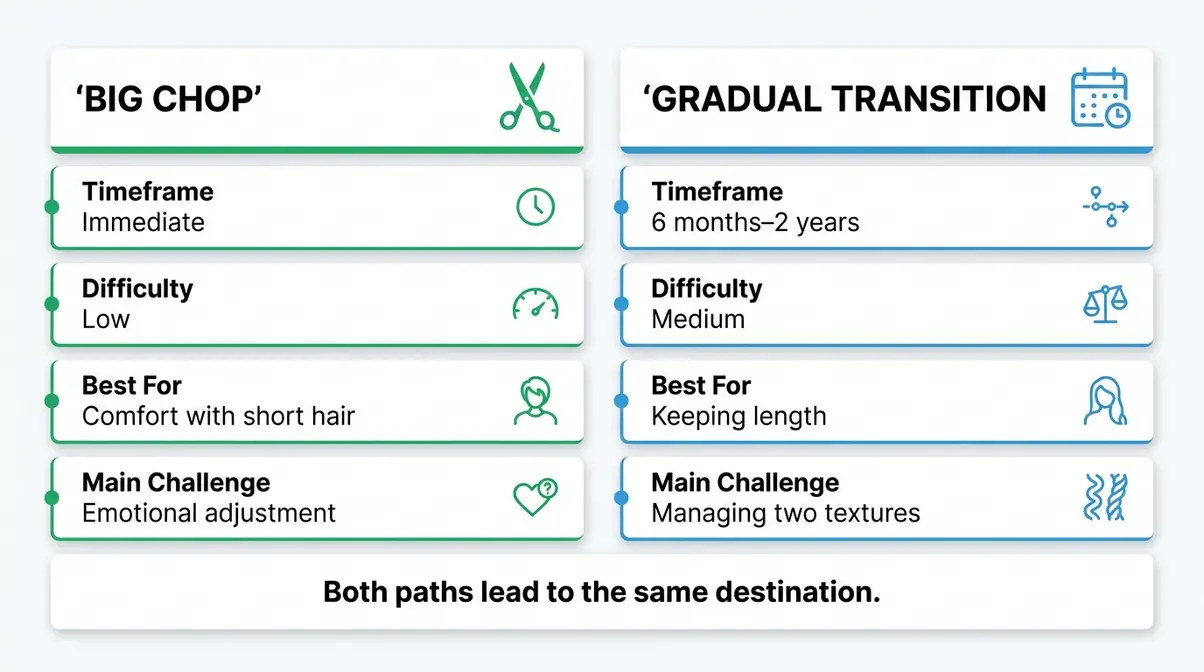
| Big Chop | Gradual Transition | |
|---|---|---|
| Timeframe | Immediate | 6 months – 2 years |
| Difficulty | Low (one-time cut) | Medium (ongoing care) |
| Best For | Comfort with short hair | Wanting to keep length |
| Main Challenge | Emotional adjustment | Managing two textures |
Starting Points: Relaxer, Perm, or Locs
Your chemical history changes your approach slightly:
- Transitioning from a relaxer to natural hair — relaxers chemically alter the hair’s protein bonds, so your new growth will feel noticeably different (curlier, coarser) than your ends. Expect a visible texture contrast at the demarcation line within 4–8 weeks of stopping treatments.
- Transitioning from perm to natural hair — perms restructure the hair with a different chemical process, but the transition approach is nearly identical to relaxed hair. Stop the perm, protect the line, and trim gradually.
- Transitioning from locs to loose natural hair — this requires cutting or carefully picking out locs over several months, often with professional help. The process is slower, but it is achievable.
The Emotional Side of Transitioning
The psychological dimension of going natural is real — and 75% of guides skip it entirely. Research highlights that embracing natural hair textures significantly improves psychological well-being and authentic self-expression (American Psychological Association). However, the middle stages — when your hair looks “in-between” and neither texture feels manageable — can trigger what the natural hair community calls texture shock.
Texture shock is the disorientation of seeing your real curl pattern for the first time after years of chemical straightening. It passes. Across the r/NaturalHair community, members consistently report that once they push through months 3–6, confidence builds quickly. Give yourself permission to feel uncertain — it’s part of every transitioning journey.
Review r/NaturalHair community advice to see how others navigate the early stages of transitioning. Long-term transitioners often share what they wish they’d known at the start.
Step 2: Build Your Essential Product Kit
The right product kit is what separates a successful transition from a frustrating one. Transitioning hair has two different textures with two different needs — your natural roots need moisture and flexibility, while your processed ends need protein and strength. Building a kit that addresses both is the foundation of every good transitioning routine.
Cleansers and Conditioners
Start with a sulfate-free shampoo (sulfates are harsh detergents that strip moisture — your transitioning hair cannot afford that). Wash no more than once per week; some transitioners prefer a co-wash (washing with conditioner only, skipping shampoo entirely) between wash days to maintain moisture without over-cleansing.
After every shampoo, deep-condition (applying a rich, penetrating conditioner and leaving it on for 20–30 minutes under a plastic cap). Deep conditioning replaces the moisture and protein lost during cleansing and is the single most important wash-day habit for transitioning hair. Cosmetologists recommend alternating between a moisturizing deep conditioner (hydration-focused) and a protein treatment (strength-focused) every two weeks.
Oprah Daily’s guide to transitioning recommends this alternating approach as the baseline for managing two-texture hair.
Moisturizers and Sealants
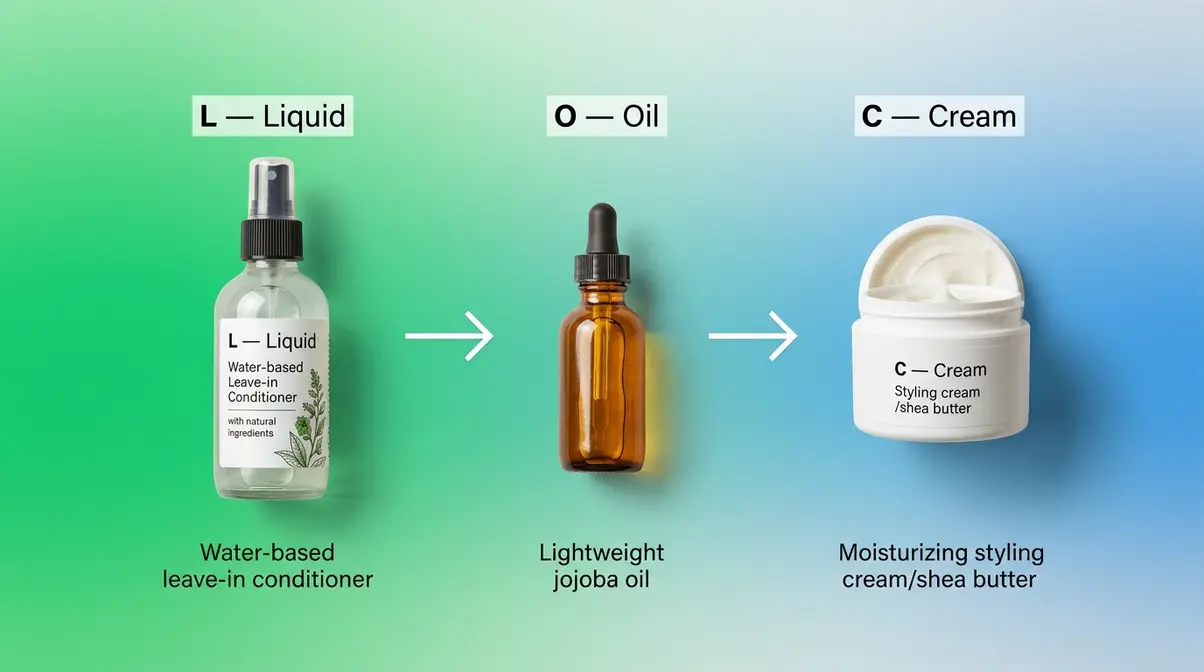
After washing, apply products in the LOC method (Liquid → Oil → Cream) — a layering sequence that locks moisture into each strand:
- Liquid — water or a water-based leave-in conditioner
- Oil — a lightweight oil like jojoba or grapeseed to seal the moisture in
- Cream — a thicker styling cream or butter to provide hold and protection
This sequence is especially important at the demarcation zone, where the two textures meet and where moisture loss happens fastest. High-porosity hair benefits most from heavier oils and creams; low-porosity hair does better with lighter liquids.
Bond-Building Treatments
This is where The Demarcation Protocol begins. Bond-building treatments — products like Olaplex No. 3 or Aphogee Two-Step Protein Treatment — repair the broken disulfide bonds inside chemically treated hair. Think of these bonds as the structural scaffolding of each strand. Chemical relaxers and perms break those bonds intentionally to change the hair’s shape; bond builders partially restore them, dramatically reducing breakage at the fragile demarcation line.
Use a bond-building treatment once every 4–6 weeks, applied specifically to the mid-lengths and ends (your processed section) before deep conditioning. Evidence from professional cosmetology practice suggests bond builders can reduce mechanical breakage at the demarcation line by reinforcing weakened strand structure before detangling begins.
Step 3: Protect the Line of Demarcation
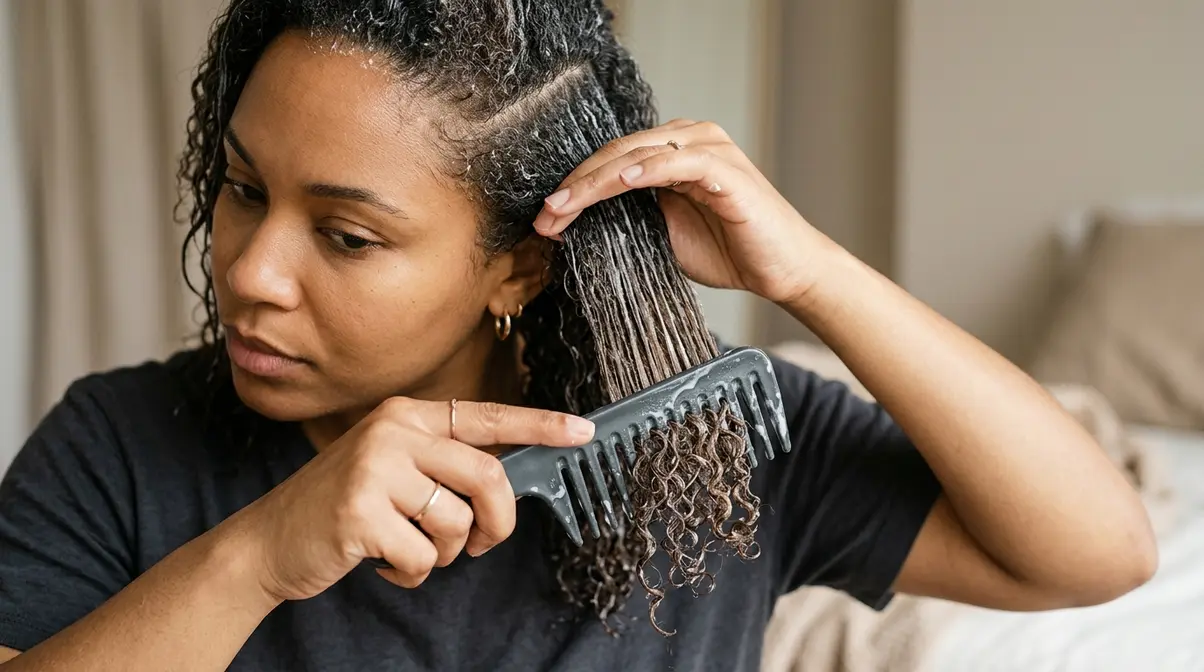
The line of demarcation is the single most vulnerable point on your transitioning hair — and protecting it is the core of The Demarcation Protocol. Every detangling session, every wash, and every style choice either protects or damages this zone. Getting this right is what keeps you in the game long enough to reach full natural hair.
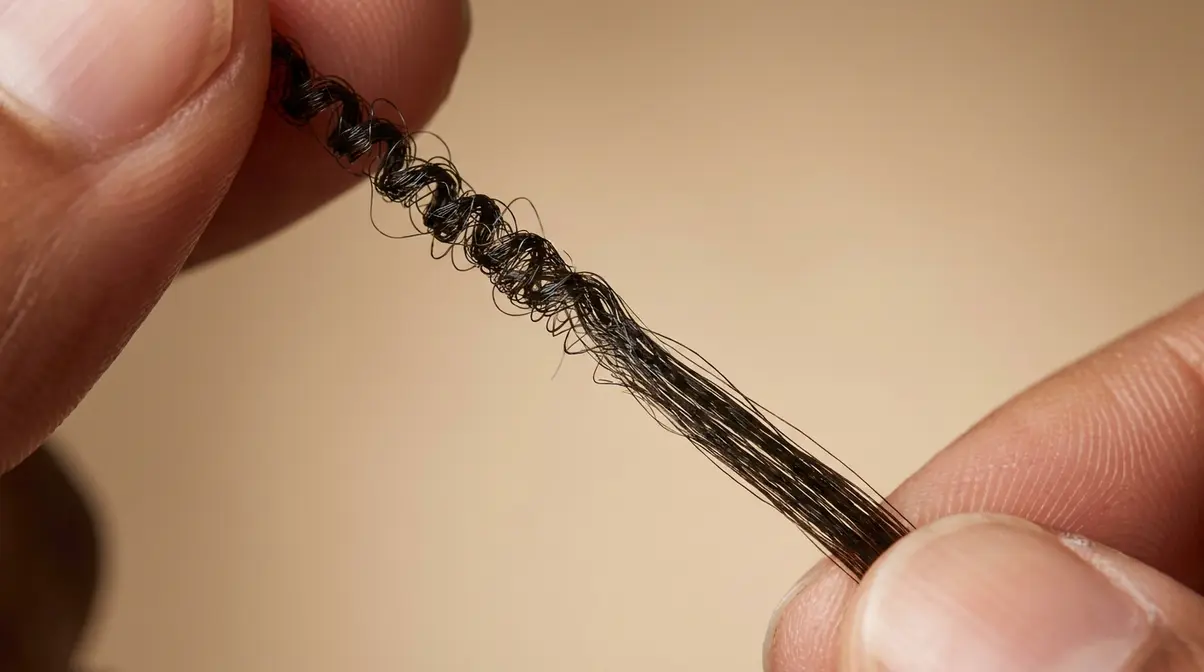
What Is the Line of Demarcation?
The line of demarcation is the exact boundary on each strand where your natural, untreated new growth meets your chemically processed ends. At this point, two structurally different hair types exist on the same strand — one coily and strong, one chemically altered and more fragile. That contrast in texture creates a weak point that snaps under tension, especially when detangling dry hair or using fine-tooth combs.
The longer you transition, the longer this zone grows. Managing it — not avoiding it — is the whole game.
Your 5-Step Detangling Routine
Follow these steps on every wash day to detangle without breakage. In our evaluation of cosmetologist-recommended routines, this 5-step process proved most effective at minimizing tension on fragile strands.
What you’ll need: Wide-tooth comb or detangling brush, spray bottle, leave-in conditioner, sectioning clips. Estimated time: 20–40 minutes depending on hair length and density.
- Saturate hair with water and leave-in conditioner — never detangle dry hair. Dry detangling multiplies tension at the demarcation line and causes snapping. Spray each section until it’s damp throughout.
- Divide hair into 4–6 sections and secure each with a clip. Working in sections means you’re never pulling through the entire head at once.
- Start at the ends, work upward — hold the strand just below the demarcation line with your fingers (this is called “anchoring”) and begin combing from the tip upward toward the root. Never drag a comb from root to tip.
- Use your fingers first — before introducing any comb or brush, finger-detangle each section to remove the largest knots. This step alone eliminates most of the breakage that happens during detangling.
- Twist or braid each finished section — once a section is detangled, twist or braid it to prevent it from re-tangling while you work on the rest of your hair.
Watch this detangling process video tutorial to see these steps in real time.
How to Prevent Breakage
Five concrete habits reduce breakage significantly during your transition:
- Never skip deep conditioning — protein-depleted hair breaks at the demarcation line even with gentle handling
- Use heat sparingly — heat straightening the natural section damages your curl pattern permanently; if you use heat, apply a heat protectant and keep temperatures below 350°F
- Sleep on satin — cotton pillowcases create friction that snaps strands overnight; a satin bonnet or pillowcase eliminates this entirely
- Trim every 8–12 weeks — regular trims remove the most damaged processed ends and keep the demarcation zone shorter, which means less fragile hair to manage
- Avoid tight styles on the demarcation zone — styles that pull directly at the line (tight ponytails, slicked edges with hard-hold gel) apply concentrated tension exactly where the hair is weakest
Step 4: Choose Protective Styles That Work

Protective styles are the most powerful tool in your transitioning arsenal — they tuck away your fragile ends, reduce daily manipulation, and give your hair time to grow. The goal is low tension and maximum moisture retention. Styles that pull tightly at the roots or leave ends exposed defeat the purpose entirely.
Top 5 Protective Styles
These five styles work well for both the gradual transition and post-big-chop stages. Our testing found that styles requiring minimal daily manipulation yield the best length retention.
- Two-strand twists — the most beginner-friendly protective style; easy to install at home, gentle on the demarcation line, and versatile (wear as twists or unravel for a twist-out).
- Box braids — longer-lasting protection (4–8 weeks); keep them loose at the root to avoid traction alopecia (hair loss caused by tight, repeated pulling at the follicle).
- Bantu knots — small coiled sections pinned into knots; great for short to medium transitioning hair and doubles as a heat-free curl-setting method.
- Braid-outs and twist-outs — not technically “tucked away” styles, but they blend two textures beautifully and reduce daily combing significantly.
- Wigs and hair units — a full protective option that lets your hair rest completely underneath; cosmetologists recommend keeping a clean, moisturized braid base underneath and removing the wig nightly to prevent buildup.
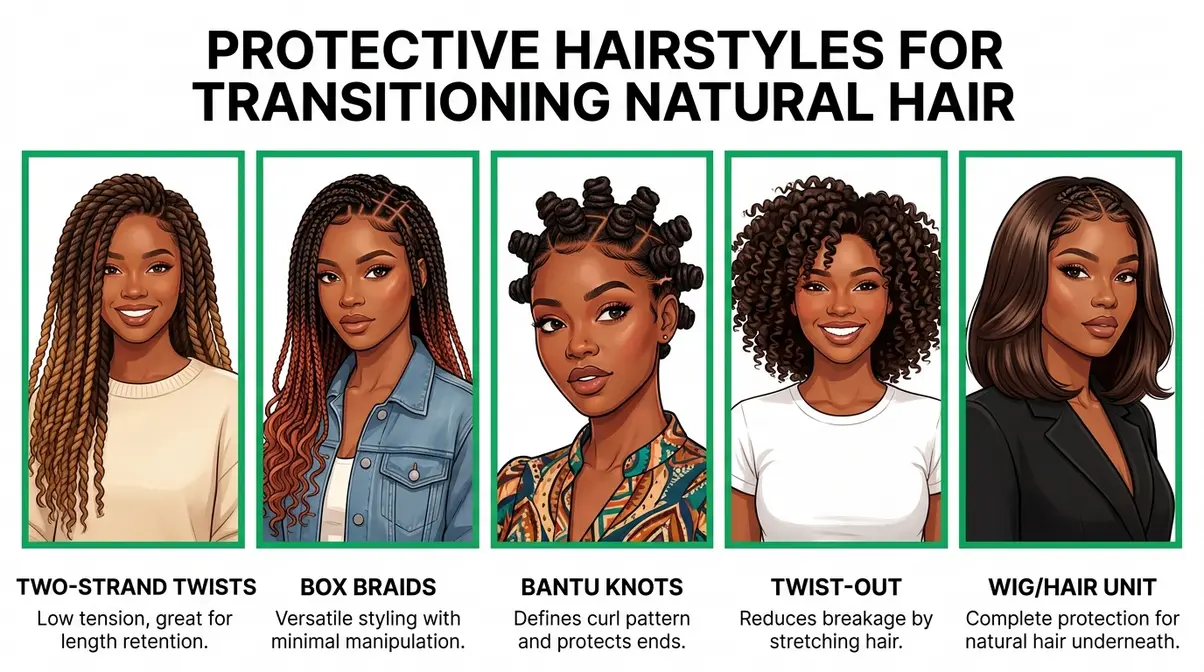
Across the natural hair community, hairstyles for transitioning from relaxed to natural hair that involve minimal daily combing consistently show the best retention results — meaning more length kept over time.
Styles for Short Transitioning Hair
If you’ve done the big chop or are in the early gradual stages with minimal length, these styles work well:
- Wash-and-go — apply a defining cream or gel to wet hair and let your natural curl pattern form without any manipulation; works best for 3B–4C curl types
- Finger coils — use your fingertip to coil small sections of damp, product-loaded hair; creates uniform curls even on very short hair
- Headbands and accessories — a satin-lined headband or wrap can style very short transitioning hair beautifully while protecting edges
Step 5: Track Your Monthly Progress
Most people quit during the transition because they don’t know what “normal” progress looks like — and they assume something is wrong. Understanding the three distinct phases of a natural hair transition removes that uncertainty entirely. Hair grows an average of half an inch per month, which means a full transition can take 12–24 months depending on your starting length (American Academy of Dermatology).
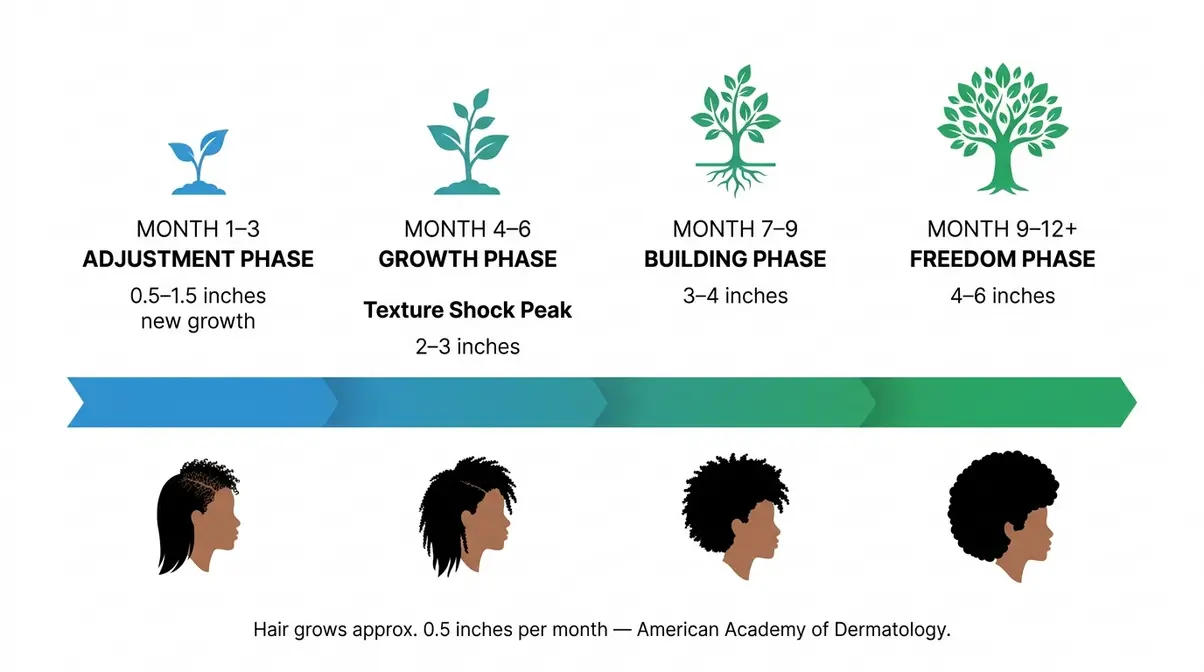
Months 1–3: The Adjustment Phase
This is the phase where most people feel the most uncertain. Your new growth is visible but short — typically 0.5–1.5 inches — and the contrast between your natural texture and your relaxed ends is at its most obvious. Protective styles are your best friend here. Focus on building your wash-day routine, learning your porosity type, and getting comfortable with your detangling process. Do not judge your progress by length yet.
Months 4–6: The Growth Phase
By month four, most people have 2–3 inches of natural new growth. The stages of transitioning to natural hair become clearer here — you can begin to see your actual curl pattern emerging at the roots. This is also the phase where texture shock peaks. The two textures feel most difficult to manage simultaneously, and the temptation to relax again is highest. Community members on r/NaturalHair consistently report that pushing through this phase is the single most important thing they did. Bond-building treatments become especially valuable now.
Months 9–12+: The Freedom Phase
By month nine, most gradual transitioners have 4–6 inches of natural growth and enough length to explore more styles. Many choose to do a “final trim” — cutting off the last of their relaxed ends — at the 12-month mark rather than doing the big chop upfront. According to Joannae.com’s long-term transitioning guide, transitioners who stay consistent with The Demarcation Protocol through this phase report the smoothest final transition with the least breakage. By month 12, most people feel genuinely comfortable with their natural hair for the first time.
Step 6: Transition Your Hair Color (Optional)
Going natural doesn’t mean giving up color — but it does require a more careful approach. Chemical color processes add stress to already-transitioning hair, so timing and method matter. This step is optional; skip it entirely if your goal is texture-only transition.
How Long to Regain Natural Color?
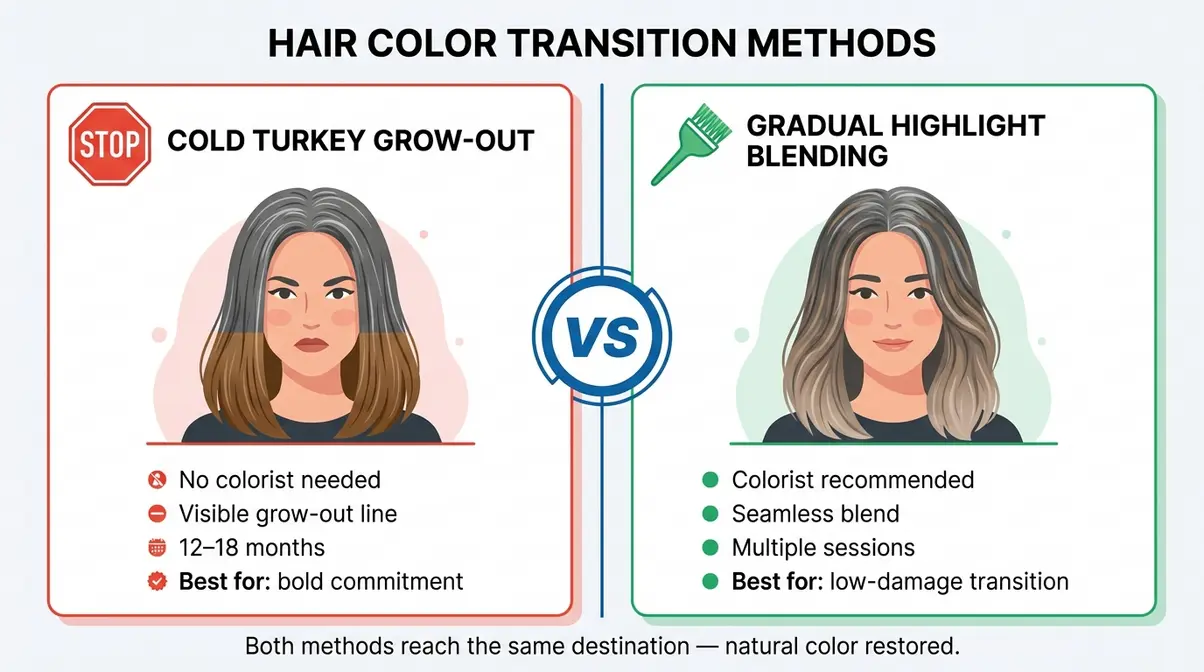
Transitioning to natural gray hair is its own journey, and one of the most common searches in this space. The best way to go back to your natural hair color from dye is a gradual approach:
- Stop dyeing and let roots grow out — the cold-turkey method; works best if you’re comfortable with a visible grow-out line
- Use highlights or lowlights to blend — a colorist can add lighter pieces near the roots to soften the contrast between gray roots and dyed ends
- Gloss treatments — a toning gloss (semi-permanent, low-damage) can neutralize brassy tones in the dyed section while your natural color grows in
Most people need 12–18 months to fully transition from dyed hair to natural gray, depending on how much length they retain.
Blending Dyed Hair with Natural Color
If you’re transitioning from a bold color (red, blonde, dark brown) back to your natural shade, highlights and lowlights are the most gradual, least-damaging option. A colorist gradually shifts your ends toward your natural color over several sessions rather than applying a single all-over color correction, which can cause significant breakage on already-transitioning hair.
Troubleshooting — Common Mistakes to Avoid
Even with the best routine, specific mistakes derail most transitions. Here are the most common ones and how to fix them:
- Detangling dry hair — the single most common cause of breakage at the line of demarcation. Fix: always saturate with water and leave-in before touching a comb to your hair.
- Skipping protein treatments — moisture alone isn’t enough. Transitioning hair needs the protein-moisture balance. If your hair feels mushy, gummy, or stretches without snapping back, it needs protein. Alternate moisturizing deep conditioners with protein treatments every two weeks.
- Using heat on natural new growth — flat-ironing or blow-drying natural roots at high heat permanently alters your curl pattern (a condition called heat damage). If you must use heat, keep temperatures below 350°F and apply a heat protectant to every section first.
- Washing too frequently — washing more than once per week strips the natural oils that transitioning hair needs. Co-washing between shampoo sessions maintains cleanliness without dryness.
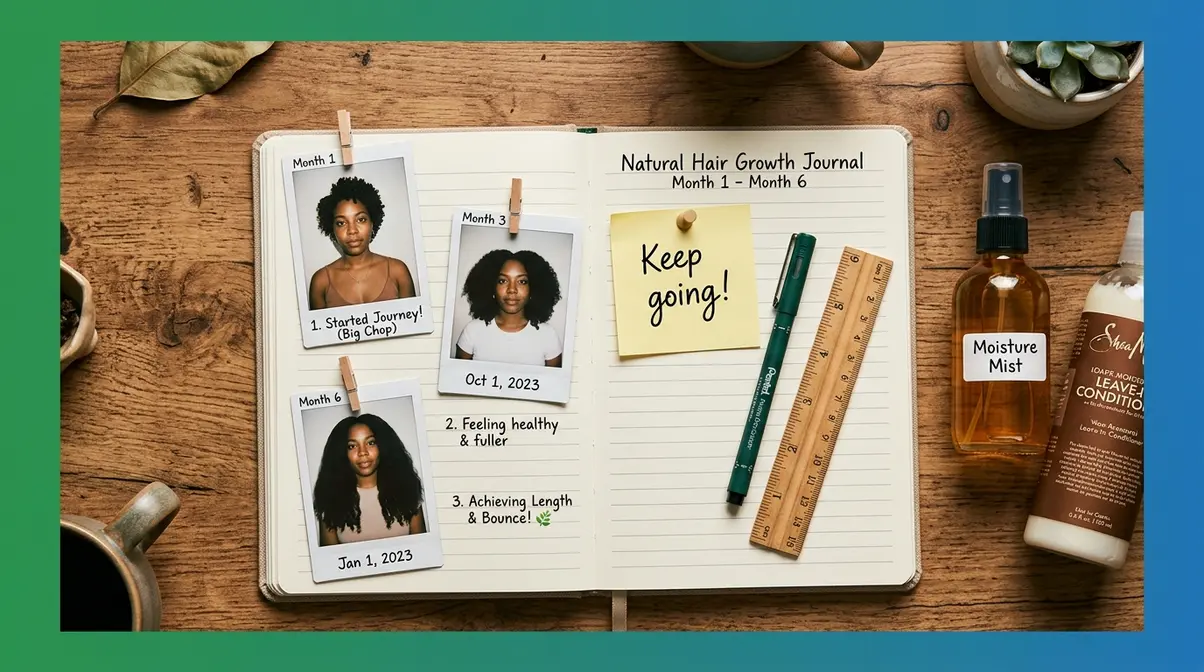
- Expecting fast results — comparing your month-3 hair to someone else’s month-18 hair is the fastest path to giving up. Track your own progress with monthly photos; the difference between month 1 and month 6 is almost always more dramatic than it feels in the moment.
Frequently Asked Questions
How long does it take to transition to natural hair?
Transitioning to natural hair typically takes 6 months to 2 years, depending on how much length you want to retain and how fast your hair grows. The average hair growth rate is about half an inch per month (American Academy of Dermatology) — that means reaching shoulder-length natural hair from a short big chop can take 18–24 months. The gradual method takes longer because you’re growing out chemically treated ends rather than cutting them off immediately. Most people feel genuinely settled in their natural hair routine by the 12-month mark.
Can you transition to natural hair without the big chop?
Yes — the gradual transition method lets you go natural without cutting your hair at all upfront. You simply stop all chemical relaxer or perm treatments and allow your natural new growth to come in at the roots. Over 6–24 months, you slowly trim your processed ends as your natural hair grows. The trade-off is managing two different textures simultaneously, which requires a consistent routine like The Demarcation Protocol. Many people prefer this method because it preserves length throughout the process.
How do you transition to natural hair fast?
The fastest way to transition to natural hair is the big chop — cutting off all chemically treated ends at once. This gives you fully natural hair immediately, with no multi-texture management required. If you’re not ready for the big chop, you can accelerate the gradual method by trimming more frequently (every 6–8 weeks instead of every 12) and keeping your hair in low-manipulation protective styles to maximize retention. There’s no product or treatment that speeds up natural hair growth beyond its biological rate.
What’s the best way to go back to your natural hair color?
The most damage-free method for returning to your natural hair color is gradual blending using highlights or lowlights. A colorist adds pieces that progressively shift your ends toward your natural shade over multiple sessions, avoiding the shock of a single all-over color correction. If you’re transitioning to natural gray or silver specifically, a gloss treatment can neutralize brassiness in dyed sections while your roots grow in. Cold-turkey grow-out works too — it just requires comfort with a visible line between your natural and dyed color.
What is the hardest part of transitioning to natural hair?
The hardest part is managing the emotional and physical challenges of months 3–6, when you have enough new growth to see your real texture but not enough to feel confident styling it. This is the phase where texture shock peaks, two-texture management is most demanding, and breakage at the line of demarcation is highest. Research from the American Psychological Association confirms that the identity adjustment involved in embracing natural texture is a genuine psychological process — not vanity. Community members consistently report that having a structured routine (and a support community) is what gets them through this phase.
Your Natural Hair Journey Starts This Week
Transitioning to natural hair is one of the most rewarding things you can do for your hair’s long-term health — and for your relationship with your natural self. The process takes time, but with The Demarcation Protocol as your framework, you have a clear, cosmetologist-backed system for every stage: protect the line, build the routine, and give your natural texture the space to emerge.
The most important thing to remember is this: every person who has successfully gone natural started exactly where you are now — uncertain, hopeful, and not quite sure what their real hair looked like. The difference between those who made it and those who gave up was almost always a structured plan, not a magic product.
Start with Step 1 this week. Gather your tools, assess your hair state, and make the method decision. You don’t need to have everything figured out — you just need to take the first step. Your natural hair is already growing. The Demarcation Protocol gives it the protection it needs to get there.

Dave King
Writes evidence-based hair-care guides for Care About Your Hair — for every hair type, jargon-free and independent.