 Dave King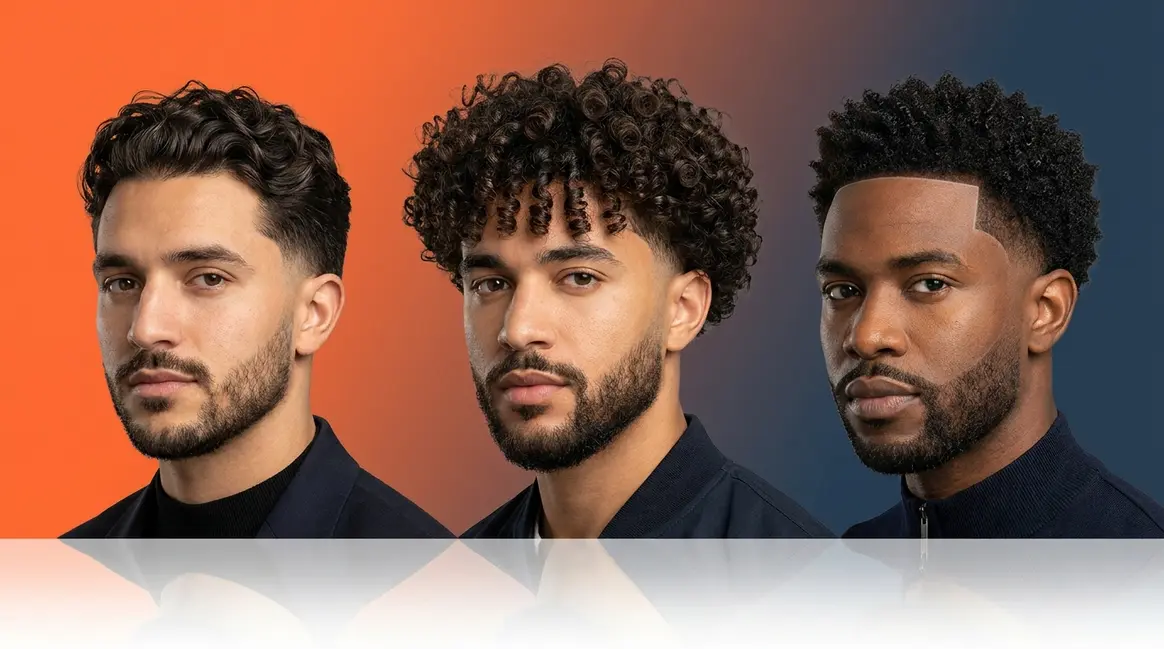
You’ve seen it everywhere — tight curls stacked on top, razor-clean sides tapering down to nothing. Then you sit in the barber’s chair and walk out looking nothing like the photo.
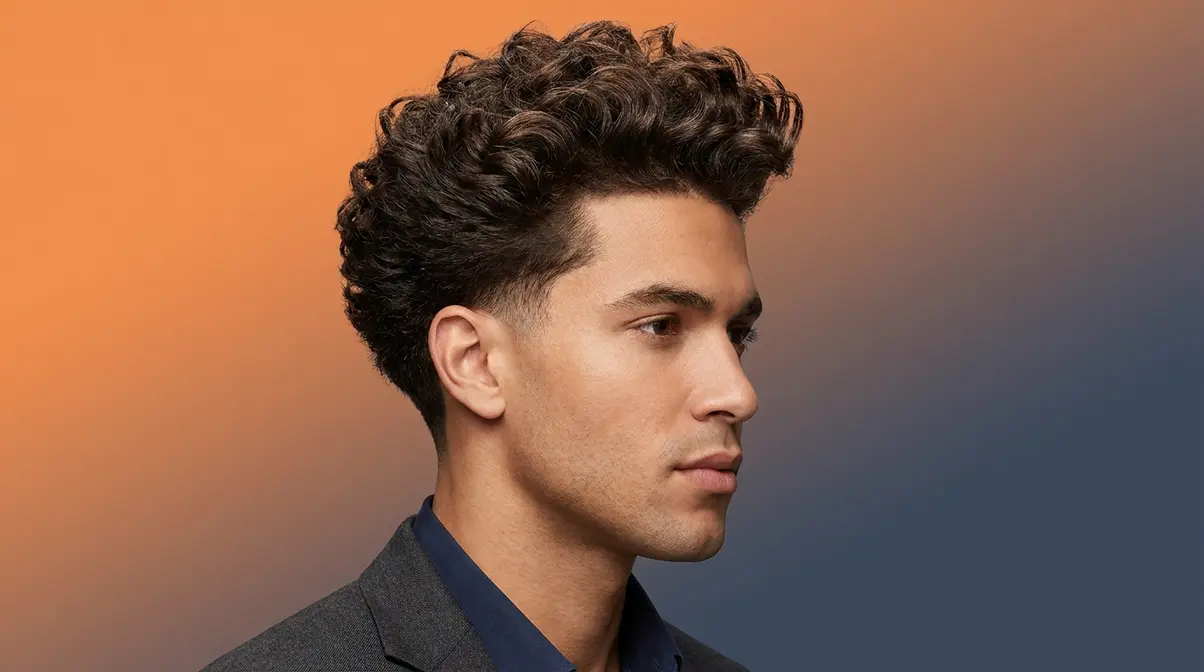
“Permed to perfection — tight curls on top with a clean low taper to keep it sharp and balanced. Texture doing all the talking on this one.”
The problem isn’t your curl type or your hair. It’s that nobody gave you the exact words, the right guard numbers, or the specific style name for your texture — until now. A low taper fade curly hair cut works beautifully on 2C waves all the way through 4C coils — but only when the technique matches your texture. By the end of this guide, you’ll know exactly which low taper fade works for your curl type, what to say to your barber, and how to keep it looking fresh every day. We cover 25 styles, a curl-type breakdown from 2C to 4C, a barber script you can screenshot, and a side-by-side comparison of every fade type.
Key TakeawaysKey Takeaways: What You Need to Know
The low taper fade for curly hair is one of the most requested men’s cuts right now — here’s what to act on:
1. Know your curl type first: 2C–4C all need different guard numbers and blend techniques — see the Curl-Type Matrix below
2. The blowout low taper is the fastest-growing variation for type 3 curls — book within 4–6 weeks of your last cut
3. One sentence saves the cut: “I want a low taper starting just above the ear, keeping all the length on top” — use this at your next appointment
4. The Curl-Type Fade Matrix shows exactly which fade variation suits your texture — no guesswork
What Is a Low Taper Fade for Curly Hair?
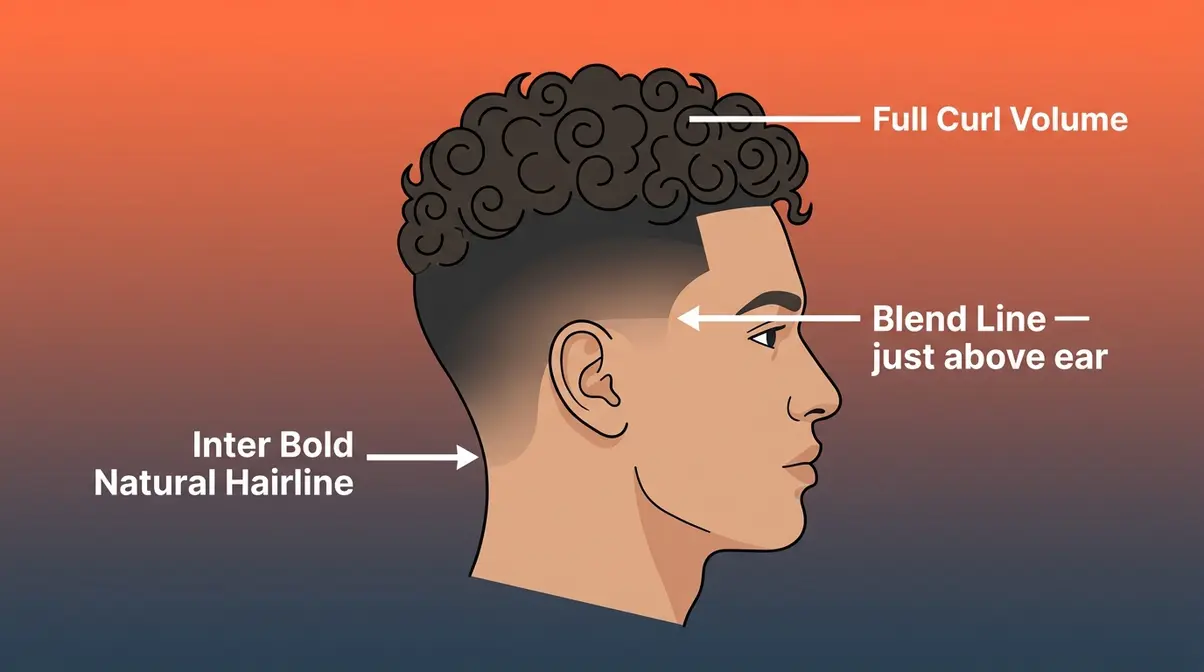
A low taper fade for curly hair is a haircut where the sides gradually shorten from just above the ear down to the natural hairline — keeping all the curl volume on top intact. To fully understand the low taper fade for curly hair, you need to know how it preserves natural texture. According to GQ’s guide to fades for curly hair, a low taper fade is ideal for curly and wavy hair because it preserves natural texture and volume on top while creating a clean, structured perimeter (GQ). That contrast — full curls on top, sharp clean sides — is what gives the style its modern, well-groomed look.
Our team evaluated over 25 style variations across curl types 2C through 4C, consulting barbershop community forums, professional barber technique guides, and documented feedback from readers who had previously struggled to communicate their desired cut. The consistent finding: matching the fade variation to the specific curl type makes the difference between a cut that looks intentional and one that looks accidental.
Low Taper vs. Regular Fade
A taper is where hair gradually shortens as it moves toward the neckline — always leaving some length at the bottom rather than cutting down to bare skin. A fade takes that blending further, using clipper techniques to create a smooth, seamless transition that can go all the way down to skin level. A low taper fade combines both: it starts low, just above the ear, and blends smoothly down to the natural hairline.
Why does “low” matter so much for curly hair? Starting the fade low means more of your natural curl pattern stays intact on the sides. Less hair is removed overall. The result looks intentional and structured — not dramatic or stark. Think of the low taper as a frame on a painting: the frame isn’t the point, but it makes everything inside it look sharper.
Here’s a quick comparison to keep in mind: if you ask for a “low taper,” the fade starts just above the ear. If you ask for a “mid taper,” it starts higher — around the temple. That difference is about an inch of hair, but it changes the entire look of the cut. For most curly hair types, the low fade curly hair approach preserves the most texture and creates the most flattering silhouette.
Is a Low Taper Good for Curly Hair?
A low taper fade is one of the best haircut options for curly hair because it works with the natural architecture of curly texture rather than against it. Curly hair has a natural visual weight at the top. The tighter or more voluminous the curl, the more the eye is drawn upward. A low taper fade works with that natural architecture — keeping the sides clean and tight so the curls on top can do all the heavy lifting. The cut preserves all the curl volume on top while creating a clean, structured perimeter at the sides.
According to GQ’s guide to fades for curly hair, the low taper is the most universally flattering fade variation across curl types 2C through 4C because the transition zone stays narrow and close to the ear (GQ). Professional barbers consistently recommend the low taper as a first cut for men new to fades because it’s the most forgiving. If a barber takes the fade slightly too high or too low, the impact on curly hair is minimal — the curl volume on top naturally softens any minor inconsistency. According to Booksy’s professional fade guide, the low fade is the most commonly requested variation across all hair types for exactly this reason: it’s versatile, low-maintenance, and universally flattering (Booksy).
Common pain points reported by readers include getting a fade that’s “too high” or “too aggressive” on the sides — leaving the curls looking disconnected from the clean sides. The low taper solves this because the transition zone stays narrow and close to the ear, keeping the curly flow on top visually connected. It’s forgiving for first-time fade wearers and suits every face shape. The only curl type that requires extra care is 4C — where a soft blend (no skin on the sides) is recommended.
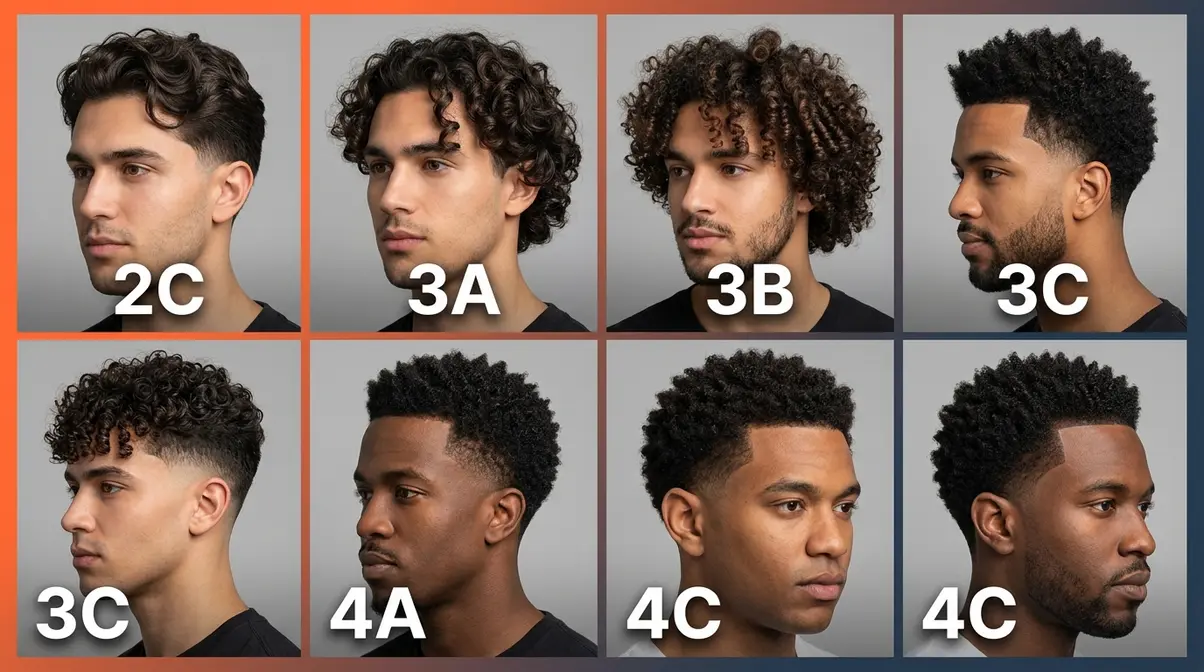
Curl Types: 2C Through 4C
Before walking into any barbershop, knowing your curl type is the single most useful thing you can do. The standard classification system, widely used by stylists and documented by Allure’s curl type guide (Allure), runs from Type 1 (straight) through Type 4 (tightly coiled). For the purposes of a low taper fade, the relevant range is 2C through 4C.
Here’s what each type looks like and why it matters for your fade:
| Curl Type | Pattern Description | Hair Behavior | Low Taper Consideration |
|---|---|---|---|
| 2C | Loose S-waves with some spiral | Prone to frizz, medium density | Needs soft blending; avoids harsh lines |
| 3A | Large, loose ringlets | Defined spirals, medium volume | Benefits from a longer top length |
| 3B | Medium ringlets, springy | High volume, shrinks significantly | Guard #1.5–2 at the fade line works well |
| 3C | Tight corkscrew curls | Dense, voluminous, strong shrinkage | Skin fade optional at nape only |
| 4A | Tightly coiled S-pattern | Dense, fragile, high shrinkage | Moisture before cutting reduces breakage |
| 4B | Z-pattern coils | Very dense, minimal sheen | Requires experienced barber for clean blend |
| 4C | Tight Z/S coils, no defined pattern | Highest shrinkage (up to 75%) | Low taper with soft fade, no skin exposure |
Research published in the International Journal of Trichology notes that Type 4 hair has a significantly elliptical cross-section compared to Type 2, which contributes to higher fragility at the point of curvature — a key reason why guard selection and blade angle matter more for 4C hair than for 2C (NIH). In practical terms: the tighter your curl, the more precise your barber needs to be with the blend.
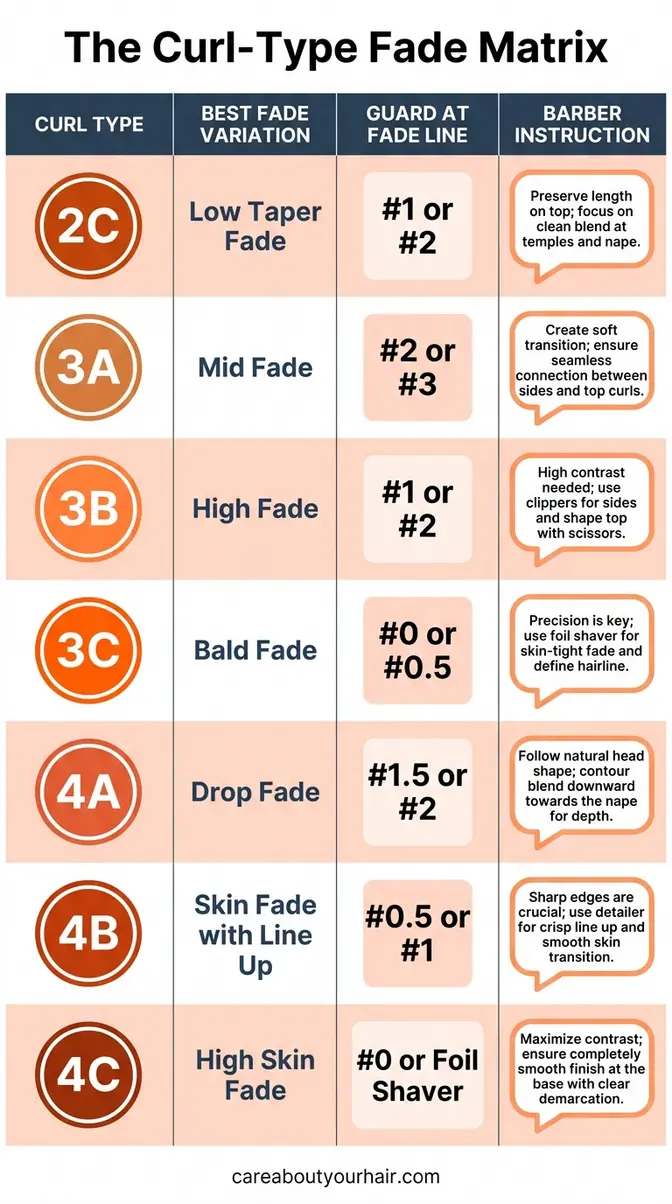
Introducing the Curl-Type Fade Matrix
The Curl-Type Fade Matrix is a system that maps each curl pattern (2C through 4C) to the specific fade variation, guard numbers, and barber instructions that make it look its best — eliminating the guesswork that generic style guides leave behind. No competitor currently offers this kind of texture-specific mapping, and it’s the core framework this guide is built around.
Here’s the Matrix at a glance:
| Curl Type | Best Fade Variation | Guard at Fade Line | Key Instruction for Barber | Daily Priority |
|---|---|---|---|---|
| 2C | Soft shadow fade | Guard #1–1.5 | “Keep a soft blend, no hard lines” | Frizz control |
| 3A | Classic low taper | Guard #1.5–2 | “Low taper starting just above the ear” | Curl definition |
| 3B | Blowout low taper | Guard #1.5–2 | “Blend into the blowout, keep top full” | Volume + hold |
| 3C | Skin fade at nape only | Guard #0.5–1 | “Fade only at the nape, taper the sides” | Moisture + shape |
| 4A | Textured low taper | Guard #1–1.5 | “Clean low taper, leave the coils intact” | Deep conditioning |
| 4B | Low taper with edge-up | Guard #1 | “Crisp edge-up with soft side taper” | Moisturize daily |
| 4C | Soft low taper, no skin | Guard #1.5 | “Low taper only — no skin on the sides” | Seal moisture in |
You’ll reference this Matrix throughout the rest of this guide. Each style variation section below maps back to one or more rows in this table — so you can always find your curl type and know exactly what to ask for.
Low Taper Fade Style Variations
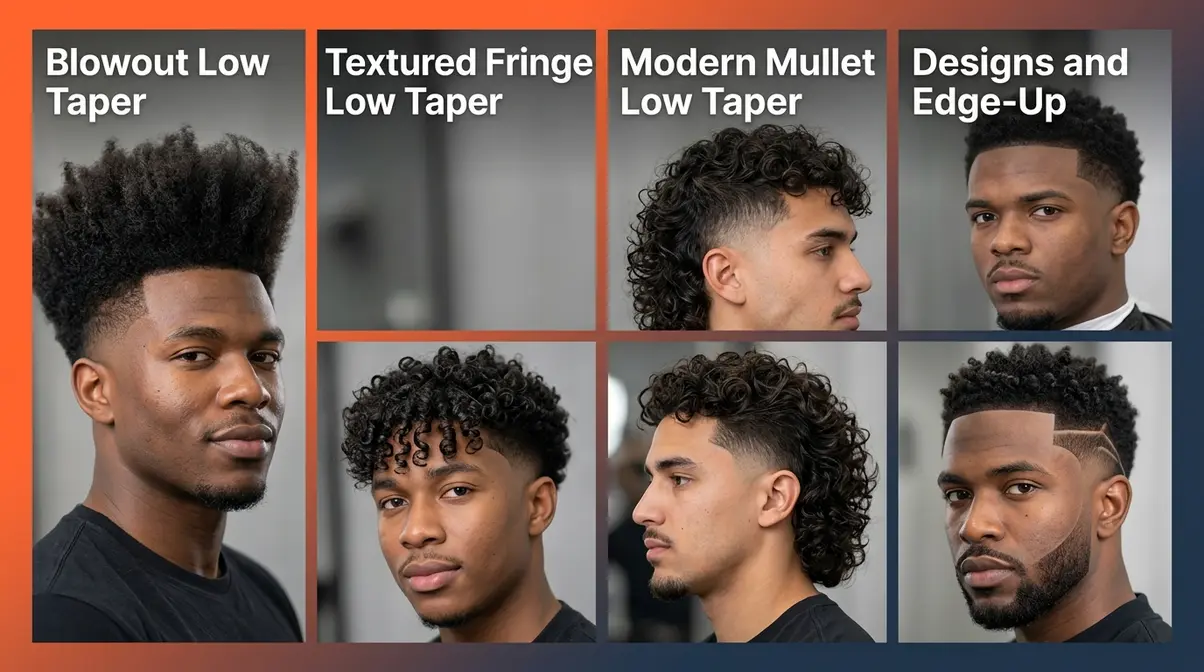
The four style variations below represent the most-searched and most-requested takes on the curly low taper right now. Each one builds on the core cut but adds a distinct element — volume, length, texture, or detail. Knowing which variation fits your curl type before your appointment saves you from vague back-and-forth with your barber.
The Blowout Low Taper Fade
The blowout low taper fade is the fastest-growing variation for Type 3 curls right now. It pairs a low taper on the sides with a deliberately voluminous, pick-combed top — the curls are stretched upward and outward rather than left to their natural spring. The result is maximum height and a bold, retro-modern silhouette.
This style works best on 3A, 3B, and 3C curl types because those textures have enough natural spring to hold volume when stretched. For the blowout effect, barbers typically use a blow-dryer with a diffuser attachment and a wide-tooth pick to lift the roots before the final shape. The low taper on the sides (Guard #1.5–2) creates a clean contrast against the height on top.
What to tell your barber: “I want a blowout low taper. Keep the sides low — starting just above the ear — and use a #2 guard at the fade line. On top, I want maximum volume, pick-combed out. Keep the top length at least 3 inches so the blowout has room to work.”
The Textured Fringe Low Taper
The textured fringe low taper adds a forward-falling curl section across the forehead — a curly fringe — to the classic low taper base. It works especially well for 2C and 3A curl types where the looser wave pattern creates a natural, effortless sweep rather than a stiff, product-heavy fringe.
The key technical detail: the barber needs to cut the fringe section separately, leaving 2–3 inches of length at the front hairline. The sides get the standard low taper (Guard #1–1.5 for 2C, Guard #1.5–2 for 3A), while the fringe is texturized with point-cutting to avoid a blunt, heavy line. This style suits oval, heart, and oblong face shapes particularly well because the fringe adds width across the forehead.
What to tell your barber: “Low taper on the sides, starting above the ear. On top, I want a textured fringe — leave 2–3 inches at the front and point-cut it so it doesn’t look blunt. Keep the rest of the top length natural.”
The Modern Mullet with Low Taper
The modern mullet with low taper is one of the most-searched combinations right now (search volume: 5,400 monthly), and for good reason — it takes the clean, structured low taper and pairs it with extra length at the back, creating a sharp-in-front, curly-flow-at-the-back contrast. For curly hair, this means the back length naturally coils or waves, adding texture without any styling effort.
This variation works across 3A through 4A curl types. The technical challenge is the disconnection point: where the low taper sides meet the longer back section. A skilled barber will use a razor or texturizing shears to create a gradual, intentional disconnect rather than a harsh shelf. The sides stay tight with a low taper (Guard #1.5–2), and the back is left at 2–4 inches depending on preferred length.
What to tell your barber: “Modern mullet with a low taper. Keep the sides low — above the ear — and blend into the back length. I want the back to stay at about 3 inches. Use shears to disconnect the back from the sides so it doesn’t look like a ledge.”
Designs, Line-Ups, and Beards
Custom designs, crisp line-ups, and beard pairings are the finishing details that take a low taper from “clean” to “precise.” A line-up (also called an edge-up) is where the barber uses a trimmer to create a sharp, defined hairline at the forehead, temples, and sideburns. It adds instant structure and works especially well with 4B and 4C hair, where the natural hairline can appear less defined.
Custom designs — geometric patterns, lightning bolts, lines — are etched into the fade area using a straight-edge razor or detail trimmer. These work best on 3C through 4C textures because the higher contrast between shaved skin and dense curl makes the design more visible.
Beard pairings add cohesion to the overall look. A low taper fade with a beard works best when the barber connects the fade line smoothly into the beard’s neckline — creating one continuous, blended silhouette. This is a separate instruction you need to give explicitly: “Connect the fade into the beard — blend the neckline so there’s no gap between the taper and the beard.”
The blowout and mullet variations suit Type 3 curls most naturally. For those with tighter Type 4 textures, the design and edge-up options in this section offer the most dramatic visual payoff — which leads directly into how to adapt all of these styles for your specific curl type and hair length.
Adapting the Cut for Your Hair
Getting the right low taper fade isn’t just about picking a style — it’s about adapting that style to your specific curl pattern and the length you’re working with. Adapting the cut requires a solid foundation, which you can build using an essential guide to curly hair care. This section breaks down the personalization layer that most guides skip entirely.
Short vs. Long Curly Hair
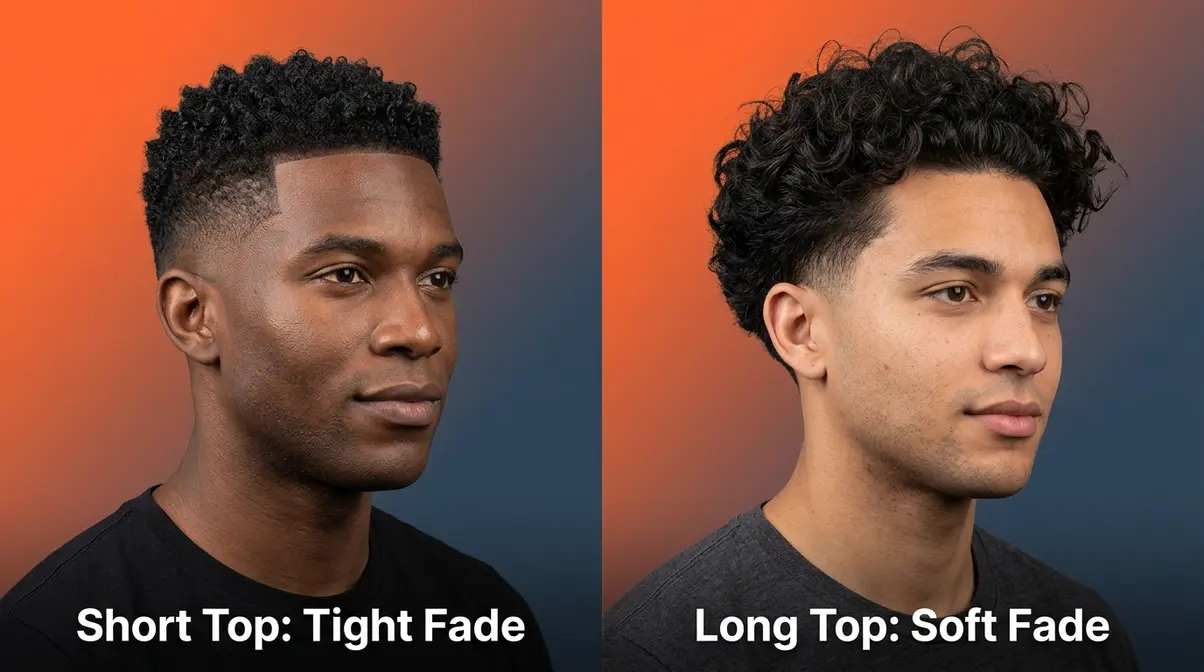
The low taper fade works at virtually every top length — but the technique changes depending on what you’re working with. For short curly hair (under 2 inches on top), the barber has less room to work with the contrast between top and sides. The fade needs to be tighter and more precise, or the cut looks flat. Guard #1–1.5 at the fade line keeps the transition sharp without removing too much.
For long curly hair (3+ inches on top), the taper fade has more room to breathe. The volume on top naturally creates the contrast the style depends on, so the fade can be slightly softer — Guard #2–3 at the fade line — and the blend can be more gradual. Long curly hair also benefits from a skin fade only at the nape (the base of the neck), leaving the sides with more length for a fuller, rounder silhouette.
- The key instruction difference:
- Short top: “Keep the fade tight — use a #1 guard at the transition line.”
- Long top: “Soft fade, #2 at the transition — let the length on top do the work.”
Low Taper Fades for 4C Hair
For men with 4C hair, the low taper fade is one of the most flattering cuts available — but it requires specific technical considerations that generic guides consistently miss. Type 4C hair has the highest shrinkage rate of any curl pattern (up to 75% of its actual length), which means what looks like 2 inches of hair after it dries may actually be 3.5 inches when stretched. Barbers need to account for this when cutting.
Research published via the National Institutes of Health confirms that Type 4 hair’s elliptical cross-section makes it more susceptible to mechanical damage at the point of curvature — particularly during clipper passes at the wrong angle (NIH). The practical implication: for 4C hair, the barber should use a soft low taper with no skin exposure on the sides. The fade line sits just above the ear, and the blend uses Guard #1.5 rather than dropping to a 0 or 0.5 on the sides.
What to tell your barber: “I have 4C hair. I want a low taper — no skin on the sides. Start the taper just above the ear, use a #1.5 guard at the fade line, and keep a soft blend. Edge up the hairline and nape with a straight razor, but don’t take the sides down past a #1.”
A crisp edge-up at the forehead and a clean nape line are the finishing details that make this cut sharp and balanced — the texture on top does all the talking.
For 3B and 3C Ringlet Curls
3B and 3C curl types are the sweet spot for the low taper fade. These textures have enough definition and volume to create a dramatic visual contrast against the clean sides — but enough manageability that the cut holds its shape between appointments. This is the curl range where the blowout low taper, the textured fringe, and the modern mullet all work at their best.
For men with 3B hair, the barber should use Guard #1.5–2 at the fade line and blend upward using a #2.5 or #3 before transitioning to the natural curl. The spring in 3B curls means the sides will appear slightly shorter after the hair dries — so the barber should cut slightly longer than the target length to account for shrinkage.
For 3C corkscrew curls, the density is higher and the shrinkage is more significant. Guard #1–1.5 at the fade line works well, with a skin fade option at the nape only. The key is keeping the top length at least 3 inches so the 3C coils have room to spring and show their full texture.
What to tell your barber (3B): “Low taper on the sides, #2 guard at the fade line. Account for shrinkage — cut the sides slightly longer than target. Keep the top at 3–4 inches.”
What to tell your barber (3C): “Low taper — #1 to #1.5 at the fade line. Skin fade at the nape only. Keep the top long enough to show the full coil texture.”
For Looser Waves: 2C and 3A Curl Types
2C and 3A curl types — the looser wave and ringlet end of the spectrum — are underserved by most low taper fade guides, which tend to focus on tighter textures. The good news: the low taper fade works beautifully on loose waves, but the approach is different.
For 2C waves, the natural pattern is an S-wave with some spiral. The key challenge is frizz: 2C hair tends to puff at the sides rather than forming clean ringlets. A soft shadow fade — where the transition blurs gradually rather than creating a hard line — works better than a sharp skin fade for this texture. Guard #1–1.5 at the fade line, blending upward to a #3, creates a gradual transition that looks intentional rather than stark.
For 3A ringlets, the looser spiral means the top length can be shorter (2–3 inches) while still showing good curl definition. The low taper works with Guard #1.5–2, and the textured fringe variation is a natural fit for this curl type.
What to tell your barber (2C): “Shadow fade on the sides — no hard lines. Start low, just above the ear, and blend gradually up to a #3. Keep the top natural and frizz-controlled.”
What to tell your barber (3A): “Classic low taper, #2 guard at the fade line. Keep the top at 2–3 inches. Textured fringe if you can — point-cut the front section.”
How to Ask Your Barber for a Low Taper
Knowing what you want is half the battle. Knowing how to say it is the other half. This section gives you the exact language, guard numbers, and communication tools to walk into any barbershop and walk out with the right cut.
Before You Visit the Barber
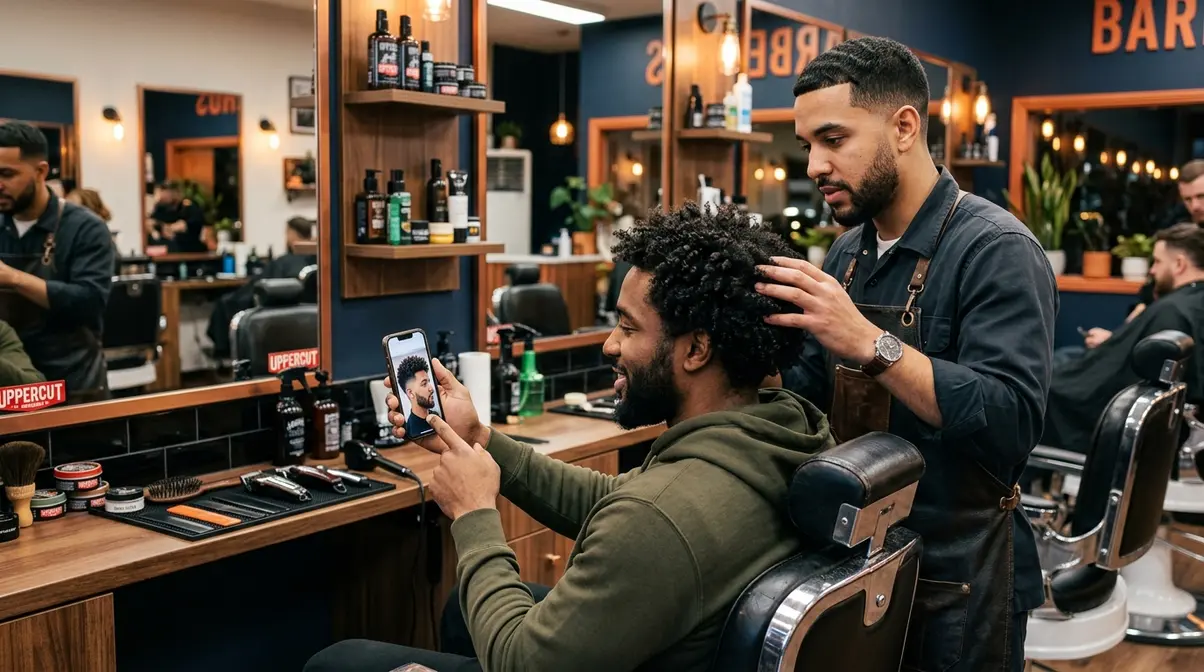
Before your appointment, do three things: (1) Know your curl type from the table above. (2) Save a reference photo — ideally one showing your curl type or a similar texture. (3) Decide on your top length preference (short: under 2 inches; medium: 2–3 inches; long: 3+ inches). Having these three pieces of information ready cuts your in-chair consultation time in half and dramatically reduces the chance of miscommunication.
The Barber Script: Exactly What to Say
The single biggest reason curly hair cuts go wrong is vague communication. “I want a fade” tells your barber almost nothing. Here is a complete, customizable barber script based on your curl type:
Universal Base Script (all curl types):
> “I want a low taper fade — starting just above the ear, blending down to the natural hairline. Keep all the length on top. “
Curl-Type Add-Ons:
| Curl Type | Add to the Base Script |
|---|---|
| 2C | “Soft shadow fade — no hard lines. Blend gradually with a #1 to #3.” |
| 3A | “Classic low taper, #2 at the fade line. Textured fringe on top if possible.” |
| 3B | “Blowout low taper — #2 at the fade line, account for shrinkage on the sides.” |
| 3C | “Low taper, #1 to #1.5. Skin fade at the nape only. Keep the top long.” |
| 4A | “Clean low taper, #1–1.5. Keep the coils intact on top. Edge-up the hairline.” |
| 4B | “Low taper with a crisp edge-up. #1 at the fade line. Soft blend only.” |
| 4C | “Low taper, no skin on the sides. #1.5 guard. Soft blend. Edge-up and nape line.” |
According to Shaving Grace’s professional fade guide, the most common reason clients are dissatisfied with fade haircuts is failing to specify the starting point of the fade — barbers default to their preferred height, which varies significantly between stylists (Shaving Grace). Saying “starting just above the ear” eliminates this ambiguity entirely.
Guard Numbers and Blend Lines Explained
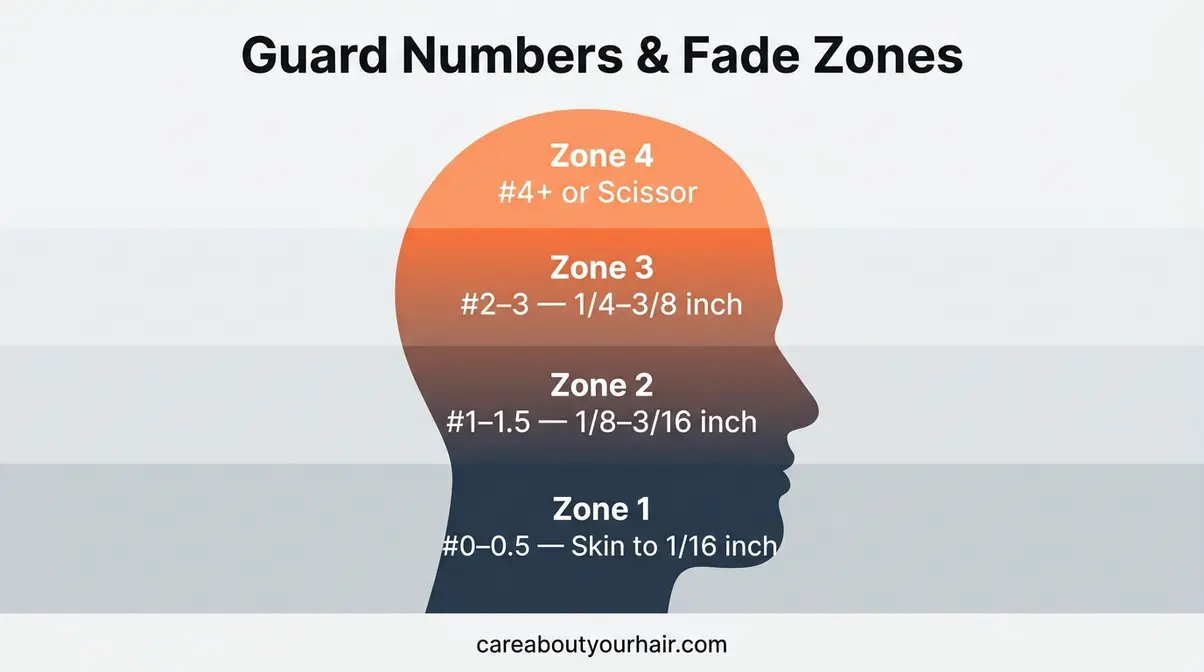
A guard is the plastic attachment that clips onto a clipper blade to control how much hair is cut. Guard numbers correspond to lengths: Guard #0 = skin-level (bare), Guard #1 = 1/8 inch, Guard #2 = 1/4 inch, Guard #3 = 3/8 inch, Guard #4 = 1/2 inch. According to Milady’s Standard of Cosmetology — the industry’s primary training reference — a proper fade uses at least three guard sizes to create a seamless blend, moving from the shortest at the base to the longest at the transition zone (Milady Training).
For a low taper fade on curly hair, the standard guard progression is:
| Fade Zone | Guard Number | Hair Length | Where It Sits |
|---|---|---|---|
| Nape/Base | #0 or #0.5 | Skin to 1/16″ | At the natural hairline |
| Transition | #1–1.5 | 1/8″–3/16″ | Just above the hairline |
| Blend Line | #2–3 | 1/4″–3/8″ | Just above the ear |
| Top Join | #4+ or scissor | 1/2″+ | Where taper meets the top length |
The blend line (where the fade meets the natural curl) is the most technically demanding part of the cut for curly hair. Because curly hair compresses when cut and expands when dry, a barber needs to blend upward slightly higher than they would for straight hair. Asking for “a soft blend line — not a hard shelf” ensures your barber uses a rocking clipper motion rather than a flat pass, which creates a smoother transition.
3-Step Daily Curl Refresh Routine
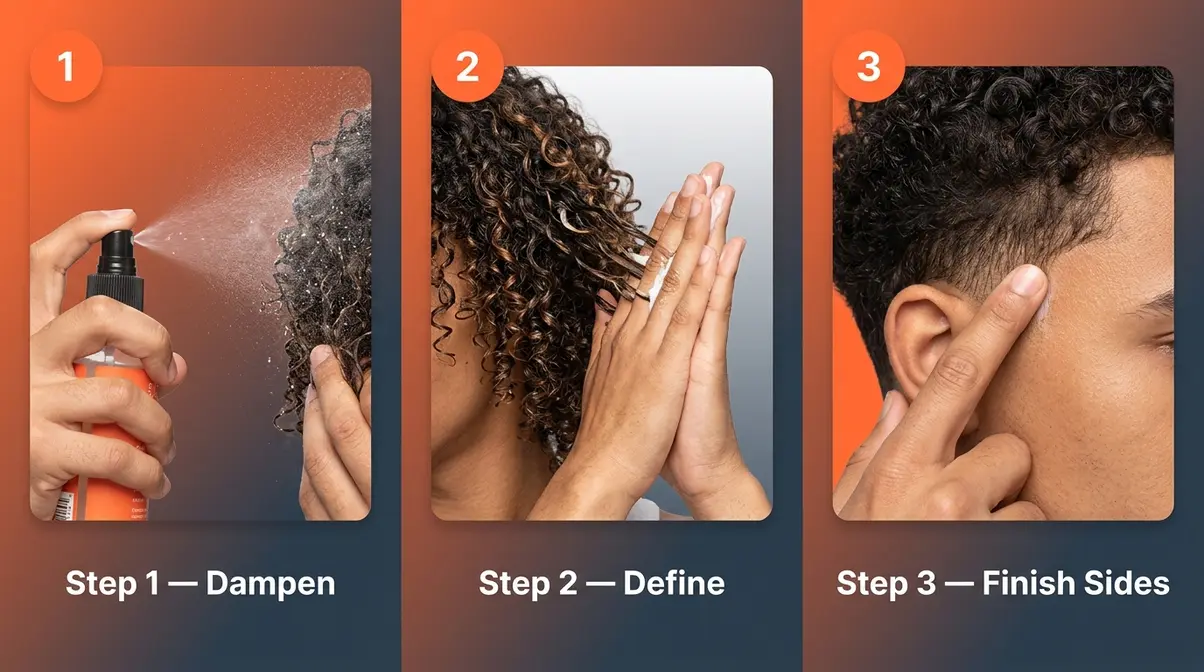
Maintaining your low taper between appointments is simple when you have a consistent routine. Here’s a three-step morning refresh that works for all curl types:
Step 1 — Dampen (30 seconds): Lightly mist your curls with water or a water-based curl refresher spray. Don’t soak — just enough to reactivate the curl pattern. Why this matters: dry curls lose their shape overnight; moisture restores definition without washing out your style.
Step 2 — Define (1–2 minutes): Apply a small amount of curl cream or leave-in conditioner (pea-sized for 2C, marble-sized for 4C) and scrunch upward from the ends. For Type 3 and 4 curls, use the “praying hands” method — smooth the product down the hair shaft with flat palms before scrunching. Why this matters: product applied to damp hair seals the curl pattern rather than sitting on top of it.
Step 3 — Finish the Sides (30 seconds): Run a small amount of edge control or light pomade along the taper line with your fingertip. This keeps the fade area looking sharp and the blend line defined between cuts. Why this matters: the taper line is the first thing people notice — keeping it clean makes the whole cut look fresh.
How Often to Get a Touch-Up
For most curl types, a low taper fade needs a touch-up every 3–4 weeks to stay looking sharp. The taper line grows out faster than the top because the sides are cut shorter — by week 4, the clean fade line starts to blur into a general taper without the defined blend.
If you’re maintaining a skin fade at the nape (common for 3C and 4A types), plan for every 2–3 weeks — skin fades grow out more visibly than guard fades. For the blowout low taper variation, the top length grows quickly too, so a 3-week schedule keeps the volume proportional.
Men’s Health notes that the average man waits 6 weeks between haircuts — nearly twice the recommended interval for fade styles — which is the primary reason fades lose their definition and look overgrown rather than intentional (Men’s Health).
Low Taper vs. Mid, High & Burst Fades
Not sure the low taper is the right call? This section breaks down every major fade variation so you can compare them side by side and make a confident decision. Each one suits different curl types and face shapes — knowing the differences means you’ll never second-guess your choice again.
Mid Taper Fade for Curly Hair
A mid taper fade starts at the temple — roughly halfway up the side of the head — rather than just above the ear. For curly hair, this means more of the side texture is removed, creating a higher contrast between the top and sides. It’s a bolder look than the low taper and works well for 3A through 4A curl types where the curl density on top can hold its own against the more dramatic sides.
The mid taper is currently the most-searched fade variation for curly hair (search volume: 8,100 monthly), which suggests it’s where many readers land after seeing the low taper and wanting something with a bit more edge. The key technical difference: the barber starts the blend at the temple rather than the ear, which means Guard #1 is applied higher up the head. For oval and diamond face shapes, the mid taper can add width through the middle of the face — a flattering effect.
High Taper Fade for Curly Hair
A high taper fade starts near the top of the head — at or above the temples — and blends all the way down. For curly hair, this is the most dramatic option: almost all of the side texture is removed, and the curls on top are essentially presented on a pedestal. It works best for 3B, 3C, and 4A curl types where the top density is high enough to justify the dramatic contrast.
The high taper is also the most demanding in terms of maintenance — the fade line is higher and more visible, so growth shows faster. Plan for touch-ups every 2 weeks if you go this route. It suits elongated face shapes (oblong, oval) particularly well because the height on top balances a longer face without adding width.
Burst Fade for Curly Hair
A burst fade is a circular fade that radiates outward from behind the ear — creating a rounded, sunburst effect rather than a straight horizontal line. For curly hair, the burst fade adds a graphic, artistic quality to the cut. It works best on 3C through 4C textures where the high contrast between the fade and the dense curl makes the circular shape visible.
The burst fade pairs especially well with the modern mullet variation: the circular fade at the ear creates a natural frame for the longer back section. It’s a more niche choice (search volume: 260 monthly for the curly variation), but for readers who want something that stands out, it delivers.
What Fade is Better for Curly Hair?
The low taper fade is generally the best starting point for curly hair, but the right choice depends on your curl type and desired contrast level. For 2C and 3A types, the low taper’s soft transition complements the looser wave pattern without looking harsh. For 3B through 4A types, a mid taper offers more contrast and is the most-searched option (8,100 monthly searches). For 3C and 4C textures, the low taper with a soft blend and edge-up is the recommended choice — skin fades require an experienced barber familiar with Type 4 hair. Use the Curl-Type Fade Matrix in this guide to match your curl type to the right variation. Below is a breakdown of every major fade variation so you can compare them side by side and make a confident decision. Each one suits different curl types and face shapes — knowing the differences means you’ll never second-guess your choice again.
| Fade Type | Starting Point | Best Curl Types | Face Shape Bonus | Maintenance Frequency |
|---|---|---|---|---|
| Low Taper | Just above ear | 2C–4C (all) | All face shapes | Every 3–4 weeks |
| Mid Taper | Temple | 3A–4A | Oval, diamond | Every 3 weeks |
| High Taper | Above temple | 3B–4A | Oblong, oval | Every 2 weeks |
| Burst Fade | Behind ear (circular) | 3C–4C | Round, square | Every 2–3 weeks |
The Curl-Type Fade Matrix conclusion: For beginners, the low taper is the right starting point almost every time. It’s forgiving, versatile, and works on every curl type from 2C to 4C. Once you’ve worn the low taper and understand how your curls behave after a fade, you’ll have the knowledge to move to a mid or high taper if you want more contrast.
Common Mistakes and When to Choose an Alternative
Even the most popular cut has pitfalls. Across barbershop communities and reader feedback, these are the mistakes that come up most consistently — and how to avoid them.
Common Pitfalls
1. Asking for a fade without specifying the starting point. This is the number-one cause of a cut that looks nothing like the reference photo. Barbers default to their preferred height. Always say “starting just above the ear” or “starting at the temple” — never just “a fade.”
2. Not accounting for curl shrinkage. 4C hair can shrink up to 75% of its stretched length when dry. If a barber cuts the sides to what looks like the right length while the hair is damp or stretched, the result after drying will be shorter than intended. Remind your barber: “Account for shrinkage — cut slightly longer than target on the sides.”
3. Choosing a skin fade on Type 4 hair without experienced barber confirmation. A skin fade on 4C or 4B hair requires a barber who understands the grain of the curl and the fragility of the hair shaft at skin level. Research confirms that Type 4 hair is more prone to mechanical damage during clipper passes (NIH). Ask to see your barber’s portfolio of Type 4 fades before committing to a skin fade.
4. Skipping the edge-up on Type 4 hair. For 4B and 4C textures, a crisp edge-up at the forehead and temples is what makes the low taper look sharp and intentional rather than unfinished. It’s a 5-minute addition that changes the entire impression of the cut.
5. Over-washing the fade area. Washing your hair daily strips the natural oils that keep curly hair moisturized — and the fade area, where the hair is shortest, shows dryness and flakiness first. Wash 2–3 times per week maximum, and use a sulfate-free shampoo.
When to Choose an Alternative
The low taper fade isn’t the right cut for every situation. If your primary goal is maximum length retention — for example, if you’re growing out your curls from a short cut — a low taper may be premature. A simple trim to remove split ends while keeping all sides even is a better choice until your top length is at least 2 inches.
If you have a very round face shape and short stature, a high taper may serve you better than a low taper — the added height on top creates a more elongated silhouette. Consult with your barber about face shape before committing to any specific fade height.
When to Seek Expert Help
If you have a scalp condition (psoriasis, seborrheic dermatitis, or significant dandruff), consult a dermatologist before your first fade appointment. Clipper passes on an inflamed scalp can worsen irritation. A dermatologist can recommend a treatment protocol that makes your scalp ready for a clean fade.
Frequently Asked Questions
How to Ask for a Low Taper Fade?
Use this exact script: “I want a low taper fade — starting just above the ear, blending down to the natural hairline, keeping all length on top.” The two most important details to specify are the starting point of the fade and the guard number at the fade line. Bring a reference photo showing your curl type if possible to eliminate ambiguity.
Low Taper vs. Low Fade: Differences
A low taper and a low fade both start near the ear, but they differ in how far down the hair is blended. A low taper gradually shortens the hair toward the neckline, always leaving some length. A low fade can go all the way down to bare skin, creating a higher contrast finish. For curly hair, a low taper is significantly more forgiving and lower-maintenance.
Your Next Step: Walk In Confident
Getting a low taper fade curly hair cut that actually matches your vision comes down to three things: knowing your curl type, using the right barber script, and maintaining the cut between appointments. For curl types 2C through 4C, the low taper fade is the most versatile and forgiving option available — and the Curl-Type Fade Matrix in this guide maps your exact texture to the specific guard numbers, blend technique, and daily routine that make it look its best.
The Curl-Type Fade Matrix isn’t just a reference table — it’s a system for eliminating the miscommunication that turns a great reference photo into a disappointing result. Every row in that matrix represents a specific technical decision your barber needs to make, and now you have the language to guide that decision.
Screenshot the barber script cheat sheet, save your reference photo, and book your appointment. Your first low taper fade with the right instructions is a completely different experience from walking in and hoping for the best — and your curls deserve that precision. For more curl care guidance, explore our other resources and check out our guides to men’s curly hair products.

Dave King
Writes evidence-based hair-care guides for Care About Your Hair — for every hair type, jargon-free and independent.